INFORMATION TO OWNER
FOREWORD
Thnk you for buying a MAHINDRA vehicle. We trust it meets your expectations & will provide you with years of enjoyable driving. This OWNER'S MANUAL has been prepared for the reference of the User & it is hoped that this will enable him to acquire working knowledge of MAHIDRA THAR CRDe
Contents include vehicle specifications, driving notes & maintenance schedule followed by instruction for carrying but minor repairs.
Owners are advised to get all the repairs & maintenance work, donebyourAuthorisedDealers. Theyarealsoadvisedtouse genuine. M&M Parts manufactured to original specifications.
Every reasonable effort has been made to ensure that this booklet is accurate / up to date. The procedures, specifications, dimensions referred to are subject to change in accordance with the Company's policy of constant product improvement.
Please contact nearest Authorised Service Dealer, Mahindra Authorised Service Centre for free inspection service during warranty & thereafter for periodical vehicle maintenance & repairs. For further assistance, please contact any of our following nearest Area Office quoting Model, Engine & Vehicle Sr. No., Date of sale, Total kms covered.
FREE SERVICE INFORMATION
While it goes without saying that your Mahindra vehicle is designed to give you the best performance, you are advised to maintain it as per Instructions given in the Owner's Manual.
You are entitled to three free inspection services by any of our Dealers/ Service Centers as per the following schedule:
| 1st Free Service to be availed | Between 4500 -5500 Kms or 4 months from the date of sale* |
| 2nd Free Service to be availed | Between 9500 -10500 Kms or 8 months from the date of sale* |
| 3rd Free Service to be availed | Between 14500 -15500 Kms or 12 months from the date of sale* |
Note : * Kms / Months whichever is earlier
Labour charges are free. Oil/Oil filter, Fuel filter and service maintenance items if changed, are charged.
All the free inspection services should be availed of, preferably within the vehicle's warranty period.
For all subsequent paid maintenance services given by Dealer/Service Centres, Customers need to pay for parts, lubricants, maintenance items (consumables) and labour charges.
Free/Paid services can be availed of at any of our Authorised Dealers/Service Centres spread across India, irrespective of the Dealer who has sold you the vehicle.
For claiming benefits under warranty, it is necessary to avail Pre-Delivery Inspection, Free Services and Paid Services given by Dealers/Service Centres at the specified Kms/Months
The nature of various jobs carried out by Dealers/ Service Centres during services are clearly indicated in the Owner's Manual.
LABOUR FREE SERVICES
Three Labour Free Service Coupons are provided in this booklet. These Coupons will entitle the owner to Three Labour Free Inspection Services during the warranty period of the vehicle detailed as under:-
- Parts, lubricants and fuel used during the course of these services will be chargeable.
- Upon completion of each service, the owner is requested to surrender the appropriate Coupon to the Servicing Dealer's Representative.
- These service can be availed by the Purchaser of the vehicle from any Mahindra Authorised Dealer or Mahindra Authorised Service Centre.
Each Service must be availed within the specified time and km limit failing which validity of the coupon jeopardizes and the warranty becomes null & void.
STANDARD WARRANTY
We, MAHINDRA & MAHINDRA LIMITED , (hereafter called "Company") MAHNDRA TOWERS, WORLI ROAD NO.13 MUMBAI 400 018, INDIA, warrant each new motor vehicle manufactured by us, to be free from defects in material and workmanship under normal use, as instructed in the Owner's Manual(OM). Under the warranty, Company's Authorised Dealer will repair or replace any part thereof, including all equipment or trade being limited to trade accessories (Except those governed by special warranty policy stipulated by respective manufacturers, like Battery, Tyres, Starter motor, Alternator,Fuel injection equipment etc...) originally supplied by us, which is within the warranty period 365 DAYS from the date of retail sale to the customer (without any mileage restriction) returned to our authorised dealers, and which our examination shall disclose to our satisfaction, to have been defective in material or workmanship. We, however , make no warranty or assume any liability in respect of any defect in metal or other material in any part, device or trade accessories which would not have been discovered by ordinary factory inspection.
For the purpose of this warranty, the term "product" means and includes only new vehicles manufactured by the Company and /or sold by Company's Authorised Dealers.
This warranty is limited to the delivery to the purchaser, free at Authorised dealer's workshop or at an other place at the dis- cretion of the company, of the part or parts whether new or repaired , in exchange for those acknowledged by the Dealer to be defective and endorsed by the company to that effect. The parts so repaired or replaced shall also be warranted for quality and workmanship but such warranty shall be co-termi- nus with this warranty.
This warranty shall not apply to and we shall in no way be liable for any vehicle which shall have been repaired outside an Authorised Mahindra Service Station or which has been altered or modified or built upon in any way or which has been subject to misuse, negligence or accident.
This warranty is in lieu of all other Warranties express or im- plied, and no person , agent or representative of the Company is Authorised to give any other warranties on the Company's behalf or to assume for it any other liability in connection, with the vehicle.
The Company's responsibility is limited to the terms of this Warranty and it shall not be answerable for personal injuries or consequential or resulting liability, damage or loss arising from any defects.
We further reserve the right, at any time or times, without no- tice, to revise, modify, discontinue or change any of the mod- els of our vehicles or any part thereof and neither Company nor the seller will incur any liability or obligation to the pur- chaser by reason of any revision, modification, discontinuance or change.
The manufacturer's " Standard Warranty " protects the customer, against defects in factory, material, workmanship. Normal maintenance requirements are the responsibility of the customer and are not covered by the warranty. To provide a better understanding of the warranty policy, certain limitations wherein the warranty does not apply, are listed below:
- Preventive maintenance services, both labour free and paid, as mentioned in the owner's manual, are an absolutely pre-requisite for availing of the vehicle warranty ( Ref Note 1 ). In other words, if any of the preventive maintenance services are not availed of at the specified kms /time and any complaint reported reflect that the complaint is due to non-availing of the specified service, no warranty consideration will be accorded to the complaint reported.
- Any slight discrepancy in paint, Chrome, and trim is corrected during the PDI. Deterioration of appearance items and trim , due to normal exposure or use , is not covered under the terms of warranty.
- Door glass/Windshield glass breakage, Fused bulbs/ Fuses are not covered under warranty.
- Maintenance Service Operations ( Ref Note 2 ) are not covered under warranty.
- Maintenance Replacement Items ( Ref Note 3 ) are not covered under warranty.
- Propriety items are covered by the respective manufacturer's warranty ( Ref Note 4 ). The decision of the proprietary manufacturer is final and binding to all.
- Repairs necessitated due to unauthorised modifications to the vehicle in any way affects the stability or reliability of the vehicle are not covered under warranty.
- Components of new parts damaged by old parts or adjustments are not covered under warranty.
- Repairs required because of accident, misuse , abuse, neglect are not covered under warranty.
- Repairs accomplished with non-genuine parts which, in our judgment, affected the reliability, will not be covered under warranty.
- Contingent expenses –Towing & transportation to the nearest authorised dealer point; Telephone expenses; Fuel cost; Loss due to out of commission etc. are not covered under warranty.
- Continued use of the vehicle inspite of knowing that the defect exists, will make the warranty void.
- The company does not take any responsibility for consequential damages / injuries resulting due to fitment of un-authorised after-market accessories and or tapping / cutting wires in the wiring harness.
- Any damage resulting from natural disaster and secondary damages are not covered under warranty.
- Any liabilities or losses due to riots, terrorist activity, munity, rodent bits etc are not covered under warranty.
EMISSION WARRANTY
This is to certify that, we, MAHINDRA & MAHINDRA LTD., MAHINDRA TOWERS, WORLI ROAD NO.13, MUMBAI - - 400018, INDIA, warrant each new motor vehicle, manufactured by us to meet the in-use emission standards as defined in the CMVR rule no.115 Sub rule (2), under normal use and service, our obligations under warranty being limited to making good at our factory any part or parts thereof, mentioned in Note 5, which is within 3 years or 80000 Kms, whichever occurs earlier , from the date of sale of the vehicle, returned to our authorised Dealer, and which our examination shall disclose to our satisfaction to have been defective in material or workmanship.
The warranty shall not apply to and we shall in no way be liable for any vehicle which have been Serviced or repaired outside an MAHINDRA authorised service centre or which have been operated on fuels not recommended by us or has been altered or modified or built upon in any way or which has been subjected misuse, negligence or accident.
This warranty runs parallel to the vehicle warranty offered by us, as mentioned in the owner's manual.
This warranty is expressly in lieu of all other warranties ex- pressed or implied and of all other obligations, or liabili- ties, on our part, if any and we neither assume nor authorise any other person to assume for us any other li- ability in connection with the sale of our vehicle.
We further assume the rights and time or times, without notice to revise, modify, discontinue or change any of the models of our vehicles or any part or parts thereof and nei- ther ourselves nor the seller will incur any liability or obli- gation to the purchaser by reason of any revision, modifi- cation, discontinuance or change.
TERMS & CONDITIONS (EMISSION WARRANTY)
- This warranty will be in addition to and run parallel to the existing comprehensive warranty given by us and will apply to components as mentioned in (Ref Note 5)
- The warranty is not applicable, if the vehicle is tested at altitudes other than Sea level.
- Warranty claim for the components under Emission Warranty as per policy will be admitted, for a prima facie examination, in the event of failure of the vehicle to meet the emission standard as per specified in sub- rule (2) of Rule No 115 of the Central Motor Vehicle Rules, 1989, herein after referred to as the "In-use emission standard" .
- The warranty claim will be accepted only after examinations carried out by authorised service centers leads to a firm conclusion that none of the original settings have been tampered with and the components as mentioned in per (Ref Note 5), has a manufacturing defect, and/or, that the vehicle is unable to meet the In-use emission standard, inspite of the vehicle having been maintained and used in accordance with the instructions in the Owner's Manual.
- The method of examination to determine the warrantable condition of the components will be at the sole discretion of Mahindra & Mahindra Ltd., and our authorised service centers. The results of such examination will be final and binding.
If, on examination, a warrantable condition is not established, the manufacturers will have the right to charge all, or part, of the cost of such examination. - In case of acceptance of the warranty under Emission Warranty, we will replace, at our authorised service centers free of charge, the components which are covered as mentioned in per Note 5 , but the consumables as mentioned in owner's manual shall be charged as per actuals.
- In case of a vehicle in which the components or the associated parts, are not independently replaceable, on account of their being integral parts of the complete assembly, we will have the sole discretion to replace either the entire assembly or by using some of the parts of the system through suitable repairs or modifications.
- Any consequential repairs or replacement of parts which may be found necessary to establish compliance to In-use emission standards, in addition to the replacement of the components covered under Emission Warranty, will not be made free of cost unless such parts are also found to be in a warrantable condition within the scope and limit of the vehicle comprehensive warranty described in the owner's manual. The consumables shall be charged as per actual during such repairs or replacement of parts.
- All the parts removed for replacement under warranty will be sent to us.
- We will not be responsible for the cost of transportation of the vehicle to our nearest authorised workshop or any loss due to non-availability of the vehicle during the period of lodging of a warranty claim, our examination and repairs.
- We will not be responsible for any penalties that may be charged by statutory authorities on account of failure to comply with the In-use emission standards.
NOTES ON WARRANTIES
Note 1 - PRE-REQUISITES FOR WARRANTY
- Regular maintenance services, both labour free and paid, as mentioned in the owner's manual are an absolutely pre-requisite for availing of the vehicle warranty. Failure to perform scheduled maintenance as specified in the owner's manual will invalidate warranty coverage on parts affected by the lack of maintenance.
- Maintenance services has to be carried out at any one of the MAHINDRA authorised Dealer (MD)/ MAHINDRA authorized Dealer Branch (MADB)/ MAHINDRA authorized Service Centre (MASC), within the specified mileages/time as mentioned in the Free/ Paid service coupons.
- All the services carried out must be endorsed in the sheet provided in the owner's manual, sealed and signed by the service station.
- Using any lubricant/Fuel/Grease not recommended by Mahindra & Mahindra Ltd., in the owner's manual, and if investigation reveal that the failure is related to the above, will invalidate the vehicle warranty.
- The owner's manual, complete in all respects about vehicle particulars, should be presented to the servicing dealer for availing warranty benefits.
Note 2 - NORMAL MAINTENANCE SERVICES
- Engine tune-up.
- Clutch pedal free play or Linkage Adjustment.
- Brake pedal free play or Linkage Adjustment.
- Body or Chassis bolt tightening operations.
- Engine oil / oil filter change.
- Belt adjustment.
- Wheel Alignment and wheel balancing.
- Fuel system cleaning and/or adjustment.
- Tyre rotation.
- Lubrication and / or Lubricant change.
- Checking and focusing of lights.
- Checking of Electrical connections.
- Road testing
- Routine servicing as recommended by Mahindra & Mahindra Ltd.
Note 3 - NORMAL MAINTENANCE REPLACEMENT ITEMS
- Replacement required because of abuse, misuse or the habits of the customer.
- Fuel and oil filter elements
- Air filter elements
- Clutch and brake Linings
- Rubber parts like Hoses, Belts, Bushings
- U Joint, Tie Rod Ends, Bell Crank kits
- Wheel and Master Cylinder Kits
- Wiper blades
- Bulbs.
SOFT TOP
- Worn
- Soiled
- Torn, or cut by foreign object.
- Normal deterioration due to use and exposure.
- Cracking or damage to plastic trim caused by improper removal / installations.
PAINT
- Dents scratches, or other damage.
- Normal deterioration due to use and exposure.
- Blemishes, stone chips after delivery.
- Damage due to chemical or industrial fallout after delivery
- Corrosion resulting from hole drilled for fitment of accessories.
BRIGHT TRIM
- Dents nicks, scratches or other damage.
- Normal deterioration due to exposure.
NORMAL USE ADJUSTMENT
Adjustments may be required after a reasonable period of normal use, the extent of which depends on the owner's individual habits, usage of the vehicle and the type of terrain over which the vehicle normally operates. Such adjustments, including the elimination of squeaks and rattles, are considered customer responsibility.
Note 4. - PROPREITORY ITEMS
All the proprietary aggregates, as mentioned below, are covered under the respective manufacturer's warranty policy. In case of complaints, Mahindra Dealer will take up the matter with the respective manufacturer or their authorised agents, on which the final decision will be theirs and binding to all.
- Fuel injection equipment (Pump & Nozzles)
- Starter Motors
- Alternators
- Tyres
- Battery
Note 5. - COMPONENTS COVERED UNDER EMISSION WARRANTY.
A. For Diesel Engines
(a) Intake system – Air cleaner, Hoses, Clamps, Manifolds & clogging indicators.
(b) Exhaust system – Manifolds, Pipes, Silencer/Muffler, Exhaust brakes, EGR valves & after treatment devices.
(c) Fuel System – Fuel injection pump, Injectors, FIP timers, Fuel lift pumps, Fuel filters, Pipes & Clamps.
(d) Engine management – ECU's, Controllers, feedback systems, sensors, actuators, vacuum modulator valves, vacuum reservoir & related wiring.
(e) Charging system – Turbochargers, intercoolers/ aftercoolers, hoses/pipes.
(f) Evaporative emission control – PCV valves, Oil separators.
B. For Gasoline Engine
(a) Intake system – Air cleaner, Hoses, Clamps, Manifolds & Clogging indicators.
(b) Exhaust system – Manifolds, Pipes, Silencer/Muffler, EGR valves & after treatment devices.
(c) Fuel system – Carburetors, Injectors, Fuel rails, Fuel lift pumps, Fuel filters, Pipes & Clamps.
(d) Engine management – ECU's, Controllers, Feedback systems, Sensors, Actuators, Vacuum modulator valves, Vacuum reservoir & related wiring.
(e) Ignition system – Spark plugs, Distributors, Ignition coils, Ignition control modules, High-tension wires & related wiring.
(f) Charging system – Turbochargers, Inter-coolers/ After-coolers, Hose/Pipes.
(g) Evaporative emission control – Canisters, PCV valves, oil separators.
ENGINE & VEHICLE SPECIFICATIONS
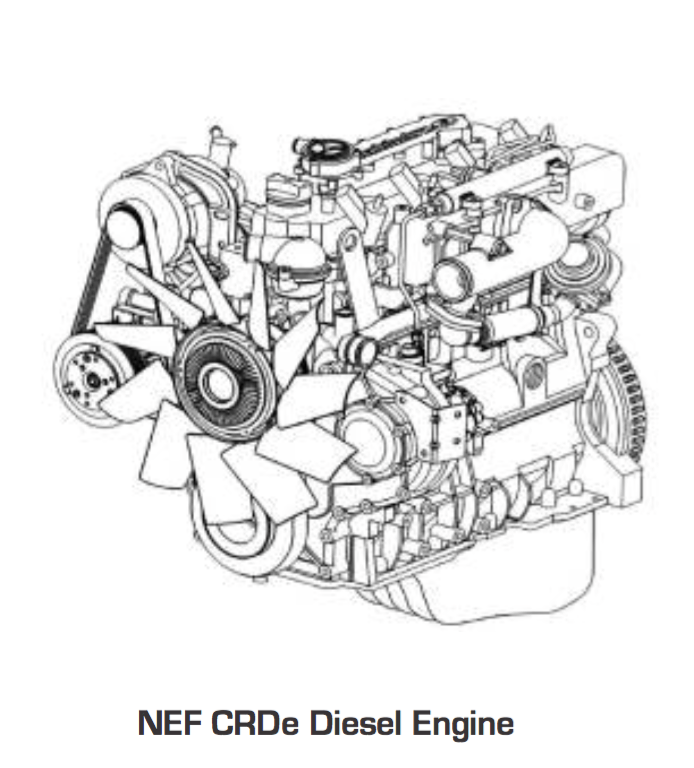
| Engine | NEF CRDe 2.49 L |
| Bore | 94mm |
| Stroke | 90mm |
| Cubic Capacity | 2498cc |
| Compression Ratio | 17.8 :1 |
| Operating Cycle | Four St roke (Firing order: 1-3-4-2) |
| Max. HP | 79 KW @ 3800 R.P.M. |
| Max. Torque | 247 Nm @ 1800 – 2000 R.P.M. |
| Axle Front | 4 WD :Full floating, 4.3 : 1 |
| Axle Rear | Semi floating, Hypoid 4.3 : 1 |
| Frame | Ladder type, rect angular, Tubular side member |
| Brakes | Hydraulic, tandem master cylinder with vacuum assisted servo. |
| Suspension | FR : IFS, RR : Semi- elliptic leaf spring |
| Fuel Tank | 60 Lts. |
| Steering | Power Steering, Rack & Pinion |
| Wheels & Tyres | 6.5J x 16 , P 235/70R16 |
WEIGHTS
| ITEM | Kgs |
|---|---|
| Kerb Weight | 1670 |
| GVW | 2200 |
| FAW | 910 |
| RAW | 1290 |
| Seating Capacity | 6 + D |
DRIVE LINE
| GEAR RATIO | NGT 530 R |
|---|---|
| 1st | 3.78 : 1 |
| 2nd | 2.09 : 1 |
| 3rd | 1.38 : 1 |
| 4th | 1.00 : 1 |
| 5th | 0.79 : 1 |
| Reverse | 3.52 |
IDENTIFICATION OF SERIAL NUMBERS
CHASSIS NUMBER
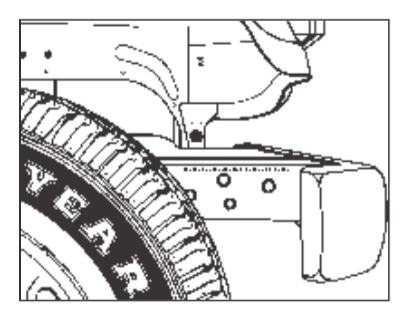
The Vehicle chassis num- ber is stamped on the right side chassis side member below the front fender. It is also stamped on the Name, Number & Instruction plate located on the left side of the engine compartment.
VEHICLE SERIAL NUMBER

The vehicle serial number is stamped on the name, number & instruction plate fixed on the left side of the engine compartment.
ENGINE SERIAL NUMBER
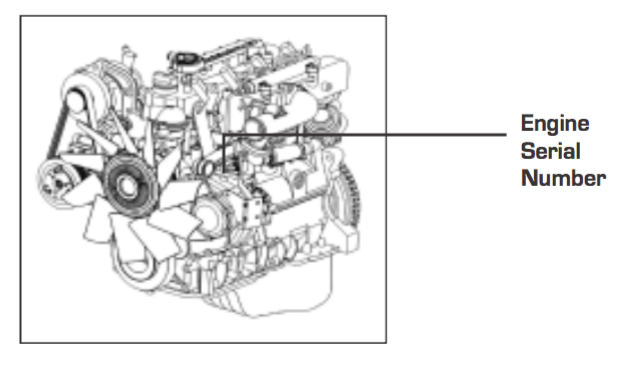
This number is punched on front top face of cylinder block adjacent to inlet manifold.
INSTRUMENT CLUSTER

INSTRUMENTS
- Speedometer
- Odometer / Tripmeter
- Tripmeter reset knob
- Fuel Gauge
- Temperature Gauge
- Tachometer
INSTRUMENTS IN CLUSTER
- Speedometer
This indicates the speed at which the vehicle is driver in km/ hr. - Odometer
The Odometer indicates cumulative kilometers covered by the vehicle. - Tripmeter & Reset Knob
The tripmeter can be used to measure the distance travelled on short strips or between fuel stops. Press the reset knob to return the tripmeter indication to zero. - Fuel Gauge
Indicates the approximate level of fuel in the tank. indicates at E - Empty; 1 / 2 - Half, F- Full. - Temperature Gauge
It indicates the operating temperature of the engine in 0C sothatyourmayguardEngineagainstoverheating. - Tachometer
Indicates Engine speed in revolutions per minute (RPM)
SPEEDOMETER / ODOMETER / TRIPMETER
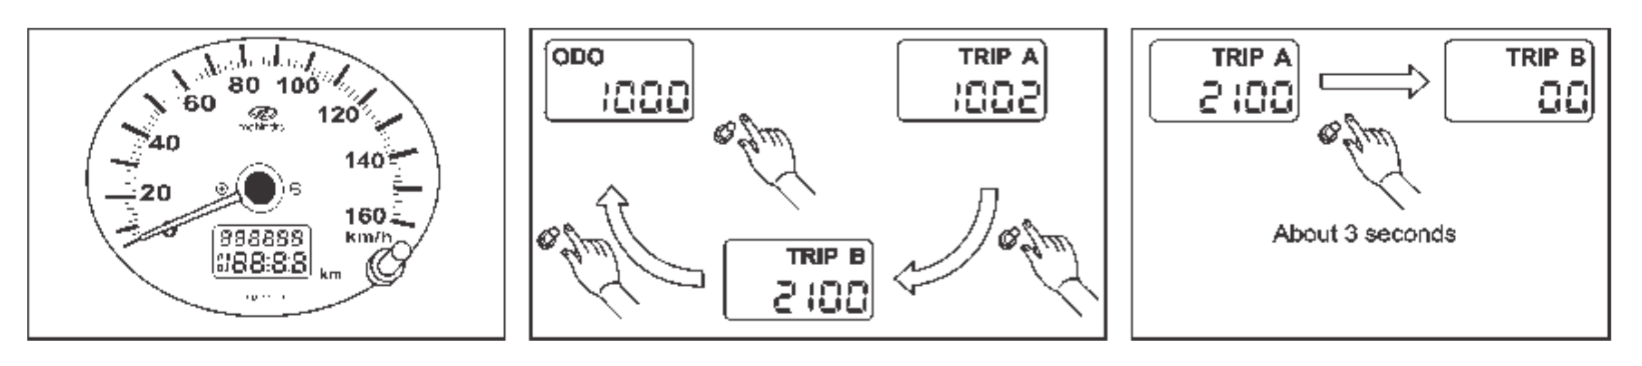
- Speedometer
- Odometer / Trip meter
- Odometer/ Trip meter selector knob
The spedometer indicates vehicle speed in km/h. The odometer records the total distance the vehicle has been driven. The trip meter can be used to measure the distance traveled on short trips or between fuel stops.
When the ignition switch is turned to "ON" the display shows the odometer or trip meter.
The display shows three types of indication;
odometer, trip meter A and trip meter B. Push the selector knob quickly to switch the indication among the three.
You can use the two trip meters (A and B) independently.
Push the selector knob for a little while (about 3 seconds) to reset the trip meter to zero.
INDICATORS
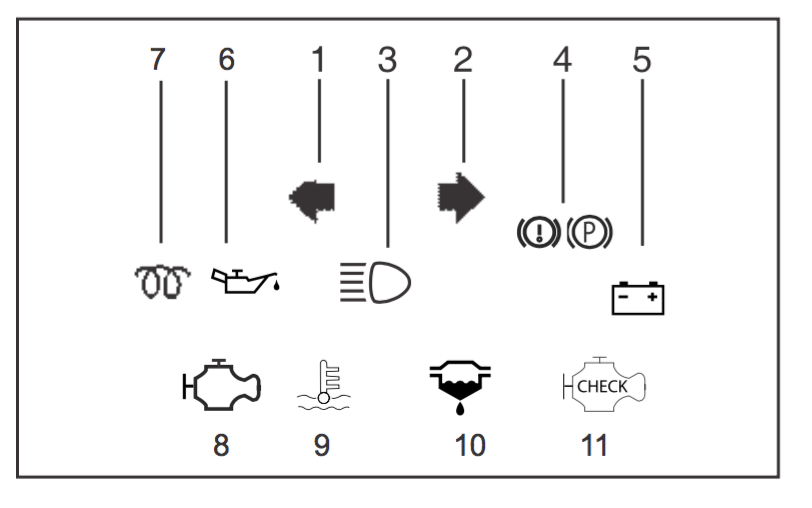
1 & 2. Indicator for Turn Signal
When the lever is turned to required side, left or right side, green lamp, will lit, to indicate the operation of the turn signal.
3. High Beam Indicator
This blue lamp is lit when the high beam lights are in use.
4. Parking & Brake Oil Indicator.
This red indicator lamp lights 'ON', when parking brakes are applied and brake fluid in the reservoir falls below minimum level.
5. Battery Charge Indicator
Normal functioning of the charging system is indicated when it comes on, when the ignition is 'ON' before cranking & must go off, when engine starts running. This red lamp comes ON when fault in charging system occurs during running of vehicle / engine.
6. Oil Pressure Indicator
This red tell-tale lamp is lit when the ignition switch is in ON position. Thelampwillswitchoffoncetheengineisstarted. If the light does not switch off, it indicates low oil pressure or clogged Filter Cartridge & needs immediate investigation.
7. Glow plug Indicator (If Equipped)
This when 'ON' indicates that pre-heating is on. Do not crank the engine when glow plug is ON, to avoid excessive load on battery & ensure effective starting.
8. Check Engine Malfunction (MIL) :
When the lamp lights up and glows continuously indicates Engine Fault (other than EMS). Arrange for checking at the nearest Mahindra Authorised Dealer immediately.
9. Engine Coolant Temperature Gauge :
Indicates the temperature of the engine's coolant. At normal operating temperature, the needle may point anywhere across the band. When the needle is continuously in the red zone of the temperature gauge / lamp glow continuously indicates engine overheating.
10. Water in Fuel Indication:
when water accumulated in Fuel Filter reaches the maximum permissible limit, the indicator gives warning to remove water and clean the fuel filter. (Instruction for how to drain the water given in the Self Maintenance Section or contact a Mahindra Authorised Dealer.)
11. Check EMS [Engine Management System] Warning Lamp :
As soon as the ignition key is switched ON, the lamp lights up and goes OFF in few seconds indicating normal status. The lamp will blink / glow continuously indicating the presence of fault in EMS. The vehicle needs attention by Mahindra Authorised Dealer immediately.
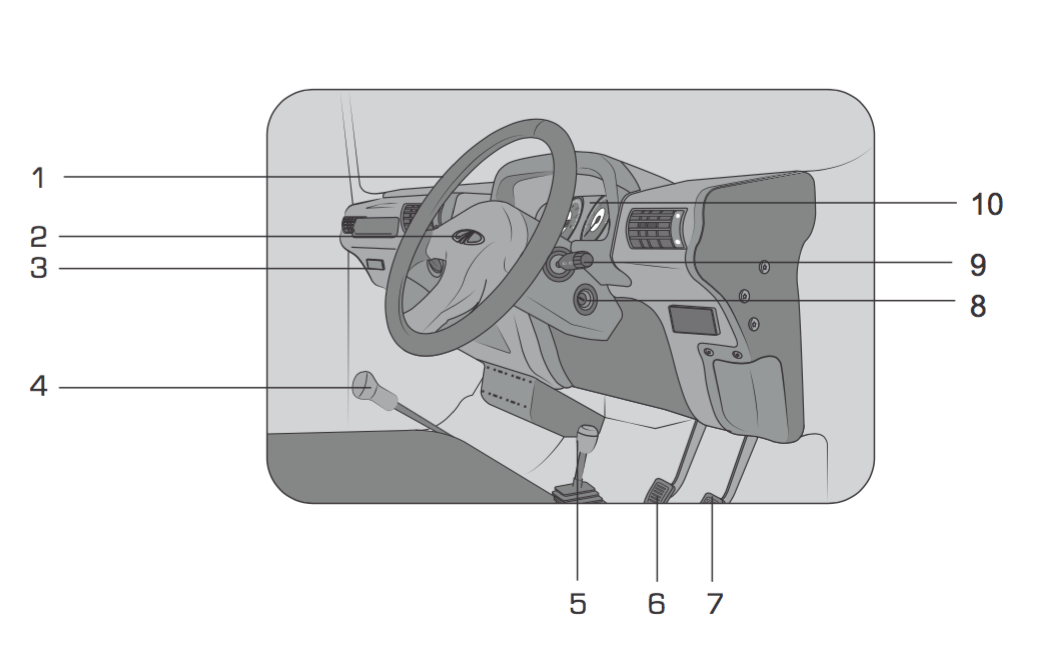
| Ref. No. | Description |
|---|---|
| 1. | Steering Wheel |
| 2. | Horn Pad |
| 3. | Glove Box |
| 4. | Gear Shift Lever |
| 5. | 4WD Shift Lever |
| 6. | Clutch Pedal |
| 7. | Brake Pedal |
| 8. | Steering Lock / Ignition switch |
| 9. | Combination Switch |
| 10. | Instrument Cluster |
CONTROLS
AIR CONDITIONING & HEATER CONTROLS (If equipped)
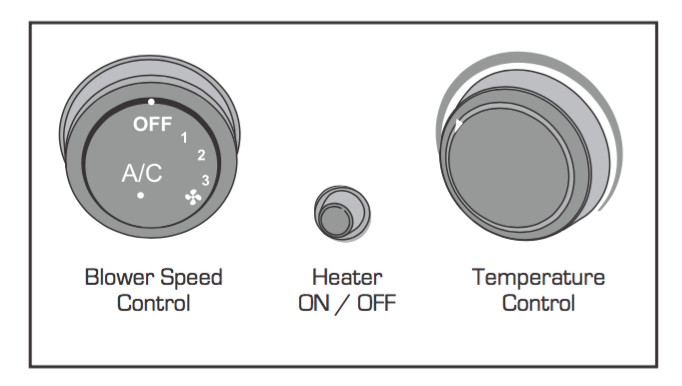
TEMPERATURE CONTROL
It controls temperature of cold airs. When turned clockwise
SWITCH HEATER
When this switch is turned on , the heater is ON.
SWITCH BLOWER
Air flow can be controlled in 3 stages : Low / Medium / High
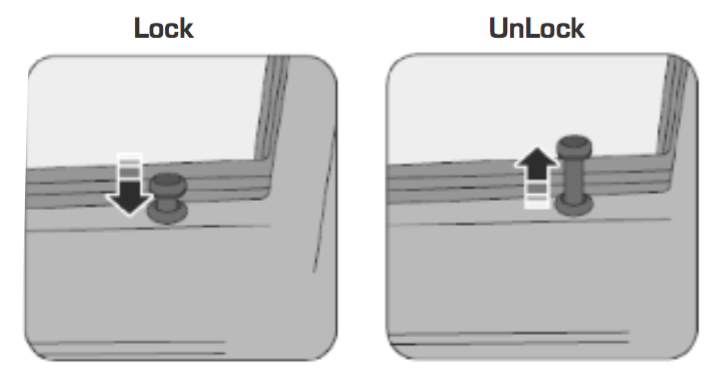
LOCK & UNLOCK THE STEERING WHEEL
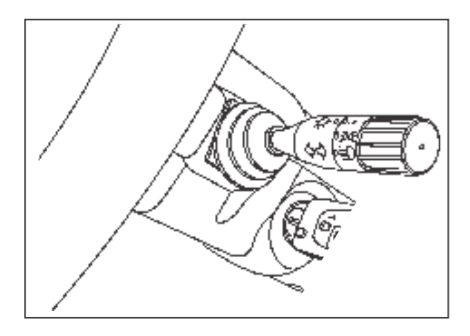
To Lock : Remove the key at the "Lock" position. Turn the steering wheel until it is locked.
To Unlock : Turn the key to the "ACC" position while moving the steering wheel slightly.
MANUAL SHIFT 4 WD
a. For shifting from 4H-N-4L & vice versa, stop the vehicle completely & then shift.
b. ON-The-GO shift feature from 2H to 4H & vice versa is available. There is a slight delay in actual 4H engagement & disengagement after the selection, due to spiring control mechanism of on-the-go shift.
AIR VENITLATION
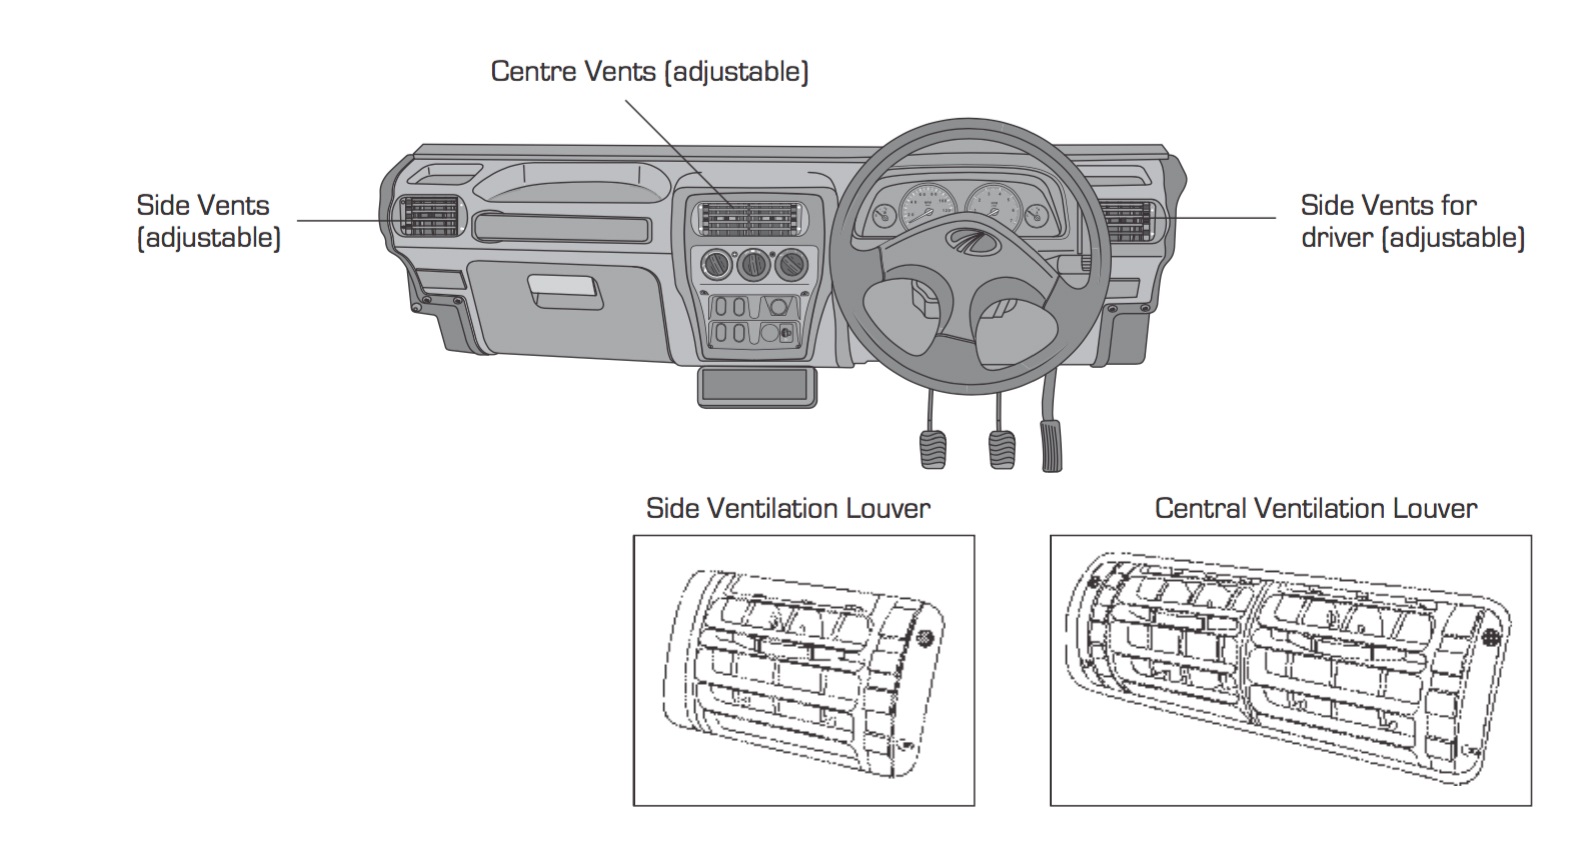
AIR VENTILATION LOUVERS
- Centre & Side Vents
The airflow volume can be adjusted with the rotary controls at the sides. The air vanes can be adjusted horizontally & vertically by swivelling the vents up / down or sideways.
STEERING COLUMN CONTROLS
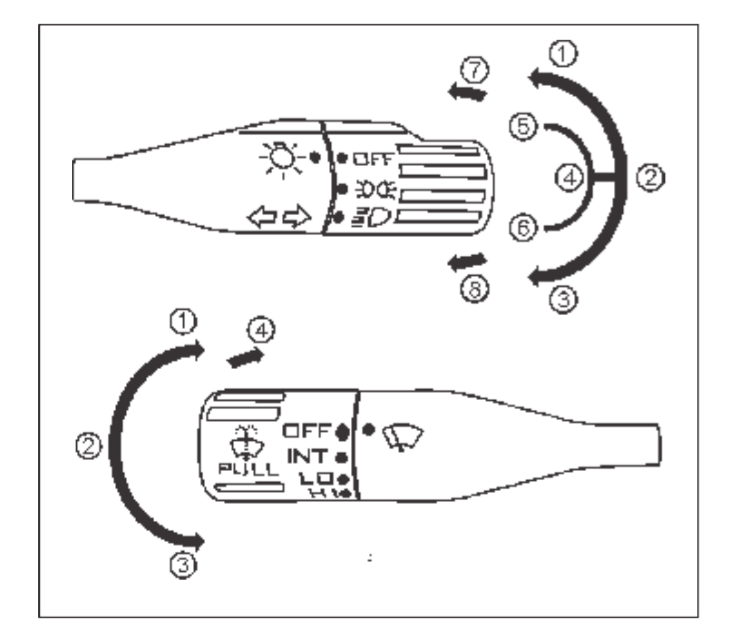
RIGHT LEVER - LIGHTS
- All lights " OFF"
- Front parking, Rear tail lights & Instrument lights "ON".
- Also headlights "ON".
- Lever down position - High beam
- Lever up position 1 - Low beam
- Lever up position 2 - Intermittent pass
- Lever turned left - Left Indicator
- Lever turned right - Right indicator
LEFT LEVER - WIPER
- Intermittent operation
- Slow speed - Low
- High speed - High
- If windshield washer is operated for more than 2 seconds, the wiping system will activate.
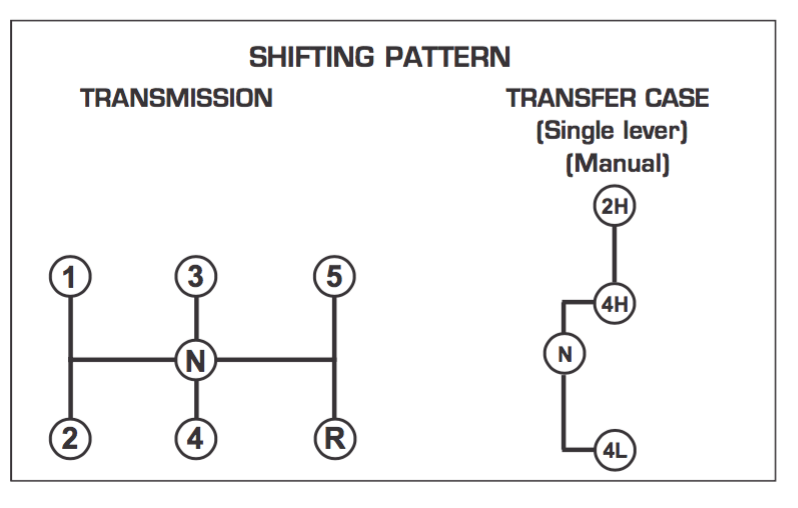
GEAR SHIFT LEVER
The gear shift pattern is indicated on the gearshift lever knob. Bring the vehicle to a complete stop before shifting into reverse.
TRANSFER CASE SHIFT LEVER (FOR 4WD ONLY)
This lever's shift pattern is indicated on its knob.
ACCELERATOR PEDAL
To avoid unnecessary increase in fuel consumption, the accelerator pedal should be operated gradually.
BRAKE PEDAL
Avoid hard braking, always maintain sufficient distance from the vehicle ahead of you.
CLUTCH PEDAL
The Clutch pedal should be fully depressed for gear changes. If this is not done, grating of the gears may result. Do not allow the foot to rest on the pedal when not using the clutch ie. avoid clutch riding.
PARKING BRAKE OR HAND BRAKE
To activate the parking brake, pull the lever upwards fully. Warning light (Red colour) on the instrument cluster will light up when the hand brake is applied.
To release it, pull the lever upwards slightly depress the locking button and push the lever downwards. Red warning lamp will go off only when the parking brake is fully released.

SEATING ADJUSTMENTS
Adjusting driver seat forward and backward To adjust the position of the driver seat, pull the lever underneath the front edge of the seat and slide either forward or backward. When you reach the desired position, release the lever. Rock the seat a little to ensure that its latch is secured properly secured properly secured.
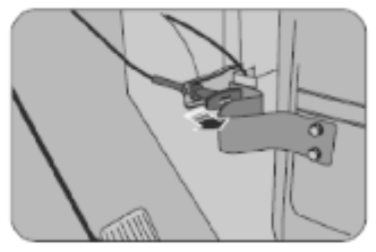
BONNET RELEASE LEVER
To unlock the bonnet, pull the bonnet release lever located below and to the right of the steering wheel. Then remove the two locks in the front side of the bonnet. Lift the bonnet until it can be supported by the stay rod. While closing the bonnet, secure the stay rod in the clip.
DOOR LOCKS
Both the front doors can be operated from both the inside and the outside, using either the door lock lever or the key when the door is closed. Rear door lock can be operated only from inside.
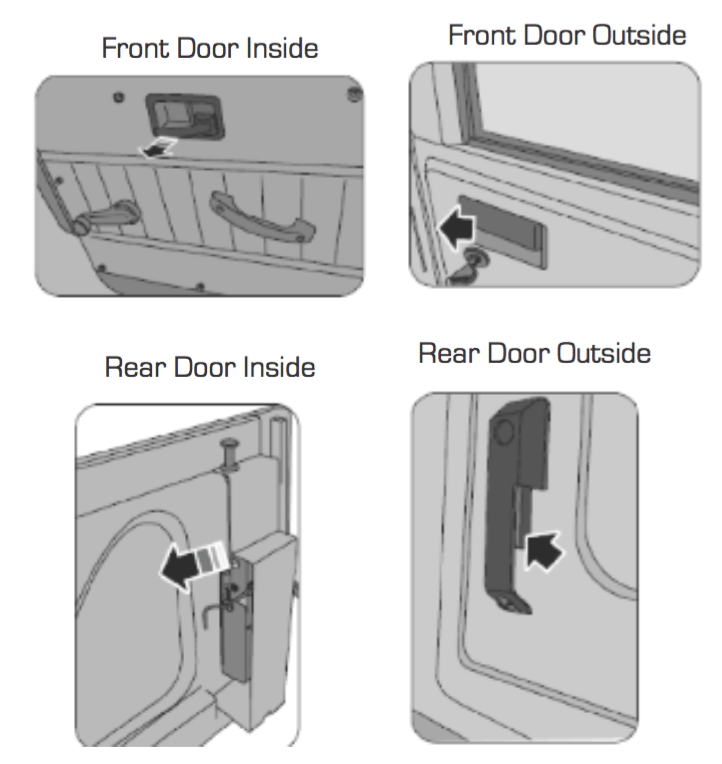
OPENING THE DOORS
Opening the Front doors from the inside
Pull the lever as shown in the picture and push the door.
Opening the Front doors from the outside
Unlock the door using the key. Place your hand under the handle, pull the handle towards you to open the door.
Opening the rear door from inside
Pull the lever as shown in the picture and push the door
Opening the rear door from outside
- Hold the door handle firmly
- Press the lever behind the handle
- Then pull the door.
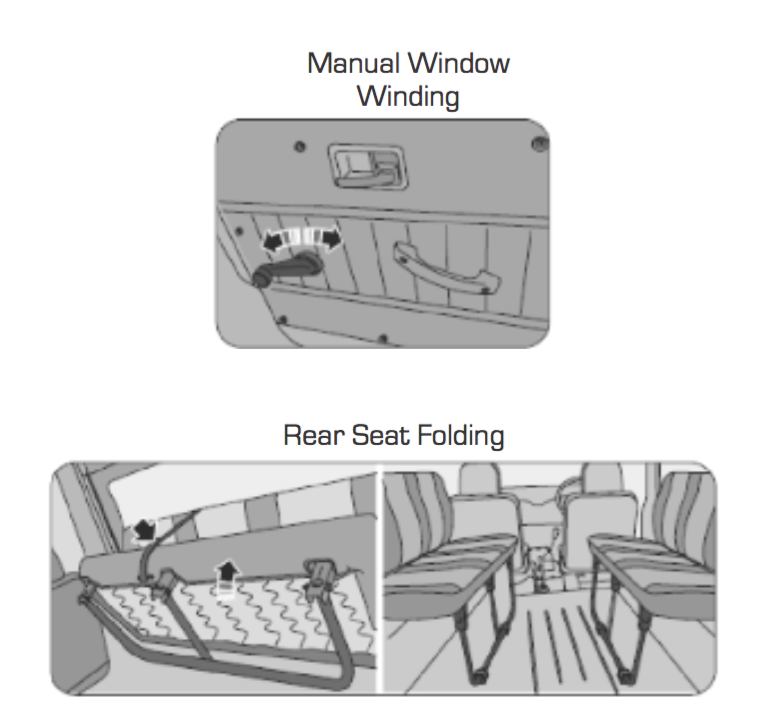
MANUAL WINDOW WINDING
To open the windows, manually rotate the handle clockwise on the doorpad. Rotate it anti-clockwise to close the windows.
REAR SEAT FOLDING
To fold the rear seats
- Lift the seat upwards
- Fold the legs
- Fix the seat lock hangers on the lock provide
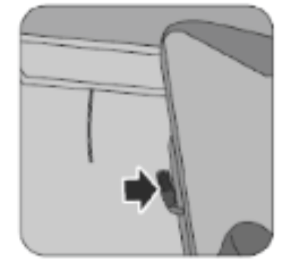
HEAD LAMP LEVELLING SYSTEM
- When Vehicle is fully or partially loaded the headlamp aim needs to be adjusted to compensate the load.
- The headlights can only be adjusted when the low beam is switched on.
- Headlamp low beam can be adjusted from driver seat with the help of switch shown in above picture. This switch is having Four positions marked as 0,1,2 & 3.
- Please select the suitable switch position as per following table :

| SWITCH POSITION | VEHICLE LOADING CONDITION |
|---|---|
| 0 | Driver / Driver with Front passenger. |
| 1 | Driver + Front Passenger + Rear seat occupied. |
| 2 | All seats occupied. |
IMMOBILIZER SYSTEM
Engine Immobilizer System
An Engine Immobilizer System is security system that prevents the vehicle being operated by an unauthorized person. The Engine Immobilizer prevents the engine from being started unless it recognizes signals from the corret coded key.
Features of the Immobilizer system :
- Prevents the vehicle being started by anyone not in posession of the correct vehicle key
- The vehicle is automatically protected after the key is removed from the ignition.
- The vehicle will not be protected until the key has been taken out of the ignition.
Changes or modifications made to this system by anyone other than an authorized service facility could void authorization to use this equipment.
Inserting the correct coded key in the ignition and switching the ignition ON, automatically deactivates the system. This enables the engine to start.
In the event of the vehicle not starting with the correct key, switch off the ignition for a minimum of 1 minute and attempt to start the vehicle again.
Do not modify, remove or disassemble the engine immobilizer system, any unauthorized changes or modifications can affect proper operation of the system and will void your warranty.
In case of loss key, the same has to be reported to an Auhtorized Mahindra Dealer immediately to register the loss in the Mahindra system and deactivate the lost key.
In order to safegaurd the theft protection system of the vehicle, Mahindra will not supply EMS ECU, vehicle keys and the immobilizer as a set for any vehicle.
OTHER FEATURES
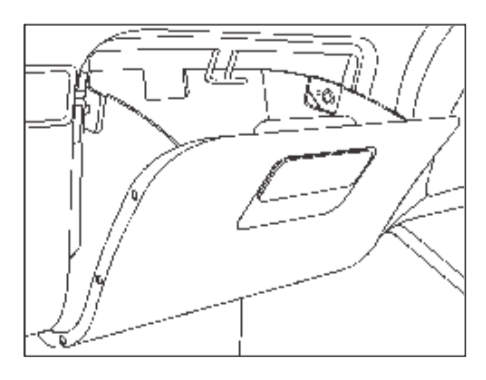
GLOVE BOX
Glove box is provided in instrument panel. Glove box canbelockedorunlockedbyusingvehiclekey. canbe kept unlocked condition & can be opened by pressing the side knobs provided on lock.
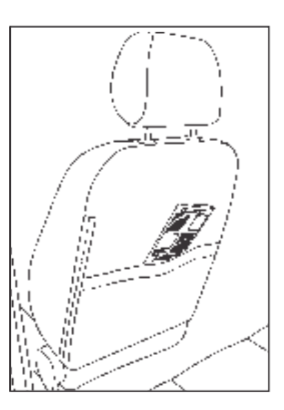
SEAT BACK POCKET
Seat back pocket is provided at Driver & Co-driver seat back test.
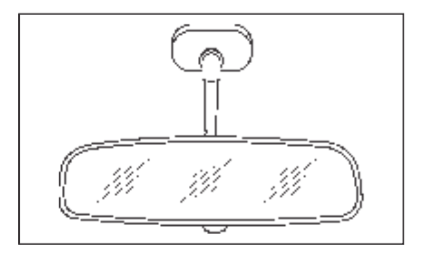
INTERNAL REAR VIEW MIRROR
Adjust the rear view mirror, in the day position, by slightly turning or twisting it until you see the road behind clearly through the rear glass.
Do not adjust the mirror while the vehicle is moving. If doing so may cause the driver to mishandle the vehicle and may result is loss of vehicle control.
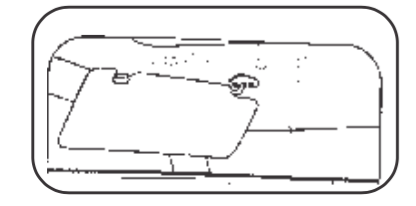
SUN-VISORS
Sun-Visors protect the eyes from bright light. They can be lowered, released from the retention clips and swivelled sideways towards the door.
EMERGENCIES
TOOLS & JACK
Store the jack and tools under the rear LH seat. The jack handle is also placed along with the jack.
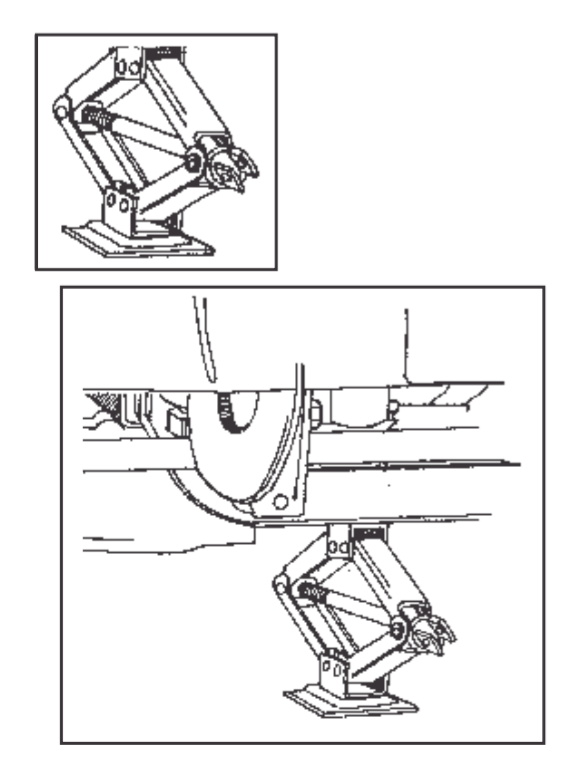
JACKING UP THE VEHICLE
- Park the vehicle on a level & stable ground, otherwise the jack may tilt or sink at an angle causing the vehicle to fall.
- Set the parking brake firmly, activate the hazard flashers.
- Set the jack near the gear carrier for axies other than IFS.
Set the jack below front chasis cross member of IFS. If the jack is set at a wrong position, the body of the vehicle could be dented or the jack might fall over, causing personal injury.
GUIDELINES ON DRIVING
Instructions for Driving in the Break-in Period
You can assure your vehicle's future reliability, economical operation and performance by paying extra attention to how you drive during the first 1,000 km .
Follow these during this period:
- After starting the engine,do not rev it up; Warmup gradually at idling speed
- Do not overspeed or drive at high speeds continously
- Avoid sudden acceleration and full throttle
- Do not drive for a long time at a single speed; either increase or decrease the speed at intervals
- Do not drive slowly with the transmission in high gear
- Avoid hard braking; brakes are to be used gradually / moderately
- Do not tow a trailer during first 2500 kms of operation
- Avoid running the engine at high speeds at full load until it has reached its normal operating temperatures.
These recommendations should be followed when the engine is overhauled or when the brakes pads / liners replaced.
Initial Checks
Ensure that the windshield, windows, mirrors and external lights are clean.
Ensure that the windshield washer reservoir is full.
Visually inspect tyres for their appearance & condition.
Ensure that tyres have appropriate pressure (including spare tyre).
Ensure that the bonnet is closed properly.
Check underneath for leaking fuel, oil water or fluid.(water dripping from air-conditioning after use is normal).
Check for availability of the Jack & wheel nut wrench.
Adjust seat position, seat-back angle and head restraint height to comfort.
Adjust internal and external rear-view mirrors.
Lock all doors. Fasten seat belts.
Safe Driving Tips
- Always slow down in gusty cross winds. This will allow/improve the better vehicle control.
- Drive slowly when passing over speed breakers / bumps or traveling on a bumpy road. Not doing so could cause severe damage to the tires/wheels/suspension system & may result in personal injury also.
- When parking on a slope, turn the front wheels until they touch the side curb to avoid vehicle rolling. Apply the parking brake and keep the transmission in first/reverse gear. If possible, block the wheels.
- Do not drive across steep slopes. Instead drive either straight-up or straight-down the slopes.
- Driving through deep water or washing the vehicle may get the brakes wet. Wet brakes could make the stopping distance longer or even no braking or brake pulling. To dry the wet brakes, drive the vehicle cautiously, when there is no- traffic near you, while lightly applying the brake pedal with parking brake applied. If brakes are still not working safely, park the vehicle beside the road and contact the nearest Mahindra Authorised dealer.
Starting the Engine
- Apply the parking brake fully
- Insert the key into the ignition switch and turn it into the IGN position.
- If the vehicle is equipped with glow plug, wait for preheat glow plug light in the instrument cluster to go OFF during cold start. The engine may be started without waiting for preheat if the engine is warm
- Check the gear lever if it is in Neutral Position
- Crank the engine by turning the key to START position till the engine starts. If the engine does not start in the first attempt, wait for few seconds and try again
- Let the engine run for atleast 10seconds before releasing the parking brake
Stopping the Engine
Bring the vehicle to a stop and allow the engine to idle. Turn the key to OFF position.
Driving in Wet Weather/Snowy Conditions
Wet weather or snow can be dangerous for driving. The following tips tell you how to avoid accidents in such conditions:
Drive slowly : Low driving speed increases the surface of tyre tread in contact with the road and provides better traction
Maintain safe distances from other vehicles: Wet weather results in longer stopping distances (about four times that of normal stopping distance). So, it makes sense to keep a good distance from other vehicles, people and objects on your path.
Maintain tyres : Tyres may not provide adequate traction once the tread wears below two thirds of the tread depth. Check tyres regularly and replace them at appropriate time. Maintain the recommended tyre pressure in the tyres at all times. While braking, accelerating or turning, avoid jerky and abrupt movements Apply smooth and even pressure on all controls. Abrupt steering wheel movements or sudden, hard application of brakes can cause loss of control. Exercise extra caution while driving in rain after a long dry spell.
After months of dry weather, the first rain brings grime to the surface of the roads, making it slippery.
While driving on wet surfaces, downshift carefully. If the traction is low, it can lock up the drive wheels for a moment and cause a skid.
If the battery is not fully charged during extremely cold weather conditions, the battery fluid may freeze and damage the battery.
To maintain the maximum efficiency, the battery should be checked regularly.
It is recommended that the following items to be carried in the vehicle during winter driving.
- A shovel to dig the vehicle out of snowdrifts.
- A sturdy, flat board to be placed under the jack to give the firm support.
- A scraper and stiff bristled brush to remove ice & snow from the windows.
Driving in Low Visibility
Being able to see clearly in all directions and being visible to other drivers is important in all weather conditions. This is more difficult in bad weather conditions. To be seen more clearly by other road users during daylight hours, turn the headlights ON. Inspect the windshield wipers and washers regularly. Keep the windshield washer reservoir full. If the windshield wiper blades start to streak the windshield or leave parts un-wiped, replace them. Use the defroster to avoid fogging of windshield on the inside.
Precautions for Off-Road Driving
This vehicle is not designed for cornering at the same speeds as regular passenger cars designed to perform satisfactorily under off-road conditions. Hence, avoid sharp cornering or abrupt maneuver at excessive speeds and it may cause vehicle rollover / lose of control resulting in serious injury or even death. While driving off-road or rough roads do not drive at excessive speeds. As with other vehicles of this type, failure to operate this vehicle correctly may result in lose of control or vehicle rollover.
- Avoid loading any items / objects on the roof of the vehicle, since it increases the height of the vehicle's center of gravity.
- Drive carefully when off the road.
- Do not grip the steering wheel spokes when driving offroad.A bad bump could jerk the wheel and injure your hands. Keep both hands especially your thumbs on theoutside of the steering wheel rim.
- After driving through tall grass, mud, rock, rivers, etc., check that there is no grass, bush, paper rags, stone, sand, etc.,trapped adhering on the underbody. Clear of any such matter from the underbody. Otherwise, a breakdown or fire could occur.
- If driving/crossing through shallow streams, first check the level of the water & bottom of the river bed for better gripping.
- Take all the necessary safety measures to make sure that no damage to the engine or other components due to water entry. Otherwise water entry can cause air intake system failure resulting in engine seizure, washing away the bearing greases causing rusting and premature failure. And transmission, transfer case or differential also may get damage due to water entry.
- Accumulated sand/mud in the brake drum/disc may greatly affect the braking efficiency & can damage the braking system components.
- It is necessary to carry out the maintenance inspection after each day of off-road driving that was driving through rough terrain, water, sand and/or mud.
GEAR SHIFTING
Your vehicle is fitted with 5 speed synchromesh gearbox & a standard transfer case (in case of 4WD) The gear positions are marked on the gear lever knob.
NOTE:
5 Speed transmission and Transfer case require separate lubrication for each unit as they have no cross over oil passage. At each Transmission service check, top up both transmission and transfer case fluids separately.
DRIVING TECHNIQUES IN 4WD
Mud, Snow and Sand
Shift to 4WDH range first gear when traversing without load. Do not shift into any lower gear than is necessary to maintain headway. Tyre pressure may be reduced by about 0.7 kg/cm2 (10 psi), if additional flotation is required.
Up hill
Shift to 4WDL range, second gear. Drop down to first gear only when the steepness of the ascent requires the lower gear to maintain headway.
Note
Over-reving the engine will cause the wheels to start spinning & traction will be lost.
Getting over the Hump
If the wheels start to slip with only a few feet of the ascent remaining, headway may be maintained by swinging the front wheels sharply left and right. This will provide a fresh 'bite' into the surface and will usually result in enough traction to complete the climb.
Stall
If the vehicle stalls or loses headway when climbing a steephill, make a fast shift to reverse or first gear. Do not depress the clutch. Engine compression will hold the vehicle on the hill. Do not try to back down with the clutch released & only the brakes holding the vehicle. By shifting to reverse, it is possible to start the engine without depressing clutch. Let the vehicle move backward with the starter. When engine starts, control the downward speed with the accelerator.
Down hill
Shift to 4WD Low range, first gear. Do not use the clutch & brakes. Now the vehicle can proceed in safely down a grade slowly with all 4 wheels turning against engine compression.
As soon as the vehicle finishes its traversing through the hubs in sand, mud or water, clean the brake drums from foreign abrasive materials sticking to it to avoid the wearing of brake linings.
When negotiating across slopes or hill, choose as mild an angle as possible (keep moving and make turns quickly). Do not travel diagonally across a hill unless absolutely necessary.
For normal driving on hard surfaced roads, 4WD should not be used.
To relieve the build up of torsional stresses, due to prolonged use of 4WD on hard surface roads, simply drive the vehilcle in reverse for several feet on drive off hard surface momentary to allow tyres to slip.
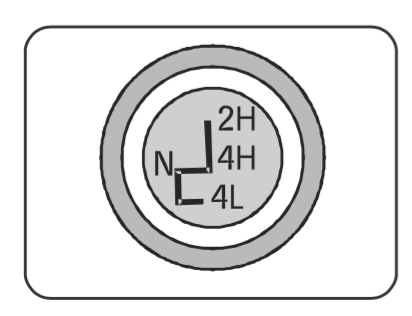
Manual Shifting of Driving Mode (In vehicles with Manual 4WD Shift Lever)
- Stop the vehicle
- Depress the clutch pedal
- Shift the 4WD lever to the desired mode
Never Shift lever to 4WD position if wheels are slipping. Stop the slipping or spinning before selecting the 4WD modes.
Note :
Driving the vehicle in 4WD Low / High mode on dry, hard surface may cause damage to the driveline, may cause excessive tyre wear / unnecessary noise and / or poor fuel economy, hence not recommended.
Transfer case Shifting Guidelines for 4WD (4 - Wheel Drive) Models.
2H- (2WD) in this mode only rear wheels are driven. Usewhen driving under conditions same as standard 2WD vehicles.
4H- (4WD, high mode) Four wheels are driven. Use when driving on roads where it is difficult to drive in 2H position (i.e. driving at normal speeds on snow covered, icy, wet, muddy or sandy road surfaces). Avoid excessive speeds, as it will cause loss of traction.
4L- (4WD, low mode) Four wheels are driven. Use while climbing or descending steep hills, or during hard driving in sand, mud or deep snow. The '4L' position provides maximum traction. Avoid excessive speed when driving in'4L'mode.
N- (Only for manual shift transfer case models) No wheels are driven. Always keep the transfer lever out of the 'N' position. Shift the lever quickly and smoothly when moving across the 'N' position with the vehicle stopped.
It is required to stop the vehicle / depress the clutch pedal, when shiffting between 2H to 4H to 2H
- Driving the vehicle in 4WD Low / High mode on dry, hard surface may cause damage to the driveline, excessive tyre wear poor fuel economy & unnecessary noise, hence not recommended.
- Never select the 4WD mode if wheels are slipping. Stop the slipping or spinning before selecting the 4WD modes.
Fuel Economy & Money-Saving Suggestions
These suggestions are to help save money on fuel & repair costs.
Maintain correct tyre pressure; Under-inflated tyres result in increased running resistance, leading to higher fuel consumption.
Maintain proper front-wheel alignment; Improper front wheel alignment causes tyres to wear out faster and exerts more load on the engine, leading to higher fuel consumption.
- Avoid driving with excess weight; Excess weight increases load on the engine, leading to higher fuel consumption.
- Avoid excessive engine idling; It is advisable to switch the engine OFF during prolonged waits at traffic signals, railway crossings etc.
- Avoid fast start and unnecessary stops; Avoid sudden acceleration or deceleration.
- Do not try to maintain the same speed up a hill; accelerate no more than you would on the level. Keep your foot in the same position on the acceleration.
- Driving with open window at high speed will increase fuel consumption.
- Avoid long warm-ups. Once the engine runs smoothly, start driving.
- Maintain a clean air-cleaner; Clogged air-cleaner decreases the amount of air supplied to the engine, resulting in incomplete combustion and thus, wastage of fuel.
- Anticipate traffic conditions. Avoid traffic congestions whenever and wherever possible. This would lead to considerable fuel savings.
Follow the recommended maintenance schedule; Get your vehicle checked and maintained periodically by the Mahindra Authorised Dealer.
- Use the air-conditioner only when necessary
- Use only recommended grade fuel
- Use only recommended grade oil
- Use only recommended coolant
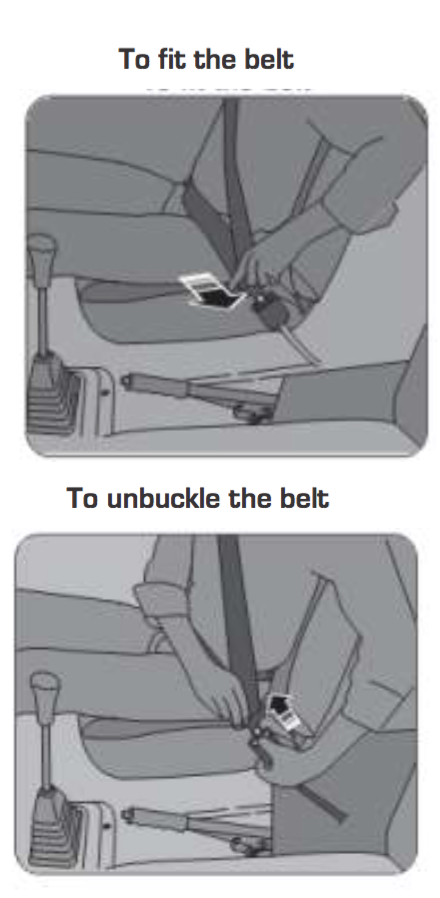
SEAT BELT
In order to fit the belt draw the tongue and webbing across the body from the outboard shoulder to the inboard hip, where the buckle is located. Push the tongue into the buckle slot until a firm click is heard.
Check the buckle for security by tugging sharply on the webbing. To unbuckle, simply press the release button on the buckle.
Ensure correct tension & slack in the webbing using the adjuster. Slack belt webbing vastly increases the chances of injury during an accident.
Care must be taken to avoid the use of polishes, acids, oils and chemicals on webbing and if contaminated or damaged or after a severe vehicle impact, seat belt must be renewed. For cleaning, soap and water can be used.
In the interest of safety to the driver and occupants of the vehicle :
Wearing of Seat Belts has become compulsory for all front seat passengers under CMVR Rule 138 w.e.f. 1 May 1999 vide MOST Notification No. GSR.214 E dated 18.03.1999 and rear seat belt w.e.f. 01 October 2002 vide MOST Notification No. GSR 31 E dated 15.01.2002.
EMISSION CONTROL - PRECAUTIONS
As the owner of the vehicle you are responsible for maintaining the vehicle in good condition & low emissions from the vehicle.
Here are few tips for lower emissions from your vehicle.
- Maintain the recommended tyre pressure. Get the tyre pressure checked perioidically.
- Clean/replace the air filter at regular intervals.
- Clean the fuel injector nozzles at recommended intervals.
- Change the engine oil/oil filters at recommended intervals.
- In case your vehicle is emitting excess smoke (Blue/ white / black smoke) get your vehicle checked at authorized service station.
- Start your vehicle after the glow plug indicator goes off.
- Allow your engine to warm up after a cold start.
- Drive the vehicle in correct gears. Avoid sudden accelerations & decelerations.
- Stop the engine if the engine has to idle for longer duration.
- Avoid clutch riding.
- Get your vehicle emission checked periodically.
- Do not use adulterated fuel.
- Use genuine parts & recommended oils & lubes.
- Check/adjust the belt tension periodically.
- Get the tappet clearances checked as recommended (to be indicated in maintenance schedule)
- Do not tamper with the FIP Settings & idling rpm.
These tips would not only reduce your vehicle emissions but also give you better performance.
DO'S AND DONT'S
DO'S
- Use recommended lubricants only. Replace oil in engine, gear box, rear axle, steering box, master cylinder & oil bath air cleaner periodically as per schedule.
- Use only genuine oil filter & fuel filter element.s
- In order to obtain trouble free & enhanced engine life, clean air filter regularly.
- Ensure periodic servicing as per maintenance schedule.
- Insist on use of genuine Mahindra spare parts for all replacement.
- Allow the starter pinion to come to rest before again attempting to start the engine in order to avoid pinion & fly wheel ring gear damage.
- Replace thermostat in the event of failure & ensure fitment of pressurized radiator cap to get better engine life.
- Maintain correct tyre pressures as specified in chart. Before moving the vehicle release the parking brake.
- Maintain electrolyte level in the battery (using distilled water). Keep battery terminals clean & cable joints tight. Apply Vaseline / petroleum jelly on terminals.
- Disconnect alternator / battery electrical connection while carrying out welding work on the vehicle. Observe correct polarity when connecting battery terminals.
DONT'S
- Do not run the vehicle with leaky air pipes, fuel pipes & water hoses.
- Do not run the vehicle without a battery in is electrical circuit as the life of alternator will be reduced.
- Do not run the engine without radiator cap. Use genuine cap only, to keep the system pressurized.
- Do not open radiator cap when engine is hot. Never add cold water when engine is hot as this may lead to cylinder head/block crack.
- Do not keep the engine running when the pointer of temperature gauge is in red zone.
- Do not use clutch pedal as a foot rest. It will cause premature wear of clutch plate, release bearing & clutch finger & also result in less KMPL.
- Number of passengers carried should be within approved seating capacity.
- Do not race or rev the engine especially when starting. This is destructive to engine & will not heat the engine quickly.
- Use of mobile phones is prohibited as per MOT R & H Notification No. GSR 221 E dated 28 .03 2001 Sr. No (6) introduced under CMVR Rule No. 21(25) which states "Powers of licensing authority to disqualify - the commission of the following act by holder of a driving licence shall constitute nuisance or danger to the public using mobile phone while driving a vehicle."
MAINTENANCE PROCEDURE
VEHICLE MAINTENANCE WHEN NOT IN USE
Engine - Start and run the Engine a few minutes once in a week. Drive the vehicle a little forward & backward once a fortnight.
Cooling system - Add anti-rust to the water. Add antifreeze during cold weather.
Electrical - Disconnect the terminals of the battery & store it separately. Smear petroleum jelly on the terminals & recharge once in a month.
Clutch - Press the clutch pedal to the floor board in fully depressed position.
Brakes - Operate the brake pedal a few times once in a week. Check & top-up brake fluid in master cylinder once in a month.
Tyres - Maintain the normal tyre pressure & check it once in a week. Support the vehicle so that load on the tyres is relieved & correct the tyre pressure before the vehicle stands on the wheel.
Body - coat rust proof to all bright metal. Cover up with upholstery.
ENGINE
Topping up the Engine Oil
The engine oil level should be maintained at little below high mark on the dipstick & must never be allowed to fall below the low. While checking the oil level, park the vehicle on a level ground with the engine shut down. Withdraw the dipstick from its holder, clean & refit. Withdraw again & note the level. Top-up as required with the clean correct grade of engine oil. Always drain & fill the oil when engine is warm.
Note - Start the engine, run at a fast idling speed for about a minute. Stop the engine and after allowing some time for oil level to stabilize, recheck again and top-up if necessary.
- Do not mix different brands or grades of oil.
- Lubricating oil filtershould be replaced at every oil change.
Use higher grade oil for severe operating conditions like
- Full load, low gear operation
- Frequent stop & start operation
- Low temperature area operation
Draining water from fuel Filter
The fuel filter warning light on indicates that the water from the fuel filter to be removed immediately.
Place a small open container / tray under the drain plug cum sensor to collect the water.
Place a small open container / tray under the drain plug cum sensor to collect the water.
Turn the drain plug cum sensor about 2 to 2 1⁄2 turns in the anti clockwise direction
Operate the priming pump until fuel begins to flow clean & clear.
After draining, retighten the drain plug cum sensor, carefully by hand. Use the priming pump to inspect for leaks.
Never drive the vehicle if the fuel tank is nearing empty (in vehicle fitted with catalytic converter). This can cause irregular fuel supply leading to misfiring. Misfiring allows unburned fuel into the exhaust system which can cause overheating and damage the catalytic converter.
Misfiring can cause a loss of power and engine running may also be rough. This may be due to fault in the ignition system. Reduce your speed immediately and have the fault rectified. Remember your Mahindra dealer knows best about your vehicle and its emission control system.
Check the following at regular intervals.
Lights : Make sure that headlights, stop lights, tail lights, turn signal lights and other lights are working properly. And also check the headlight aim.
Engine coolant level : Check the radiator reserve tank every time you fill the fuel tank
Windshield Wipers : Check the wiper condition every month; Check for wear, cracks or other damage
- Do not operate the wipers on a dry screen
- In freezing or very hot conditions, ensure that the blades are not frozen or stuck to the glass
- In winter, remove any snow or ice from around the arms and blades, including the wiped area of the windscreen
Brakes : Check the brake fluid level regularly, if the level is low add the brake fluid until it reaches Max level. It should be kept at max level.
Low brake fluid level could be dangerous. Low level could signal brake lining wear or brake system leak, which may leads to system failure and cause a serious accident. If you find fluid level low, have the brake system checked at Mahindra Authorised dealer.
Power steering: Check the oil level regularly when engine is off, if the level is low add the recommended power steering oil until it reaches Max level. It should be kept between Max & Min level.
Brake pedal : Check the brake pedal for smooth operation
Clutch pedal : Check the clutch pedal for smooth operation
Parking brake : Check the parking brake lever for smooth operation
Tyres : Check the tyres for air pressure; Check tread every month for wear and foreign objects
Battery : Check battery and terminals for corrosion
Windshield washer fluid : Check that there is adequate fluid in the tank.
Doors : Check all doors including the tail door for smooth opening/closing and secure locking
Seat Belts : Check all the parts of seat belt system working properly and smoothly. Check belt webbing for cuts, fraying wear or damage.
Fluid leaks : If you frequently find puddles underneath the vehicle, you may be able to identify the origin from the color/ odor of the fluid.
- Coolant is usually bright green
- Oil is brown
- Power steering fluid is generally red
- Brake fluid is either tan or clear
- Fuel (diesel/petrol) has a distinct odor
CATALYTIC CONVERTER
The catalytic converter is a device for treatment of exhaust gases, fitted in the exhaust system of your vehicle to reduce pollution. it converts harmful unburned hydrocarbons, carbon monoxide and oxides of nitrogen into harmless carbon dioxide, water vapor& nitrogen.
Care and maintenance to minimize the possibility of damage to catalytic converter
Maintain the engine in the proper operating conditions, as per owner's manual.
Consult a Mahindra Authorised Dealer/Authorised service center at the earliest in the event of irregular engine running following a cold start, misfiring, a significant loss of vehicle derivability or other unusual malfunctions which may indicate a fault in the ignition/ fuel system.
Avoid jump starting of engine by pushing or towing or coasting down hill the vehicle.
Do not switch off the engine or interrupt the ignition when the gearbox is engaged and the vehicle is in motion.
Do not idle the vehicle for prolonged periods if idling seems rough or indicates any other malfunctions.
Do not drive vehicle if fuel tank is nearing empty. This can cause irregular fuel supply leading to misfiring, which can cause damage to catalytic converter.
Do not switch off the ignition while the vehicle coasting down a slope.
Avoid driving on roads flooded with water.
Do not park or operate the vehicle near combustible materials such as grass and leaves as this may lead to fire. hazards.
Check for exhaust system leaks and any damages whenever:
- vehicle is raised for an oil change.
- change in the noise of the exhaust system.
- all pipe end of the exhaust system is found rusty.
AIR CLEANER
NEF CRDe engine is equipped with turbo charger. It is preferable to keep the engine at idle for a minute after start or before switching off.
This will ensure proper lubrication of the turbine blades at the start and at the end.
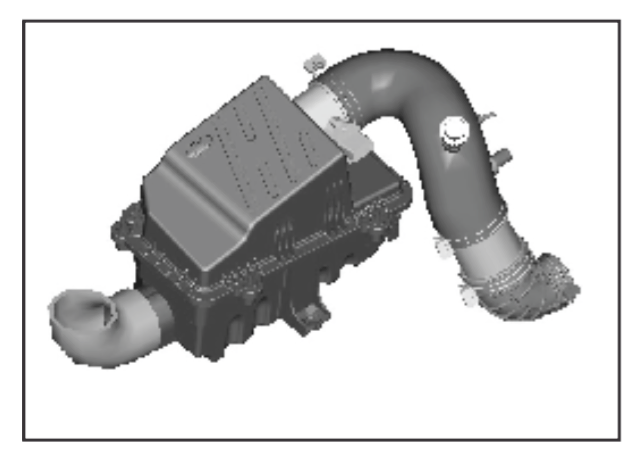
Taking all aspects into account, our recommendation for dry type element is as follows:
- The removal of the air cleaner is to be avoided as much as possible. Whenever the element is removed, it gives opportunity for the entry of foreign particles at the inlet.
- Any improper handling of the air cleaner element during unauthorised servicing do more damage to the element than increase the life of the element.
- It is necessary to continuously monitor the restriction of the air cleaner element by looking at the red band of the service indicator.
- It is advisable to restrict the element clean period to 20,000 KM and attend to the element only when
- Restriction indicator showing red.
- Loss of power Pickup.
- Heavy black smoke.
TYRES
Inflate the tyres as per chart.
For getting a good tyre life, it is suggested to rotate the tyres for every 10000 Kms. Check the tyre for alignment.
| TYRE SIZE : P235 / 70 R 16 | ||
|---|---|---|
| FRONT | REAR | |
| UL | 2.4 Kg./cm (35 p.s.i.) | 2.4 Kg./cm (35 p.s.i.) |
| L | 2.4 Kg./cm (35 p.s.i.) | 2.4 Kg./cm (35 p.s.i.) |
Note : " The Tyres fitted in this vehicle meet the requirements of BIS and they comply with the requirements under the Central Motor Vehicles Rules (CMVR) 1989".

WHEEL BEARING
Use always recommended wheel bearing grease. Lubricate the rear wheel bearing sparingly.
Don't mix lithium base grease with sodium base grease as it may lead to oil seal failure.
ELECTRICAL EQUIPMENTS
Battery (12V)
Check & top up electrolyte level in each cell with distilled water once in two months.
Avoid over-filling. Solution level - Maintain 6mm (1/4") above the plates.
Check specific gravity of electrolyte as per manufacturer's specifications.
Use petroleum jelly on the battery terminals to avoid corrosion.
Check for tightness of the battery terminals.
Note
In cold weather charge the batteries immediately after addition of distilled water.
Alternator
Keep the alternator clean so that ventilating slots (airspaces) are clear & unobstructed.
Head Light Aiming
Correct headlight aiming is important to provide maximum road visibility & safety. Aim the head lamps as per Maintenance Schedule.
Head lamp Bulb Replacement
Raise the bonnet of the vehicle.
Remove rear protective cover.
Pull out socket from bulb.
Remove lock ring holding the bulb and remove bulb. Install new bulb & fit back locking ring, cable socket & rubber cap.
Aim the Head Lamps.
LUBRICATION CHART
| SYSTEM | RECOMMENDED LUBRICANTS CHART THAR CRDe | Filling Volume | SPECIFICATION | REMARKS |
|---|---|---|---|---|
| Diesel Engine NEF CRDe | MAHINDRA "MAXIMILE FEO" NEW GENERATION GENUINE ENGINE OIL | 6.0 lit | Special Engine Fluid | For other than Maximile brand, the oil change interval has to be reduced to 10000 km if the oil meets minimum of API CH-4 SAE 15W-40 specification. |
| Engine Oil Filter | Mahindra "Maximile Universe" Genuine Oil Filter | - | - | |
| Engine Cooling | MAHINDRA "MAXIMILE ULTRA COOL" (Ready to use coolant. No need to mix water) | ~8.0 lit | Brand specific. Don't use other coolants for top up. In case of emergency, coolant meeting JIS K2234 specification should be used (30% concentration diluted with distilled water) and coolant change periodtobereduced to 30,000km. | |
| Manual Transmission | MAHINDRA "MAXIMILE SYNTEC F-2" NEW GENERATION GENUINE TRANSMISSION OIL | 1.75 lit | Special Transmission Fluid | If Maximile GO Synchro 80W-90 is used, the oil change interval has to be reduced to 40,000 km. For other than Maximile brand, the oil change interval has to be reduced to 20000 km if the oil meets minimum of API GL-4 SAE 80W-90 specification |
| Rear axle | MAHINDRA "MAXIMILE ELITE" NEW GENERATION GENUINE DIFFERENTIAL OIL | 1.8 lit | Special Axle Fluid | If Maximile DO EXL is used, oil change interval should be reduced to 30,000 km. For other than Maximile brand, the oil change interval has to be reduced to 20000 km if the oil meets minimum of API GL-5 SAE 80W-90 specification |
| Manual Transfer Case | CASTROL Protector series TQD / IOC-SERVOTRANDEX II / BPCL - MAK AUTRAN II | 1.2 lit | Dexron II | - |
| Power Steering | SHELL "SPIRAX S3 ATF MD3" / CALTEX "TEXAMATIC 1888" | 0.8 lit | Brand Specific & no other brand should be used | |
| Brake and Clutch | CASTROL UNIVERSAL BREAK FLUID "CUBF" / TVS Grilling DOT 3 | 0.9 lit | Brake fluid Meeting SAE J1703; FMVSS No. 116 DOT 3 or IS 8654 Type - 1 Specification | |
| Grease | MAHINDRA "MAXIMILE LCG " GENUINE WB GREASE | As Reqd. | Advise to use only the genuine grease for better life & Protection. In emergency Lithium Complex Grease meeting NLGI 2 / 3 specification can be used. | |
| Recommended Fuel | High Speed Diesel confirming to - Indian Standard IS 1460 : 2005 BS IV / BS III specification or equivalent. | 60 Lit. | - | |
MAINTENANCE SCHEDULE
| MAINTENANCE SCHEDULE | ||||||||||||||||||||||||
|---|---|---|---|---|---|---|---|---|---|---|---|---|---|---|---|---|---|---|---|---|---|---|---|---|
| Distance Covered (kn Kms) / Months in service whichever is earlier | ||||||||||||||||||||||||
| Maintenance Item | 5000 / 3 months | 10000 / 6 months | 15000 / 12 months | 20000 | 25000 | 30000 | 35000 | 40000 | 45000 | 50000 | 55000 | 60000 | 65000 | 70000 | 75000 | 80000 | 85000 | 90000 | 95000 | 100000 | 105000 | 110000 | 115000 | 120000 |
| Engine | ||||||||||||||||||||||||
| Engine Oil 1 | R | I | I | R | I | I | I | R | I | I | I | R | I | I | I | R | I | I | I | R | I | I | I | R |
| Engine oil Filter | R | R | R | R | R | R | R | |||||||||||||||||
| Auto Tensioner | I | I | R | I | ||||||||||||||||||||
| Accessory drive belts | I | I | R | I | ||||||||||||||||||||
| Coolant 3 | I | I | I | I | I | I | I | R | I | I | I | I | I | I | ||||||||||
| Air, Fuel & Exhaust | ||||||||||||||||||||||||
| Air filter element | R | R | R | |||||||||||||||||||||
| Fuel filter element | R | R | R | R | R | R | ||||||||||||||||||
| Fuel tank & stainer | C | |||||||||||||||||||||||
| Water sediments drain-fuel filter (or when indicator glows) | A | A | A | A | A | A | A | A | A | A | A | A | A | A | A | A | ||||||||
| Transmission | ||||||||||||||||||||||||
| Transmission Oil 2 | R | I | I | R | ||||||||||||||||||||
| Transfer Case Oil - 4 WD Only | R | R | R | |||||||||||||||||||||
| Axls, Wheels & Tyres | ||||||||||||||||||||||||
| Differential oil (Rear)2 | R | I | R | I | R | |||||||||||||||||||
| Differential oil (Front) - 4 WD Only2 | R | I | R | I | R | |||||||||||||||||||
| Auto Locking hub - 4WD only | L | L | L | |||||||||||||||||||||
| Front & Rear Wheel Greasingy | L | L | ||||||||||||||||||||||
| Tyre Rotation | A | A | A | A | A | A | A | A | A | A | A | A | ||||||||||||
| Brakes | ||||||||||||||||||||||||
| LSPV setting | A | A | A | A | ||||||||||||||||||||
| Brake + Clutch fluid - Level & leak check B | I | I | R | I | I | I | R | I | I | I | R | |||||||||||||
| Brake Pads / Calliper | I | I | I | I | I | I | I | |||||||||||||||||
| Brake drum and lining | I | I | I | I | I | I | ||||||||||||||||||
| Parking brake operation | A | A | A | A | A | A | A | |||||||||||||||||
| Suspension | ||||||||||||||||||||||||
| Front Suspension bolts torque | A | A | A | A | A | A | A | A | ||||||||||||||||
| Suspension bushes (Shackle & Pivot) | I | I | I | I | I | I | ||||||||||||||||||
| Steering | ||||||||||||||||||||||||
| Power steering fluid - level & leak | I | I | I | I | I | I | I | I | I | I | I | I | I | |||||||||||
| Power steering belt | I | I | I | I | I | R | I | |||||||||||||||||
| Wheel alignment * | Inspect if abnormal conditions are noticed or 40000kms, whicever is ealier | |||||||||||||||||||||||
| Electricals | ||||||||||||||||||||||||
| Battery electrolyte level | I | I | I | I | I | I | I | I | I | I | I | I | I | I | I | I | I | I | I | I | I | I | I | I |
| Battery specific gravity | I | I | I | I | I | I | I | I | I | I | I | I | ||||||||||||
| All lights, horns, wipers & Washers | I | I | I | I | I | I | I | I | I | I | I | I | I | I | I | I | I | I | I | I | I | I | I | I |
| Head light aiming | I | |||||||||||||||||||||||
| Final Inspection | ||||||||||||||||||||||||
| Tyre Pressure | A | A | A | A | A | A | A | A | A | A | A | A | A | A | A | A | A | A | A | A | A | A | A | A |
| All Nuts & bolts for tightness | I | I | I | I | I | I | I | |||||||||||||||||
| Exhaust pipe mountings & damage / leakage | I | I | I | I | I | I | I | |||||||||||||||||
| Road Test - if any complaints reported | I | I | I | I | I | I | I | I | I | I | I | I | I | I | I | I | I | I | I | I | I | I | I | I |
| Legend | * On chargeable basis | B- Change break fluid @ 40,000 km or 2 yrs. whichever earlier | 1. change as per the km or 1 year whichever earlier | 2. change as per the km or 2 year whichever earlier | 3. change as per the km or 3 year whichever earlier | |||||||||||||||||||
| A - Adjust | I = Inspect and correct or replace | R = Replace | C-Clean | |||||||||||||||||||||
RECORD OF SERVICES PREFORMED
| Recommended Service at Kms | Date | Odometer Reading | Repair Order | Servicing Dealer's Signature |
|---|---|---|---|---|
| PDI | ||||
| 5000 | ||||
| 10000 | ||||
| 15000 | ||||
| 20000 | ||||
| 25000 | ||||
| 30000 | ||||
| 35000 | ||||
| 40000 | ||||
| 45000 | ||||
| 50000 | ||||
| 55000 | ||||
| 60000 | ||||
| 65000 | ||||
| 70000 | ||||
| 75000 | ||||
| 80000 | ||||
| 85000 | ||||
| 90000 | ||||
| 95000 | ||||
| 100000 | ||||
| 105000 | ||||
| 110000 | ||||
| 115000 | ||||
| 120000 |
RECORD OF MAINTENANCE & REPAIRS
| Date | Odometer Reading KM | Repair Order No. | Particulars of Repair | Servicing Dealer's Signature with Stamp |
|---|---|---|---|---|
BATTERY WARRANTY CARD
BATTERY WARRANTY
- The warranty periods for various types of Vehicles are as under:
Utility Vehicle / Commercial Vehicles :- 15 months from date of mfg. of battery or 12 months from date of sale of Vehicle whichever is earlier. - The liability of the warranty is limited to making good defects arising solely from the use of faulty material or workmanship during manufacture and developing UNDER PROPER USE during the warranty period.
- This warranty is VALID only if the battery is properly used and serviced regularly (every month) at the service stations of OEM authorised wholesalers / service dealers during the period of warranty and entries made on the service card.
- RECHARGING DOES NOT COME UNDER THE PURVIEW OF THE WARRANTY.
- This warranty does not cover damage to the battery caused by faulty electrical systems, irregular servicing, failure to use distilled water, negligent maintenance, wilful abuse, or destruction by fire, collision, theft or recharging.
- The warranty is NOT VALID if the battery under complaint has been opened or tampered with in any manner whatsoever. It should be returned to the nearest Authorised wholesaler / service dealer complete with electrolyte.
The OEM wholesaler /service dealer has the option either to rectify the defect in the battery or replace the battery. - Breakage of container and cover do not come under the purview of the warranty.
- To and fro transportation charges of the battery under complaint will be borne by the customer.
- The liability under this warranty will cease on the transfer of a battery to any person other than the original purchaser or to any vehicle other than that on which the battery was originally fitted.
- This warranty card along with a copy of the Cash Memo / Bill must accompany all claims arising within the warranty period.
- Recharging will be billed extra.
BATTERY MAINTENANCE
Although the battery is made as robust and durable as possible. the foflowing must be observed to get the maximum performance from the battery.
- THE BATTERY must be fitted firmly in the battery cradle, so that no undue vibration or straining occurs.
- CONNECTING CABLES should have adequate current carrying capacity and be long enough to prevent straining of the battery terminals. It must be ensured that correct polarities (plus to plus and minus to minus) are connected.
- TERMINALS should be brushed clean before connecting and coated immediately afterwards with pure petroleum jelly (vaseline) and NOT grease.
- BATTERY TOP should be kept clean and dry.
- VENT PLUGS should be kept clean and tight.
- LEVEL of acid should be kept about 10 mm above separator tops, Add approved distilled water only to each cell to restore level. NEVER ADD ACID.
- STRENGTH of acid should never be allowed to exceed 1.230/1.240. Insist on this specific gravity, even if you are advised otherwise.
- NEVER INSTALL a lower ampere hour battery than advised by your motor dealer or instructions handbook.
- NEVER keep your battery idle for periods exceeding 2 weeks. If this cannot be avoided, arrange that the battery is removed from the car and recharged every 2-3 weeks.
- In extreme cold condition, the specific gravity of battery should be changed. Refer to dealer or Mahindra Authorised Service Centre.
BATTERY SERVICE CARD
| Date | Specific Gravity | Voltage | Remark | Dealer's Stamp / Signature | |||||
|---|---|---|---|---|---|---|---|---|---|
| Cell 1 | Cell 2 | Cell 3 | Cell 4 | Cell 5 | Cell 6 | ||||