

1. Overview
1.1 Car overview
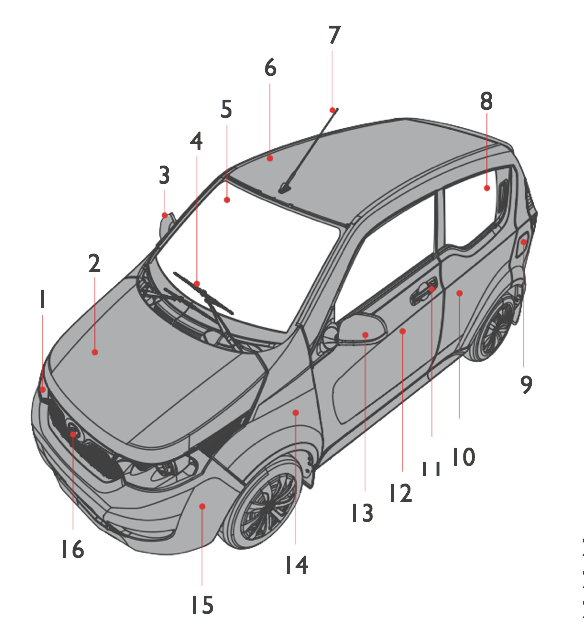
- HEADLIGHT
- HOOD
- ORVM- RH
- FRONT WIPER
- WIND SHIELD GLASS
- ROOF
- ANTENNA
- REAR DOOR GLASS
- CHARGE PORT
- REAR DOOR
- DOOR HANDLE
- FRONT DOOR
- ORVM- LH
- FENDER
- FRONT BUMPER
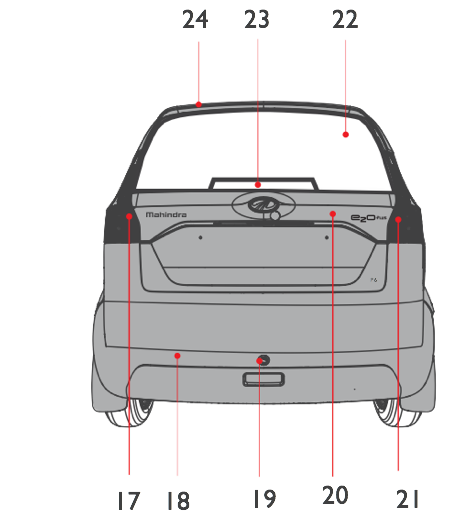
- MONOGRAM 17.TAIL LIGHT- LH
- REAR BUMPER
- REAR CAMERA
- REAR HATCH 21.TAIL LIGHT- RH
- HATCH GLASS
- HIGH MOUNT STOP LAMP
- SPOILER
1.2 Instrument panel and center console
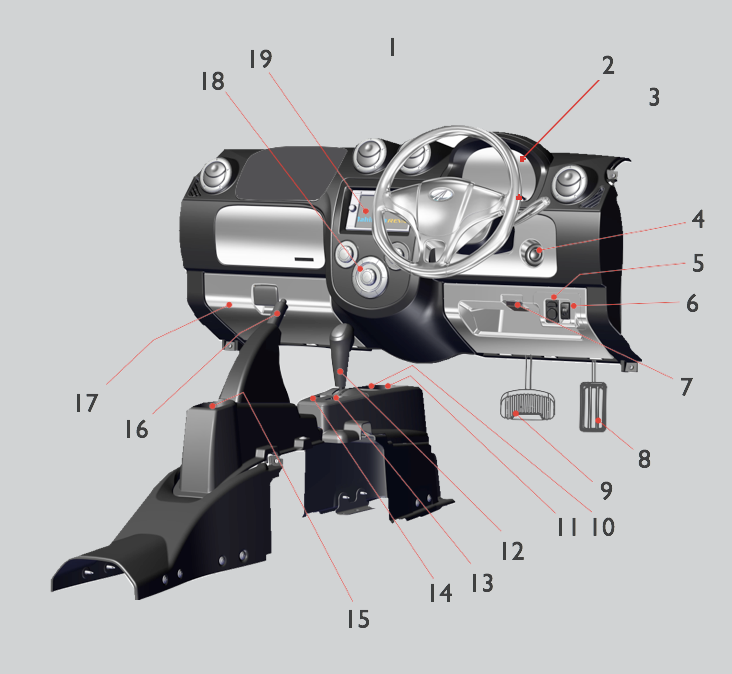
- AIR VENTS
- INSTRUMENT CLUSTER
- STEERING WHEEL
- START AND STOP SWITCH
- ORVM’S CONTROL SWITCH
- HEADLIGHT FOCUS SWITCH
- HOOD RELEASE LEVER
- ACCELERATOR PEDAL
- BRAKE PEDAL
- 12V SOCKET
- USB SLOT / AUX 2 IN
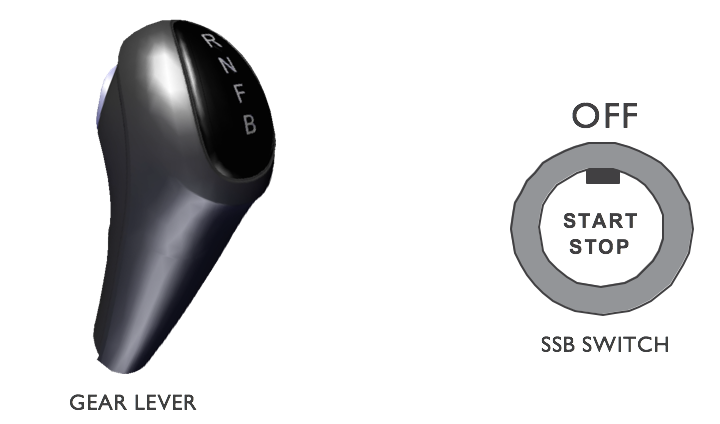
- GEAR LEVER
- POWER WINDOW SWITCH -RH
- POWER WINDOW SWITCH -LH
- CUP HOLDER
- PARKING BRAKE LEVER
- GLOVE BOX
- HVAC CONTROLS
- INFOTAINMENT SCREEN
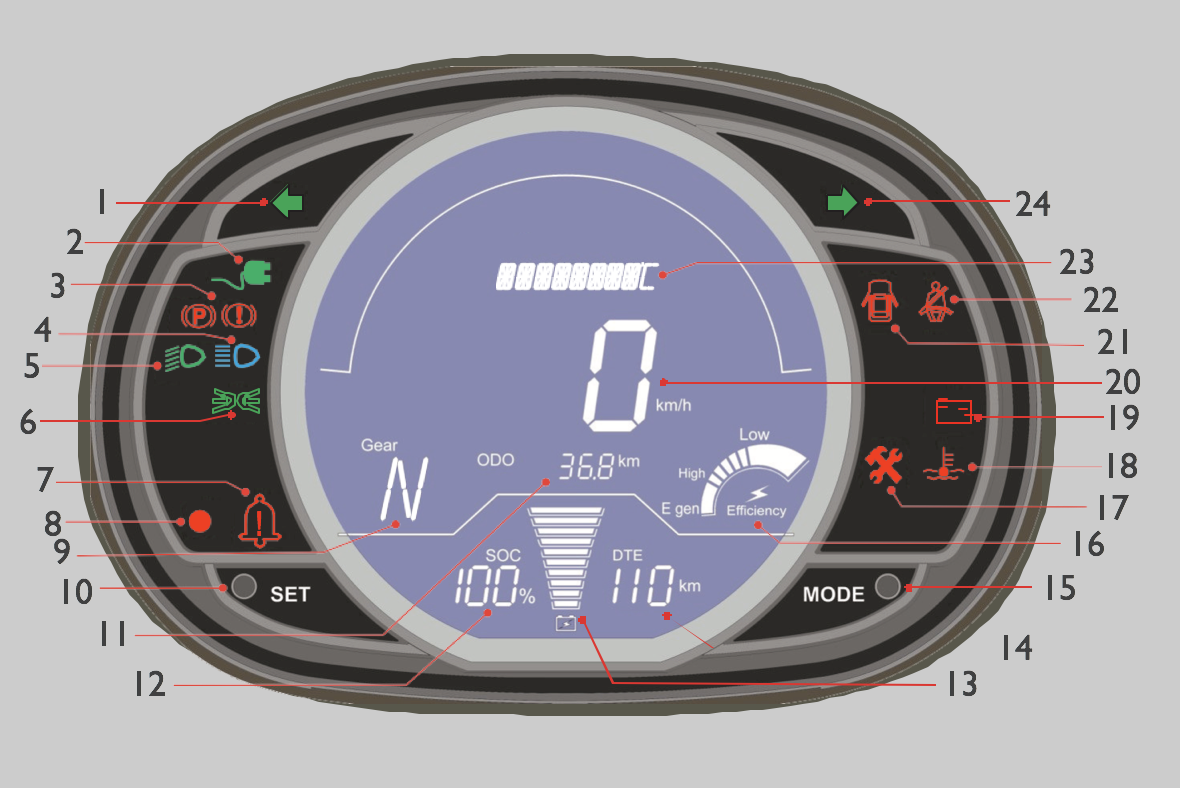
1.3 Instrument cluster
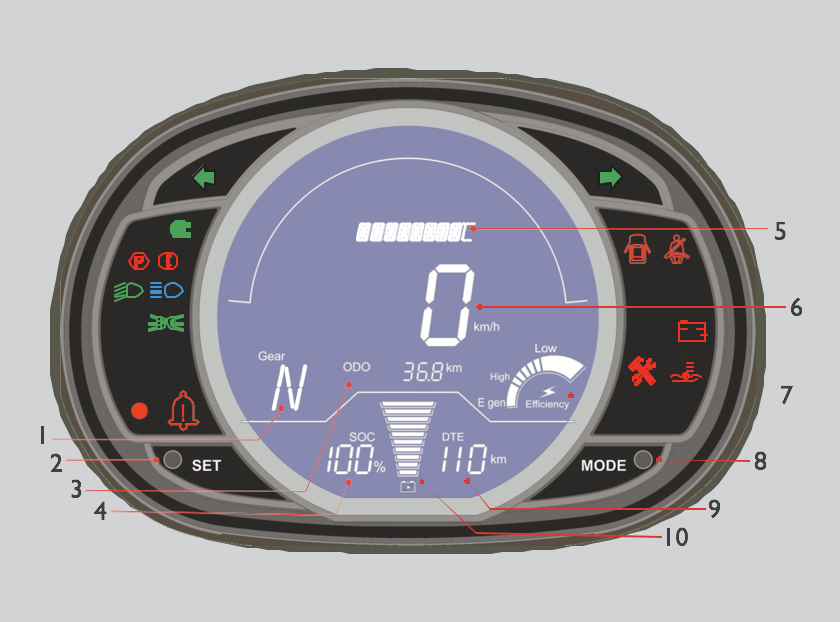
- GEAR POSITION
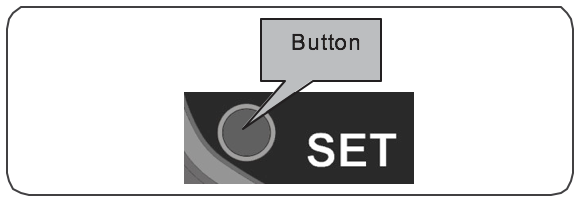
- SET BUTTON
- ODO / TRIP A OR TRIP B
- STATE OF CHARGE (SOC)
- MESSAGE DISPLAY
- VEHICLE SPEED DISPLAY
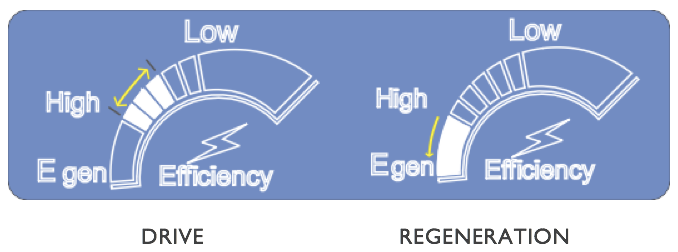
- DRIVE EFFICIENCY GAUGE
- MODE BUTTON
- DTE / TTC DISPLAY
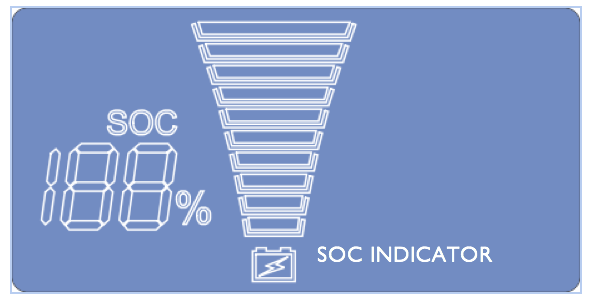
- SOC BAR
1.4 Instrument cluster indicator lights
 Turn signal / hazard indicator lights
 Charge indicator light
 Parking brake / low brake fluid light
 Low beam indicator light
 High beam indicator light
 Park position indicator light
 Anti-theft indicator light
 Temperature indicator light
 EV warning indicator light
 Door open indicator light
 12V Low auxiliary battery indicator light
 Service light
a) Solid- EV system fault
b) Blinking- Scheduled service due
 Seat belt indicator light
1.5 Instrument cluster message display

The cluster message center displays messages with information, or prompts to perform actions to get optimum benefit from your vehicle and enable you to care more effectively for your vehicle.
- INS PLUG- Check and insert charge port handle completely.
- TURNMAIN- Check for AC power supply at charge cable end indicated at switch when the power is on.
- CHARGING- The charging process of the car is on.
- CHG FULL-The charging process is complete.
- CHG OFF- The charging process has been stopped using mobile app.
- CHG FALT- The charging process will slow down / stop due to fault in the charge system.
- FULL CHG- Is displayed if the car is not charged fully for 3 continuous cycles. Allow vehicle to charge fully.
- UPLG CAR-Remove the charge cable handle from port before turning ON the START switch.
- REL PEDL-Release the accelerator pedal before turning ON the START switch.
- AUTH KEY- Place the remote key fob near the START switch for authentication.
- SHF TO N- Shift the gear lever to N mode at authentication.
- WELCOME- Car is ready to drive.
- RESTART- In case of authentication failure, restart again.
- PWR SAVE- When the charge level drops to below 10%, the car enters the power saving mode and HVAC will turn OFF.
- ACT RVIV- If the charge level drops to 0% SOC, activate Revive via Infotainment system or the mobile app.
- GO SLOW- Slow down the car if the temperature light starts blinking along with this message.
- STOP CAR- Stop the car for a while, if the temperature light becomes solid and this message is displayed.
- CHG CAR- Displayed if the charge level drops to 0% SOC, and all Revive’s have been used. Plug-in car to charge.
- SERVICE-If scheduled service is overdue, this message will appear for 20 seconds every time the key is turned ON after charging.
- CHK BRK-Press the BRAKE PEDAL once to turn OFF this message.
- BRK FLD-Indication to top-up the brake fluid if it is less than the minimum level in the reservoir.
- SAFE MOD- In case of any fault in EV drive system, the car will continue to move but with reduced performance.
- DRV FALT- In case of a fault in the EV drive system, the car will not move.
- PARK BRK- This message appears when a door is opened in drive (Key ON). Keep the parking break engaged when the car is idle.
- REVIVE- Is displayed during the Revive activation process.
- COLD BAT- Is displayed if the battery temperature is subzero and is followed by low driving range.
- KYFOB BT-Indicates that the key fob battery is low and is a prompt to replace the key fob battery.
- CHK EPS-Is displayed in case of a fault in the Electric Power Steering system and a higher steering effort will be required to drive the car.
- BAT LIVE- Displayed in case of a battery disconnect.
- INACTIVE- Maintain the power pack by charging to the fullest. Vehicle is inactive or has turned inactive.
- INACT 1- Vehicle has become inactive after one cycle.
- INACT 2- Vehicle has become inactive after two cycles.
- RVIV MOD- Vehicle driving in Revive mode.
- PWR SAVE- Displayed during low battery voltage or high temperature of the drive system.The vehicle performance is reduced.
- STOPPING- Is displayed if the car has to stop due to low battery voltage / low SOC / High temperature of drive system.
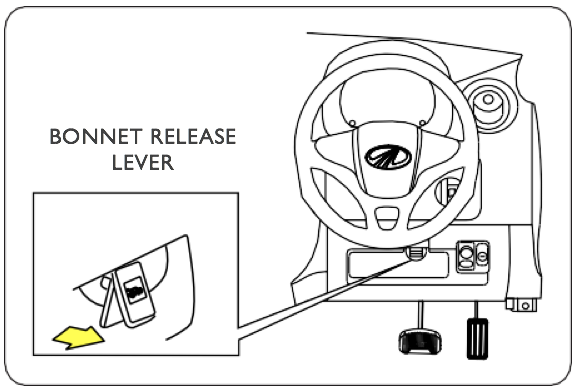
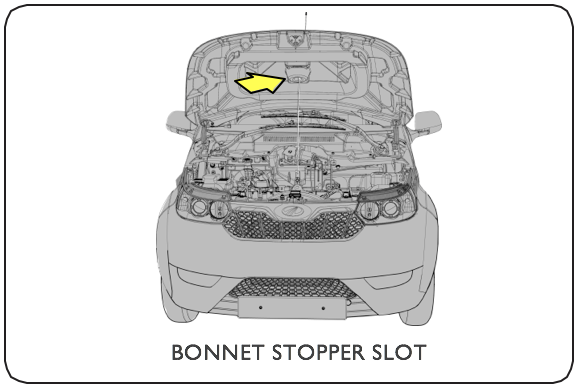
1.6 Bonnet
Step 1: Pull the bonnet release lever located below steering wheel.
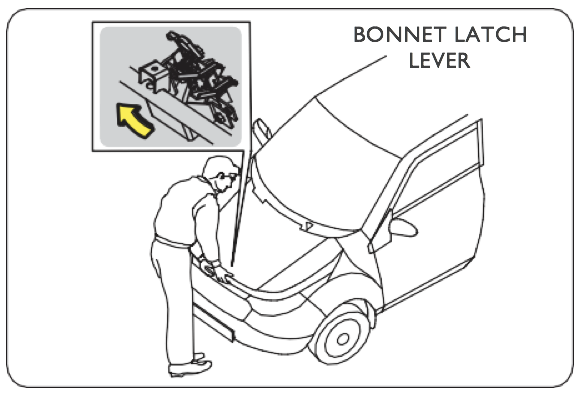
Step 2: Locate the bonnet-latch lever under the centre of the bonnet with your index finger. Pull the lever to the left till it unlocks from latch.
Step 3: Lift the bonnet and pull the support-rod from the clip mounted on the fuse box cover and place it in the bonnet stopper slot.
Bonnet light remains ON till the bonnet is closed.
1.7 Rear hatch
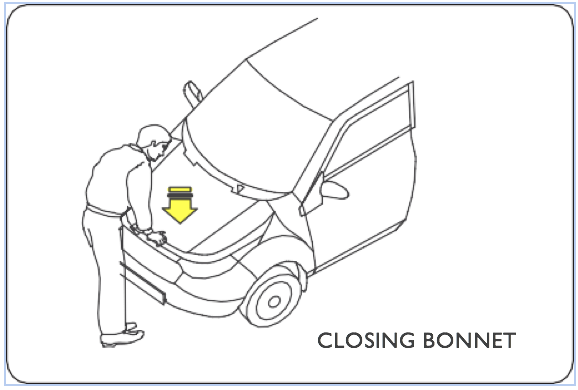
II. Closing the bonnet
Step 1: Hold the support rod and lift the bonnet slightly. Place the support rod back in its location.
Step 2: Lower the bonnet and gently press it downwards till it locks with a click noise.
Do not drop bonnet from a height for closing it.
Ensure that the bonnet is properly locked before driving. The wiper will not work when the bonnet is not locked which could be dangerous in rainy / snowy conditions.
I.7 Rear hatch
To release the rear hatch, press HATCH RELEASE button on HVAC control unit. When vehicle is locked, use the remote key fob BUTTON 3 to release the rear hatch.
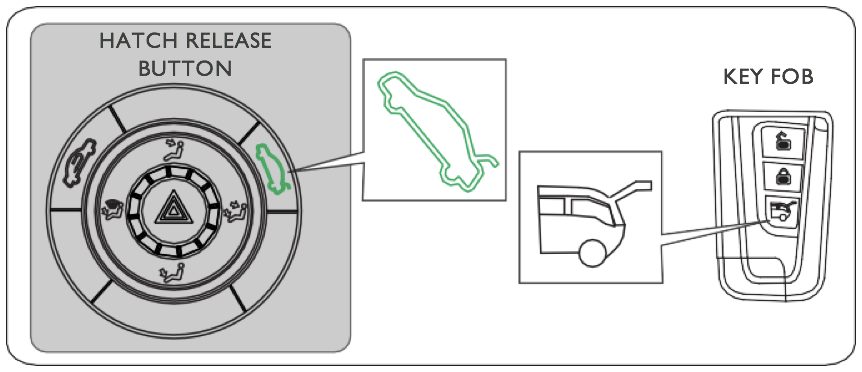
Rear hatch will not get released while driving.

Closing rear hatch:
Close rear hatch gently and push the hatch down till it locks into position with a click sound.
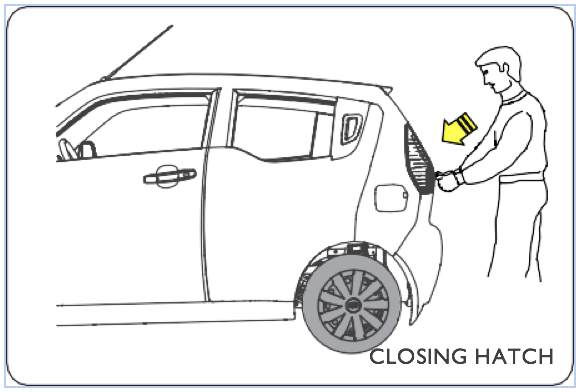
To avoid getting hurt, be careful while closing or opening the hatch. Do not drop it from a height. Push it gently downwards for closing.
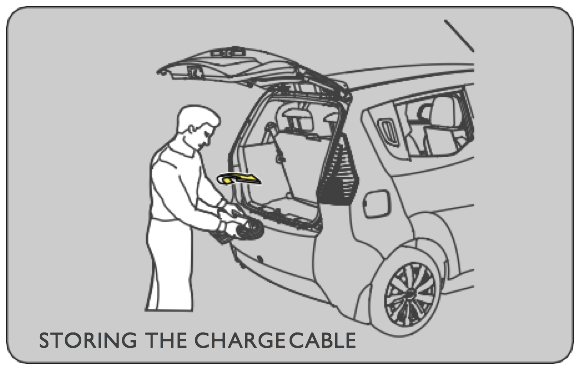
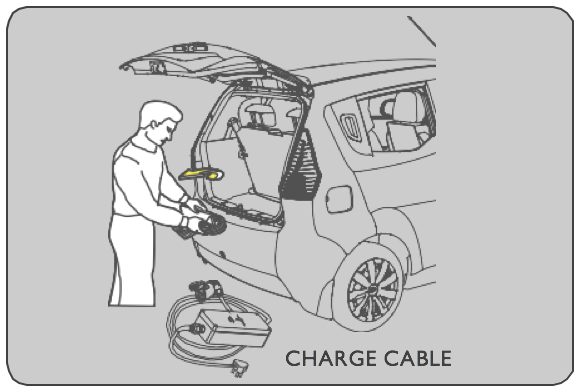
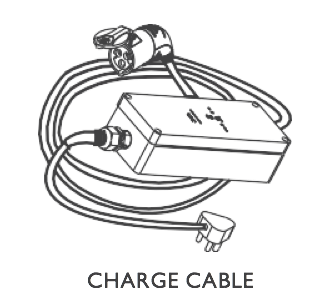
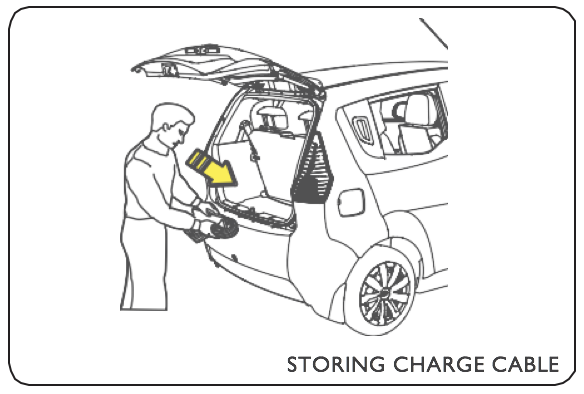
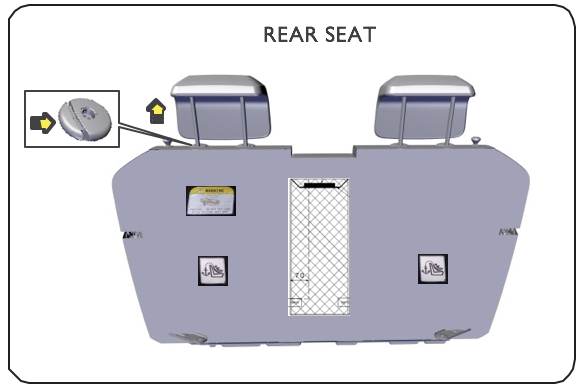
1.8 Charge cable storage
The charge cable can be stored in the area behind the rear seat.
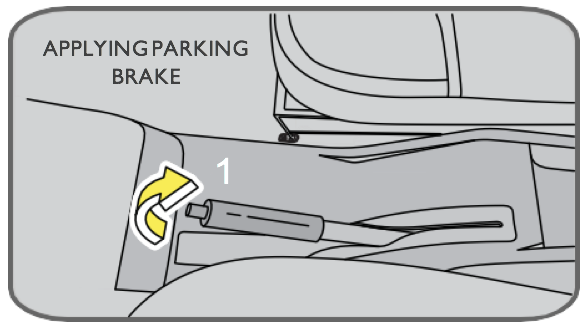
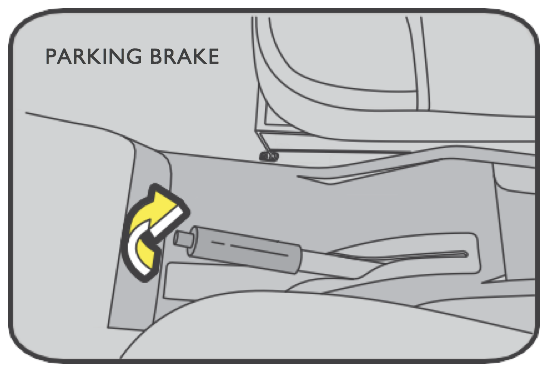
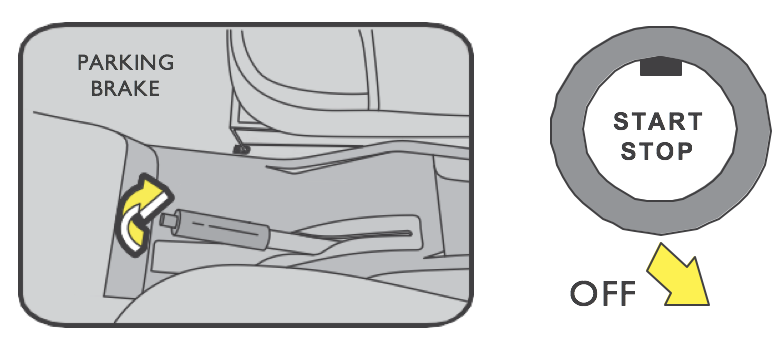
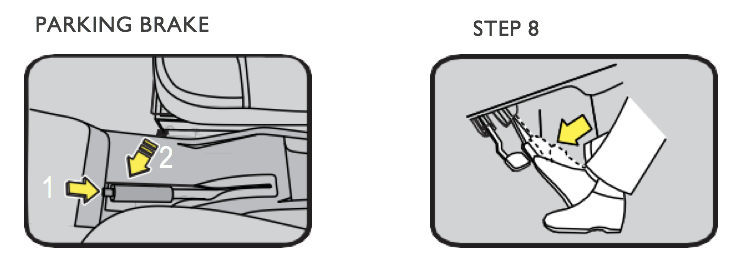
1.9 Parking brake
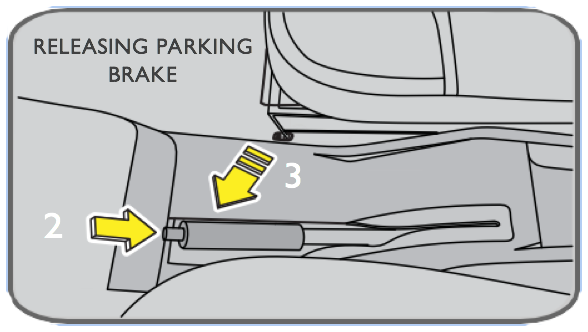
To engage - Pull the BRAKE LEVER (1) upwards. To disengage-
- Press and hold BUTTON (2) on the lever.
- Release HANDLE (3) with a slight downward push.
- Ensure that the handle is fully released before driving.
a) If the parking brake is not released while driving, a beep sound will be heard indicating the user to release it.
b) If the parking brake is not engaged and the door is opened, beep sound will be heard indicating the user to pull parking brake before exiting from the car.
As the car does not have a gear lock system, do not leave children or adults requiring special attention unattended in the car when parked on slopes with only the hand brakes on. An unintended release of the parking brake can cause the car to roll or result in an accident or serious injury.
Never drive the car while the parking brake is engaged. It reduces the performance of your car.
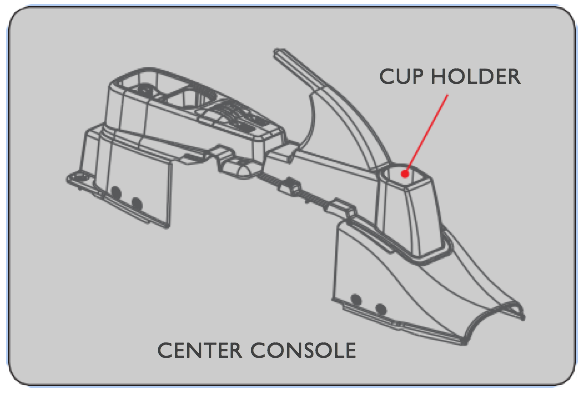
1.10 Cup holder
A cup holder is provided on center console for rear seat passenger to place a cup.
Use the cup holder carefully. Hot liquids when spilled can scald you or the other passengers. They can also result in damage to the upholstery, carpeting and electrical components.
1.11 Main components location and high voltage lines
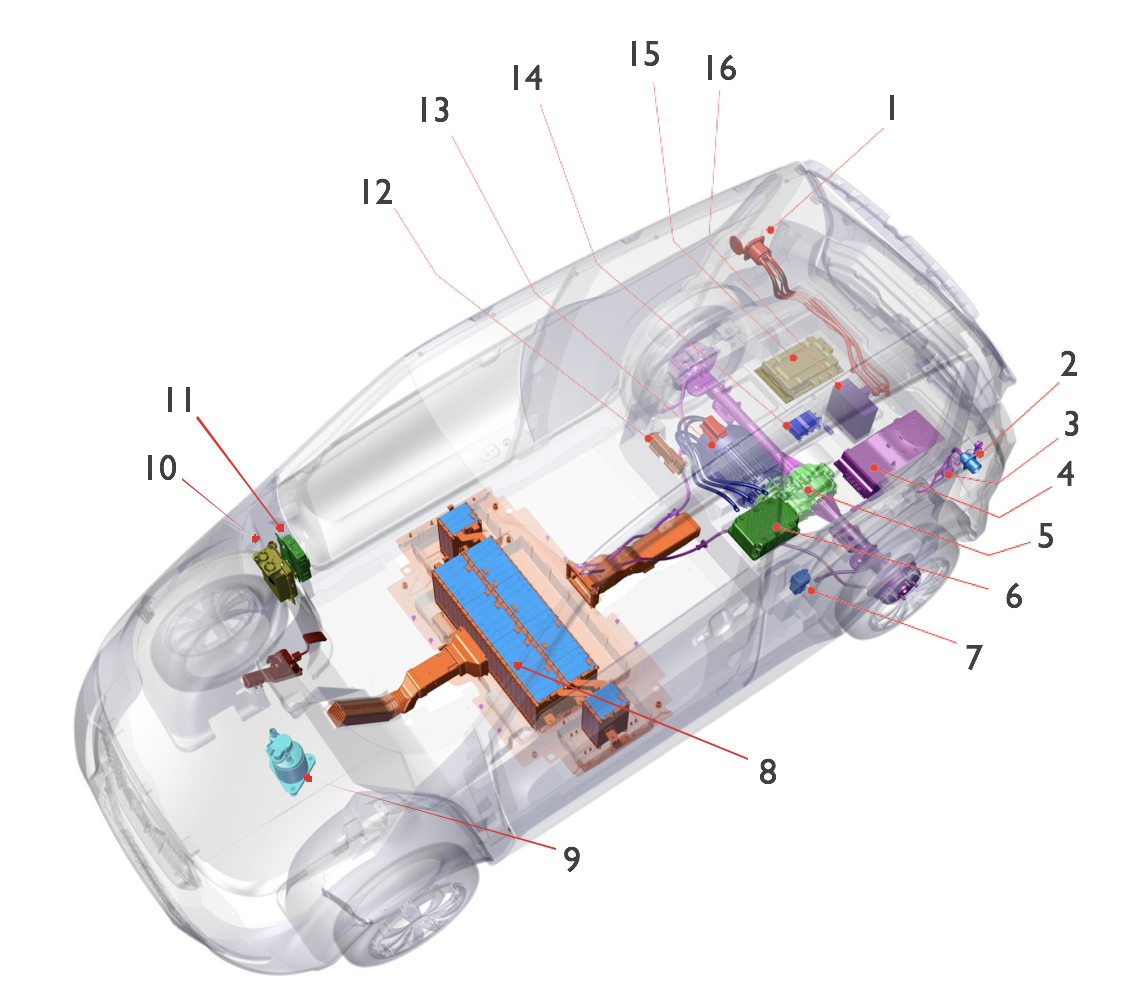
- FAST CHARGE PORT*
- NORMAL CHARGE PORT
- CHARGE PORT HARNESS
- CHARGER
- TRANSMISSION ASSEMBLY
- TRACTION CONTROL UNIT
- MAIN CONTACTOR
- BATTERY PACK
- AIR CONDITIONER MOTOR
- AIR CONDITIONER CONTROLLER
- BODY CONTROL MODULE
- DATA PORT
- DRIVE MOTOR
- TELEMATIC UNIT
- IEMS
- AUXILIARY 12V BATTERY
1.12 Cluster messages
| Short form | Full form |
| ACT RVIV | Activate Revive |
| AUTH KEY | Authenticate key |
| BAT LIVE | Battery live |
| BRK FLD | Brake fluid |
| Brake fluid | Charge car |
| CHG FALT | Charge fault |
| CHG FULL | Charge to full |
| CHG OFF | Charge off |
| CHK BRK | Check brakes |
| CHK EPS | Check EPS |
| COLD BAT | Cold battery |
| FULL CHG | Full charge |
| INACT 1 | Inactive after 1 cycle |
| INACT 2 | Inactive after 2 cycles |
| INS PLUG | Insert plug |
| KYFOB BT | Key fob battery |
| PARK BRK | Parking brake |
| PWR SAVE | Power save mode |
| REL PEDL | Release pedal |
| RVIV MOD | Revive mode |
| SAFE MOD | Safe mode |
| SHF TO N | Shift to neutral |
| UPLG CAR | Unplug car |
2. EV overview
2.1 Electric vehicle system
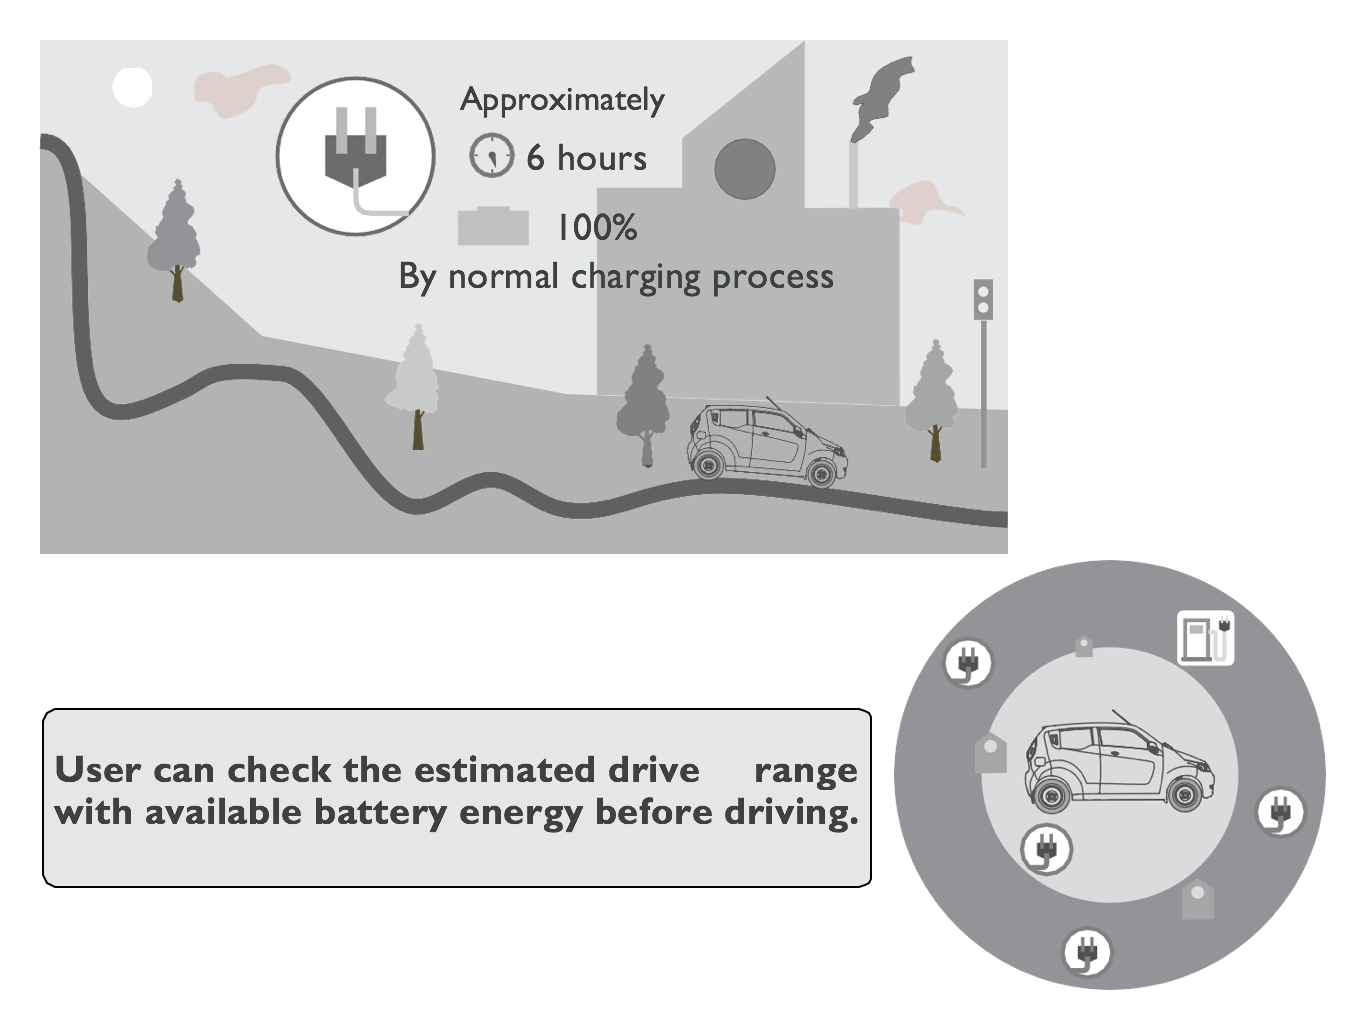
An electric vehicle operates differently as compared to an internal combustion engine vehicle as it is powered by a battery power pack. The car battery must be charged with electricity before driving it. Driving the car uses up the energy in the battery pack. The car stops when the power reduces to 0% SOC and must be recharged. The charging time depends on the state of charge of battery pack and ambient conditions. Under normal conditions (battery temperature of 30°C), full charging takes up to 6 hours.
The work functions of the car 12V systems in drive/idle and switched off modes are supported by an 12V auxiliary battery and DC-DC converter. The battery pack powers the drive motor. The car brakes are operated by regenerative electric braking with vacuum assisted hydraulic brakes.
Always check available energy for your required travel distance by checking the state of charge (SOC) and also distance to empty. Whenever the charge level goes below 5%, the last SOC bar starts blinking, indicating user to carefully drive in order to reach the destination. If charge level drops below 10% SOC, car will shift to power saving mode, resulting in reduced car performance.
The air-conditioning will be automatically turned OFF. The Revive feature can be enabled if the energy levels drop to below 10% SOC. The battery pack also gets discharged by 2.5% per day if the car is parked idle mode without usage for a long time.
Requires special attention:
- Battery performance depends on its temperature. Park your car in a warm garage to optimize driving range.
- Make sure to turn OFF the drive system before exiting the car.
- Engage the parking brake before getting out of the car.
- Do not allow an untrained person to access the
- EVsystem. In any event, please update responders about e2o being an electric vehicle.
For preventing damage to Li-ion battery pack:
- Do not expose it to very high temperatures for longer durations.
- Do not use the car battery for any other purposes. Always consult your dealer or manufacturer for help and support.
2.2 Warning
The car uses a 48-volt battery system. Some of the systems could be extremely hot before or after use. Practice caution and follow the warning labels located at several places in the vehicle.Don't try to access or remove parts/cables/connectors that can cause shock, severe burns or result in serious injury. The 48-volt cables are coloured Orange and cannot be serviced by users. For any maintenance issues, contact your authorised service centre.
In the event of an accident:
- If the car can be driven, move it off the road. Park and turn OFF the drive system.
- Check for any exposed 48-volt cables or parts.You can do so by referring to the diagram showing the voltage layout of the system. Never touch exposed 48-volt cables to avoid possible electric shock.
- In case the battery compartment floor area has been badly affected,stop at a safe location and check the floor area for any possible leak or damage that could cause a fire.
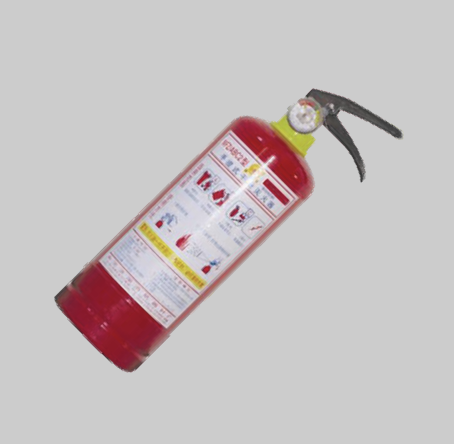
In case of a fire in the EV,evacuate immediately.
Only use ABC, BC or C type of fire extinguishers recommended for electrical fire hazards. If the car has to be towed,do it with recovery vehicle support.If the recommended fire extinguishers are not used, the drive motor may generate electricity and damage the EV components and result in a fire. In case the vehicle cannot be assessed for extent of damage, immediately contact the nearest authorised service centre or customer care executive for support. Do not touch the vehicle. If the body of the vehicle requires repair, the vehicle should be taken to the authorised service center to evaluate the extent of damage and take necessary precautions. Damaged Li-on battery modules could pose safety risks and should not be handled by an untrained technician or repairman.
The car has a sealed Li-ion battery pack. Improper disposal of battery could lead to of severe burns and electrical shock that may result in serious injury or death. It may cause environmental damage. Always dispose battery as per the local regulations.
2.3 Notes
- The car will not run on a completely discharged battery. Even at low SOC, avoid repeated acceleration resulting in more energy consumption.
- When accelerator pedal is released while driving down a slope, regenerative brakes will provide some energy to charge the battery pack. It simultaneously assists in deceleration and helps to keep the car under control.
- Brake should be applied to slow down or stop the car while driving.
- It is normal for the vehicle to emit some sounds and vibrations while driving.
- Driving in B gear mode in high acceleration will result in more power consumption and reduce your drive range.
- The drive motor makes some sound during its operation. The sound levels might go up during deceleration of the vehicle.
- The brake vacuum pump emits some sound while in operation.
- The contactor makes sound when the vehicle is switched on and authentication is successful.
- Both the air-conditioner motor and the condenser fan turn ON during the AC cooling operation.
- If the battery temperature is below 0°C or less, the battery pack will not accept charge. It is therefore, advisable to park your car in a warm garage. If the battery temperature is below -20°C, the car will not drive.It is advisable to park the car in a warm garage.
- Performance of the battery will decrease with time and usage.This is normal and does not indicate any defect in the battery pack.
- The battery pack has a specific lifespan. When its charge holding capacity reaches below a specific level, it may require an inspection from authorised service engineers. If required, you may need to replace battery pack.
- It is mandatory that during the process of battery or vehicle/components disposal,the owner should contact the authorised dealer for guidance and information on recycling or proper disposal without causing any environmental pollution.
- While driving, if the charge level drops below 20%, the car will switch to E (economy) mode limiting the drive power. If the charge level drops below 10%, the car will switch to L (limp home) mode with the PWR SAVE cluster display.This will automatically turn off the cabin heater orAC,but the blower will continue to work.
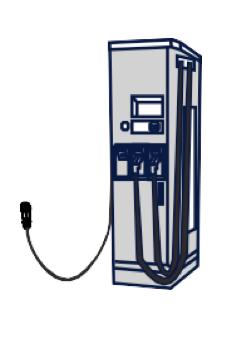
2.4 Types of charging
| Charging Type | Charge Port |
Charge Connector |
Power Port |
Input Supply | Estimated Charge time |
| Normal charging |  |
 |
 |
Use input of 16 Amps 230V supply with proper electrical earthing. | Approximately 6 hours from empty to full at 30°C of battery temperature. |
| Fast charging* | 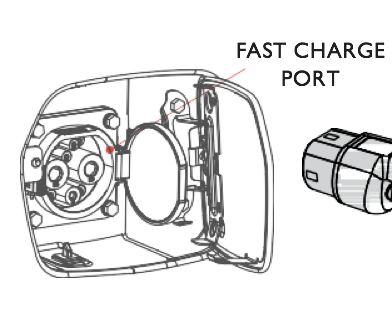 |
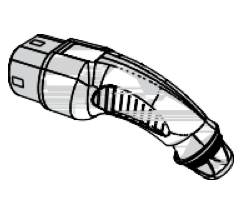 |
 |
Compatible public fast charging stations. | Approximately 1hour 15 minutes from empty to 95% SOC (At 30°C). |
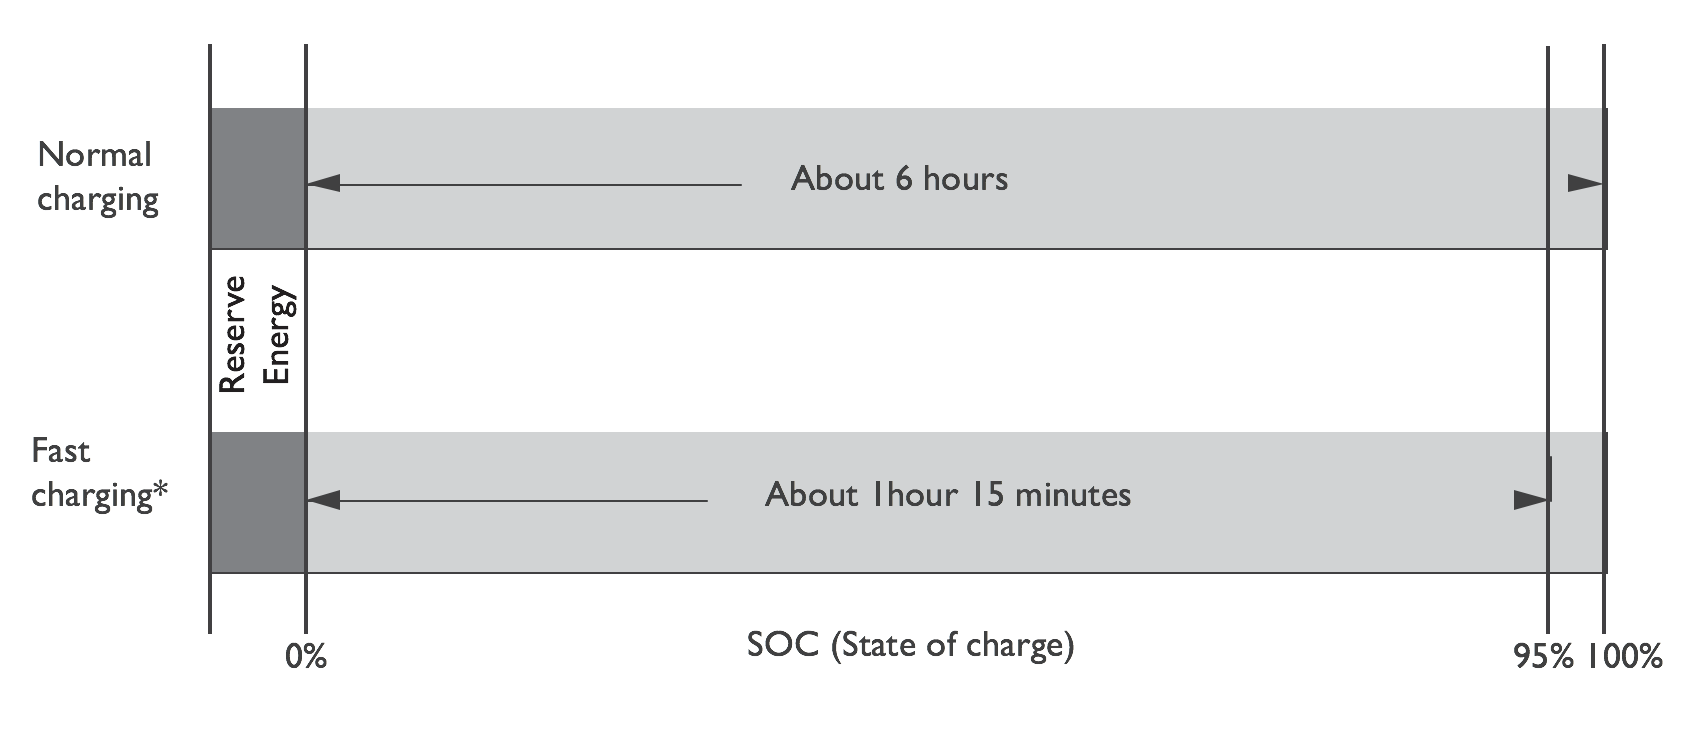
2.5 Charging duration
2.6 Before driving
The state of charge can be checked with the mobile app enabled in your smart phone to check the available energy is sufficient for your drive.You can pre-condition the car cabin with remote air conditioning.
For more information, refer the "Air Conditioning Systems" section on page 68
.2.7 Parking your car
When you finish driving, shift the gear lever to N mode, turn OFF the SSB switch and apply the PARKING BRAKE.If the parking area is equipped with a charging facility, you can plug in your car.
2.8 Efficient usage of your car
The driving range of your car depends on the state of charge, weather, temperature, usage, driving style, geographical topography and the age of the battery power pack.
2.9 Optimizing drive range
The estimated drive range at 100% charge of a new battery power pack is approximately 110 kilometers at 30°C of battery power pack temperature in F mode without any accessory usage under standard test condition. Your actual drive range can vary as the battery power pack ages, and depending on the usage pattern and driving style. Most users experience a drive range between 80 to 110 kilometers under normal driving conditions.On tips to get good drive range,refer to the "Extending Driving Range" section on page 92.
Factors influencing the driving range
The drive range depends on some of the factors listed below:
- Vehicle speed
- Vehicle pay load and tyre pressure
- Electrical load from accessories
- Road condition and traffic
a) Always drive in the‘F’ mode.
b) Get the wheel alignment checked at recommendedperiodic intervals.
c) Precondition your car cabin while vehicle is plugged-in for charge.
2.10 Battery life and performance
Due to battery characteristics, the performance of the e2o's battery power pack will decrease with usage, surrounding environment, actual usage pattern and ageing resulting in a reduced estimated drive range.This is normal and does not indicate a malfunction / defect in the vehicle system or the battery power pack.
The charge holding capacity can also be affected by usage pattern, vehicle storage conditions, battery operation temperature.
It is recommended that you:
- Store your vehicle in a warm location when the ambient temperature is cold (less than 10°C).
- Always use normal slow charging to maintain battery life and performance.
- Allow overnight charging once in 3 charge cycles.This will ensure optimal battery performance and to avoid stopping of car at lower charge levels.
2.11 Battery protection mode
The car is equipped with a Battery protection mode that prevents deep discharge of the battery power pack. The conditions for the Battery protection mode being enabled are as follows:
- Whenever the charge level of the battery power pack falls below 12% SOC and is idle for next 24 hours with the key OFF.
- Whenever the charge level of the battery power pack goes down to 0% SOC and the car is idle for the next 2 hours with the key turned OFF.
- The user has enabled the Revive feature in the current drive cycle and has not plugged in the car for charge after 2 hours of idle time.
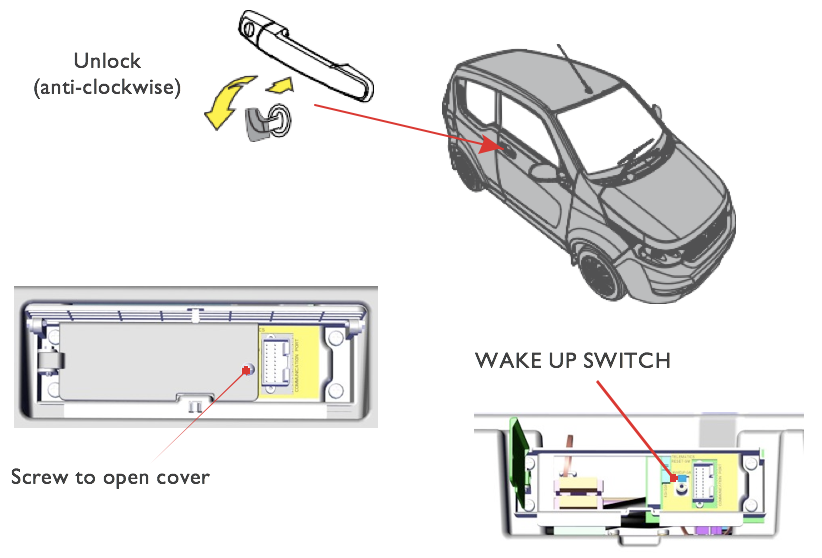
Follow the steps given below to wake-up car from battery protection mode:
- Use the manual key from key fob and open the driver side door.
- Lift the data port cover upward (located behind driver seat, under the rear RH passenger seat) and unscrew by screw driver to open the cover.
- Press and hold WAKE UP switch for 10 seconds until you hear relay sound.
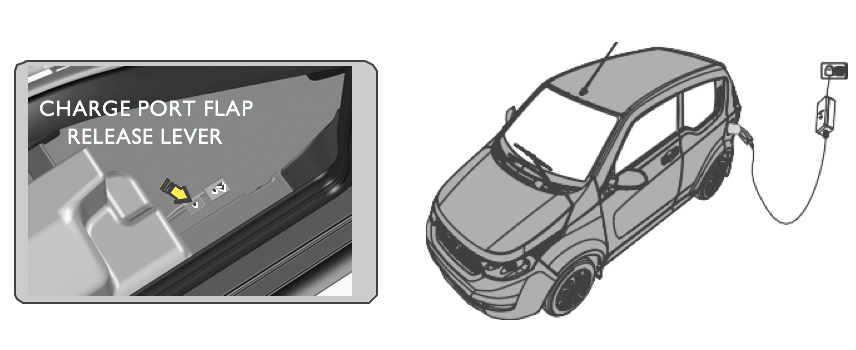
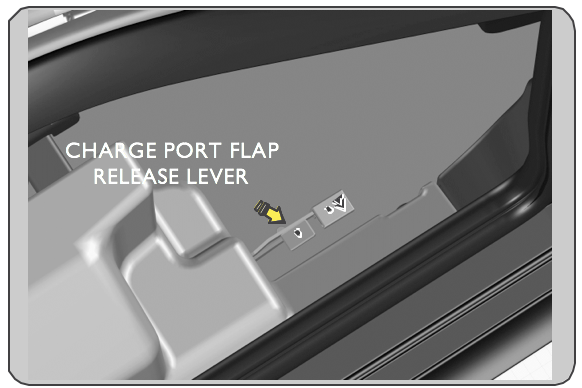
- Open the charge port flap by pulling the charge port release lever located near the driver seat on floor.
- Open the rear hatch and take out the charge cable in vehicle and then put on charge to 100% before driving your car.
2.12 Immobilizer / 2.13 Energy saver feature
2.12 Immobilizer:
The car will be immobilized after the car doors get locked with the Key fob. In case of an unauthorised entry into the car without unlocking with the Key fob,all indicators (hazard indication) will start flashing for 30 seconds unless it is unlocked again using the key fob.
2.13 Energy saver feature:
The car is equipped with ‘Energy Saver Circuit’ that activates and turns off power supply to few of the car components after10 minutes there by conserving the car battery energy. If you want to operate any accessory while sitting in car, push start switch to ON position to disable this feature .
3. Charging
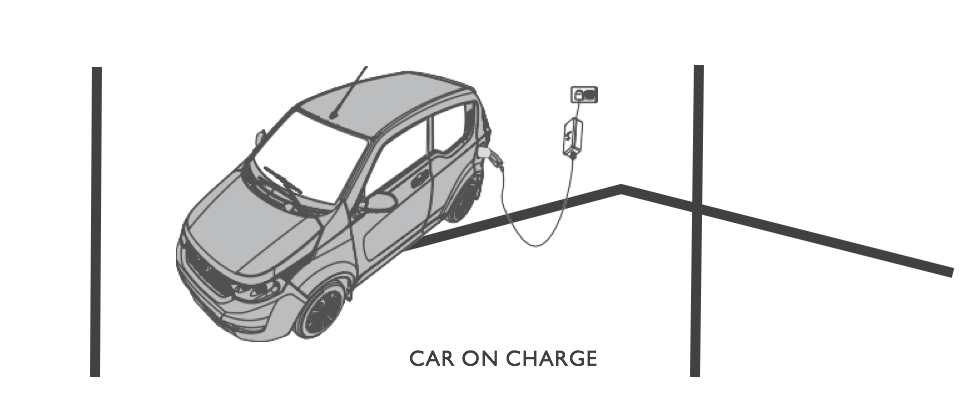
3.1 Vehicle charging
The battery power pack has to be charged once the energy in it is depleted.There are two ways to charge the battery power pack:
- Normal charging
- Fast charging* (if available)
The time taken to charge the battery pack depends on many factors such as the state of charge, the ambient and battery temperature.The charging time, therefore, is an estimate and may vary depending on the aforementioned conditions.
- If you use any medical devices such as a cardiac pacemaker or a cardiovascular defibrillator, please check with the supplier or manufacturer on concerns of effects that the EV charging or discharging system might have on the device.
- It is also advisable not to stay inside the car or access it during the charging process as it may affect the functioning of the electric medical device resulting in serious injury.
- Do not drag the charge cable or store it close to any heat source.
- Make sure that there are no foreign particles or water traces in the charge plug or port as it can result in electric short circuit or shock causing serious injury. Do not touch metal contacts on cable.
- Ensure that the power supply is turned OFF before accessing charge cable.
- Do not handle the charge cable or port with wet hands as it may cause electric shock resulting in serious injury or death.
- Do not pull or twist the cable and always remove it by holding the charge cable handle after switching OFF.
- Do not modify the cable as it may cause fire hazard.
- If you observe an unusual odor or smoke coming from vehicle, immediately stop charging.
- Always make sure that the charge cable is disconnected from vehicle charge port before driving.
- Charging may affect the operation of worn or implanted electric medical devices and could result in serious injury or death.
3.2 Types of charging / 3.3 Normal charging
3.2 Types of charging
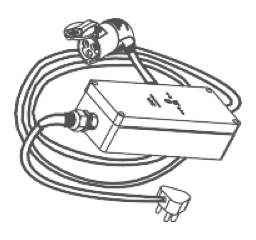
The vehicle can be charged using a charging cable provided with car at home or at work.
Always use the charging cable provided with car while charging. A normal full charging cycle takes approximately 6 hours at the ideal battery pack temperature.
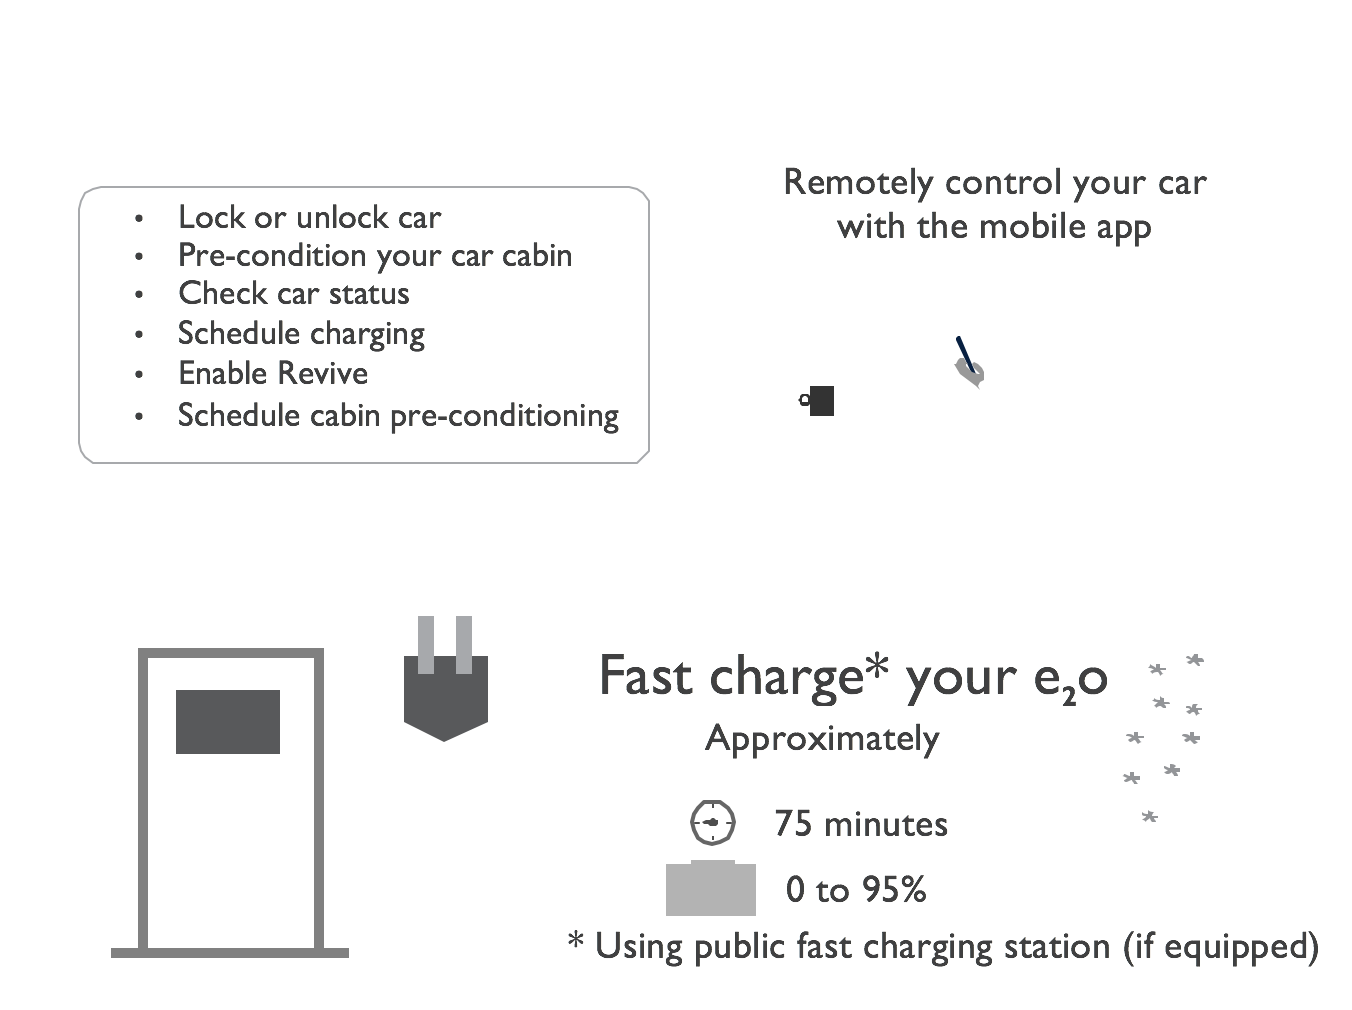
Fast charger allows you to charge the battery power pack quickly from 0% to 95% energy level in 1hour 15 minutes at the ideal battery pack temperature.
Fast charging cannot be done at home.It can only be availed at 'Fast charge' stations available exclusively for suitable electric vehicles equipped with compatible charge cables. It is recommended to use Fast charging only during emergency.
For more details, refer "Fast charging" section on page 35.
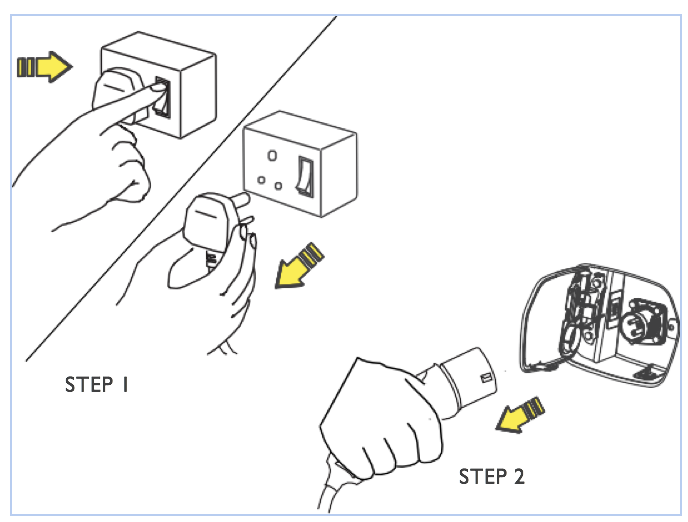
While you plug in the car for charging after a drive, always connect the charge cable to plug point and then charging port after stepping out of the car, then turn on mains to start charging.
3.3 Normal charging
Charging your car is safe and easy and can be done in 5 simple steps:
Step 1: Apply the PARKING BRAKE, press start switch once to switch OFF.
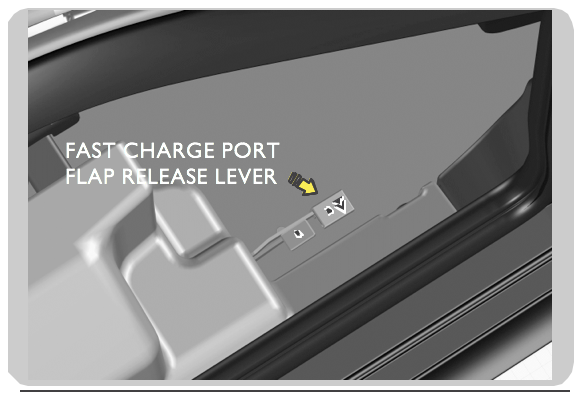
Step 2: Pull the charge port flap release lever to open.
Step 3: Open the rear hatch to take the charge cable from car located behind rear seat and close rear hatch.
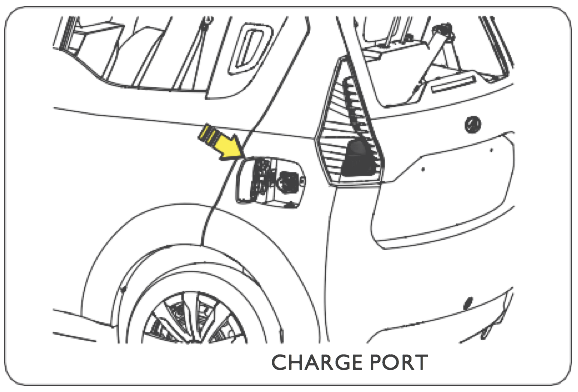
Step 4: Plug in one side of charge cable to vehicle charge port. Ensure the handle is pushed in completely.
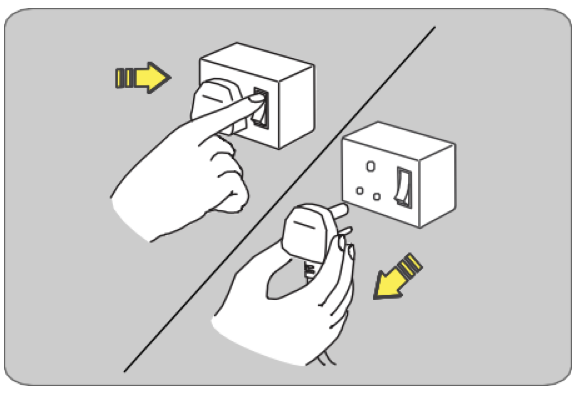
Step5: Plug in other end to plug point and turn ON the power supply switch to enable the charging process.
Before installing the plug point (16A, 230V AC), get your house electrical wiring verified by an electrician. This will prevent any power trips due to overload and ensure a safe fitment.
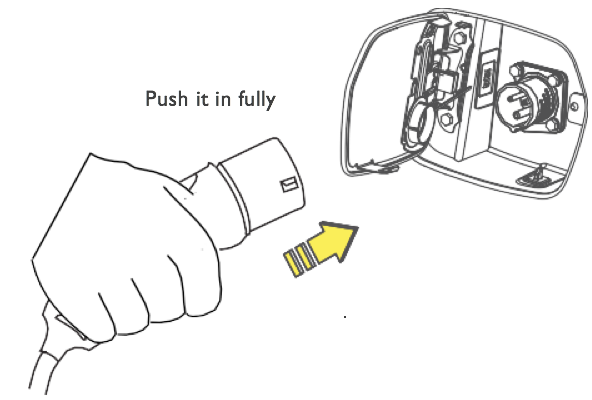
Ensure that charge cable handle is fully pushed in to the vehicle charge port and then insert other end to plug point before starting the charging process.

Once you connect and plug it in on both sides,turn ON the power supply. The charging message and blinking charging light will be displayed on the cluster.
The charging light on the cluster turns solid once the charging is complete. After the vehicle battery power pack is fully charged, turn off power supply at plug point to disconnect. Remove the charge cable from plug point and then from onboard charge port.
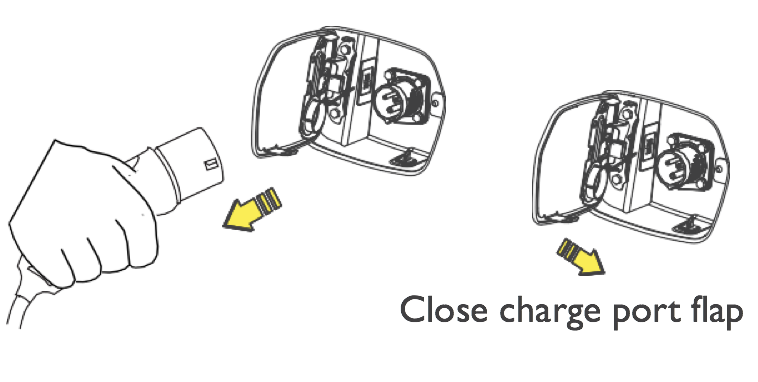
Close the charge port flap till it locks. Roll and keep the charge cable back in the storage area behind the rear seat.
.
Always charge car to 100% state of charge and once in 3 days leave the car plugged in for overnight, by doing this, the car battery pack will get balanced and improves life, performance.
3.4 Charge duration
Time taken for charging can go up to 6 hours from level zero. It takes up to approximately 6 hours for a 100% charge (given the temperature of the battery power pack is 30°C at the time of charging). After charging, the power pack will internally start cell balancing for about 4 hours. This process optimises the battery power pack's life and performance.
Charging duration may vary:- If the battery power pack temperature is above 30°C at the time of charging. It will take more time for a full charge and will not charge if it is more than 45°C.
- If the battery power pack temperature is below 0°C, the car will not charge. It is therefore, advisable to keep your car in a warm garage.
- The battery balancing will start after 100% charge in plugged condition and takes up to 4 hours.
- There is no indication on cluster while the battery cell balancing is in progress. Allow car to remain on charge for 4 hours post a full charge cycle (indicated by 100% SOC and solid charge light).
3.5 Ideal time to charge
The vehicle can be charged anytime with available charging facility. However, charging the vehicle during a specific time does have its advantages:
- Normally most of requirements for city mobility are during daytime. Charging at night will not interfere with daily travel plans.
- At night the ambient temperature is lower and ideal for charging.
3.6 Intelligent charging system
The vehicle has an Intelligent Energy Management System [IEMS] and Battery management system [BMS] that controls the energy flow from mains to the battery pack through the on-board charger. This optimises energy consumption while charging the battery pack. If there is a voltage fluctuation or an interruption in the main power supply while charging, the system resumes from the point where it paused charging.
RCD display :
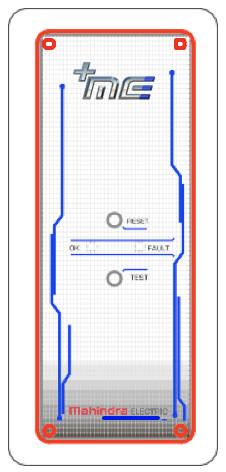
OK LED : Green LED light indicates normal charging and healthy earth in charging circuit.
Fault LED : Red LED light indicates fault in charging circuit for under or over voltages and earth leakage, current trip.
Reset Button: In event of earth leakage or any other faults it will trip. Press to reset after rectifying the issue.
Test Button: Press to evaluate healthy condition of electric power supply once in a while if cable is being used sparingly that also shows cable is working OK or faulty.
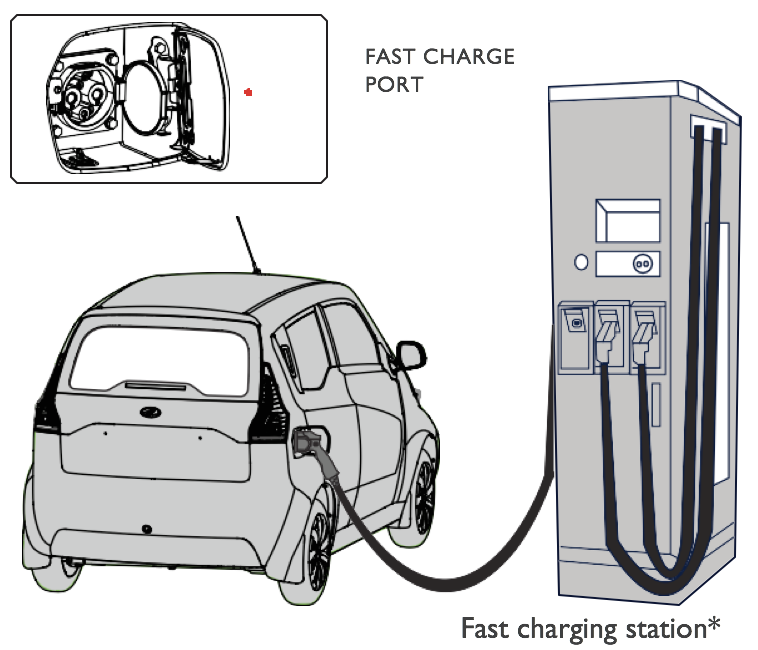
3.7 Fast charging*
The car if fitted with a fast charging port which uses high DC (current) supply for charging.This can be done only at a public fast charging station.
Fast charge can be done in the following steps:
- Check for public fast charging station availability in the region.
- Park the car next to the fast charging station and ensure that the STOP button is turned OFF.
- Open the fast charge port flap by pulling the release lever located next to the driver side seat.
- Take the fast charge cable from station. Open the charge port flap, Insert the connector with a slight push into the car's fast charge port.
- If equipped, set the charging time and press START button on fast charger based on requirement.
- The car will charge as per charge settings selected at the time of charging.
- Once charging is complete, turn OFF power supply, unplug the charge cable from the car and dock the cable back to the fast charge station.
- Close the fast charge port flap and flap till it locks.
3.8 Fast charge duration
- Normally charging by this mode takes approximately 1hour 15 minutes from a level zero charge to 95% of energy level with an ideal battery power pack temperature of 30°C.
- The charging time will be more if the battery power pack temperature is between 0°C and 15°C or more than 30°C.
- Fast charging will not take place if the battery temperature is below 0°C or more than 45°C.
- If you use fast charging often, ensure that you allow a normal overnight charge once in 3-4 days for the batteries to balance and be optimised.
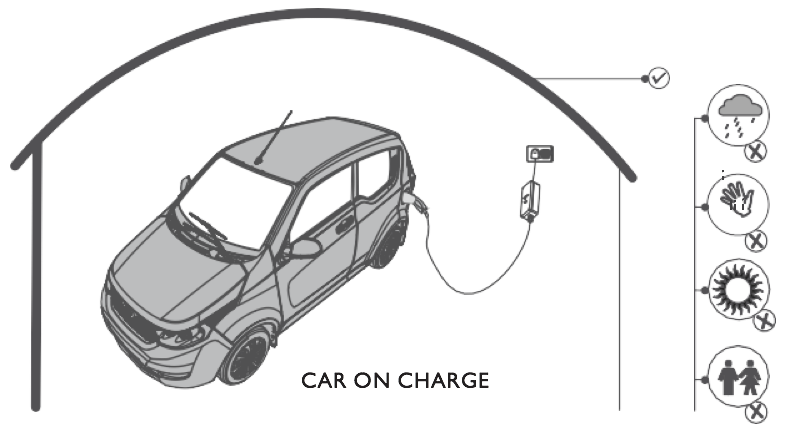
3.9 Charging precautions
- Always use the charge cable purchased with your car for charging.
- Do not charge your vehicle, if the power socket and / or charge port are exposed to rain or water.
- Do not plug in charge cable with wet hands.
- It is recommended not to charge your car in direct sunlight.
- Make sure that children are at a safe distance from the vehicle charge port and external charge ports, while charging.
- The car should be disconnected from the power source before carrying out any maintenance services.
Always carry suitable charge cables in the car.They are useful when you have to charge your car off-site or in public charging locations. Carry suitable or compatible adapters in the car at all times. These help connect your charge cable to public charge ports.
3.10 Charging high voltage lines
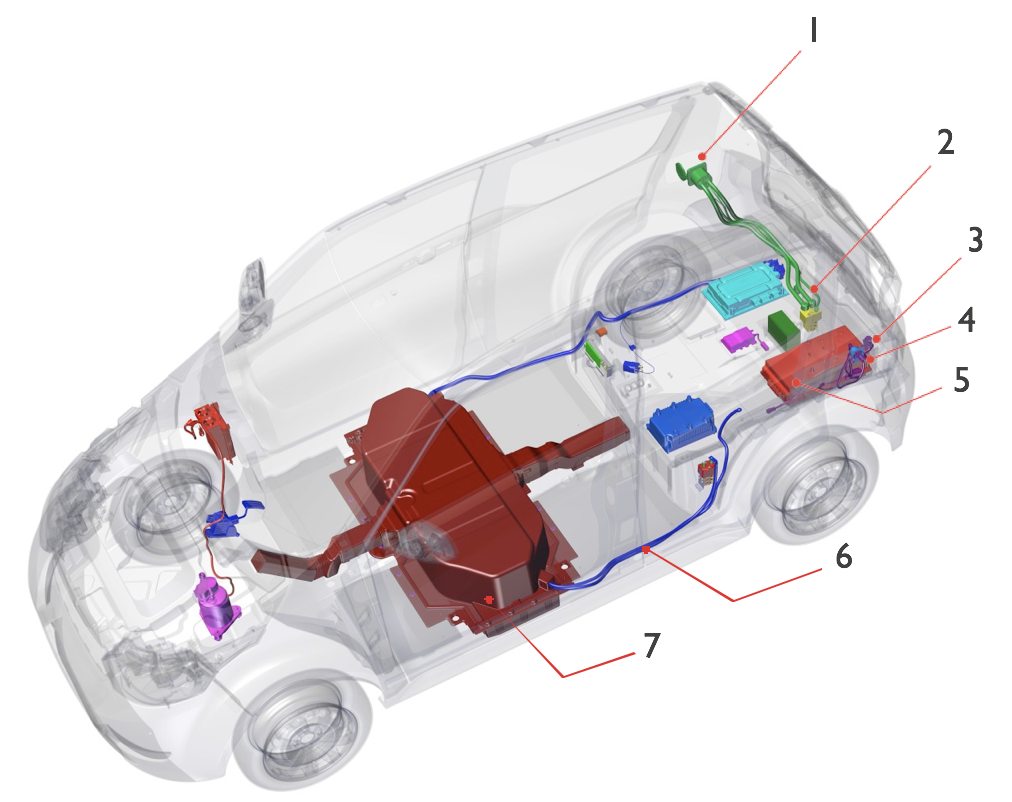
- FAST CHARGE PORT
- FAST CHARGE CONTACTOR
- CHARGE PORT HARNESS
- NORMAL CHARGE PORT
- CHARGER
- 48V POWER CABLE
- BATTERY PACK
3.11 Charging troubleshooting
| Problem | Possible cause | Remedy | |
| 1 | Charge light does not switch ON and the INS PLUG message is displayed |
|
|
| 2 | Temperature light is on while charging. |
|
|
| 3 | The car does not charge with CHG FALT cluster message. |
|
|
| 4 | TURN MAIN fault |
|
|
| 5 | FULL CHG message on cluster for one minute in drive. |
|
|
3.12 Charge point requirement
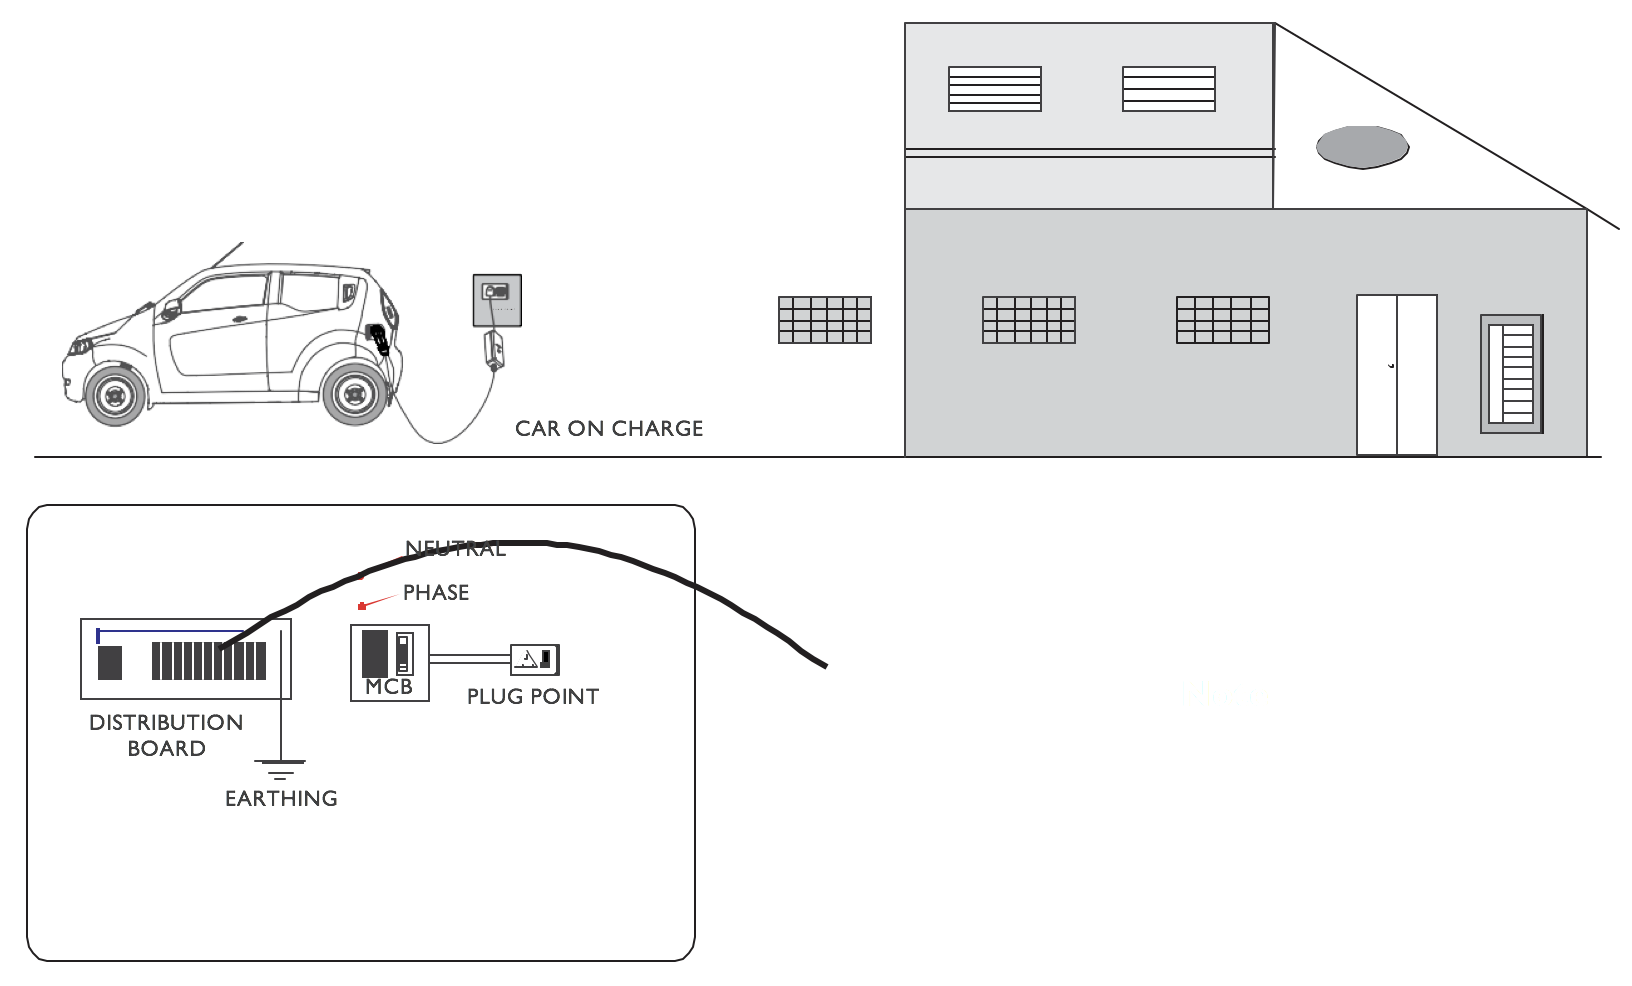
Charge point specification:
Power requirement: 3KW, single phase Plug socket: 230 V, 16 Amps AC
Wire thickness: 2.5 sq. mm for 25 meters length
Grounding requirement: <3V between Neutral (N) and Earth (E)
Safety: Power source should have MCB and good earthing.
4. Seats, seat belts and CRS
4.1 Warning
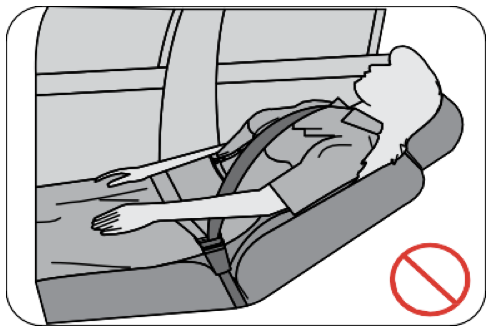
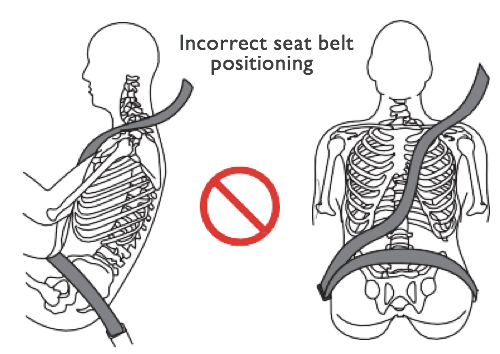
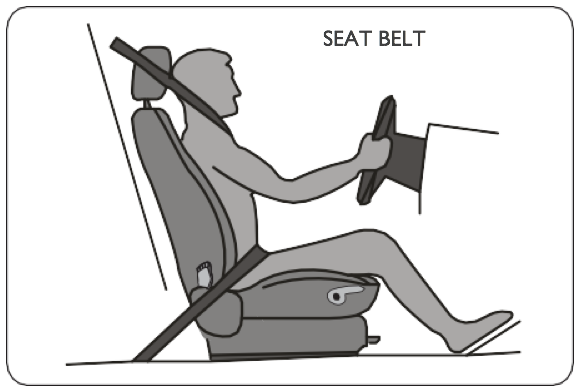
Riding in a moving vehicle with the seat back reclined can result in serious injuries in a collision, as you could slide under the lap belt or be propelled into the seat belt. Ensure your seat back is reclined no more than 30 degrees when the vehicle is moving.
While driving, the seat should be upright. You should always sit back into the seat with both feet firmly planted on the footrest. Adjust the seat belts properly.
- Ensure that seat is securely locked after adjustments by gently rocking the seat forward or backward.
- Never leave children unattended in the vehicle. They may unknowingly activate controls or switches that could result in serious accidents.
- Never recline the seat backrest more than required as it can cause serious injuries in a collision or sudden braking.
Headrests are adjustable and supplement other vehicle safety systems.They provide additional protection during front and rear collisions.Check the adjustment every time and readjust if the seats have been used by someone else. Failure to do so could increase the risk of serious injury or reduce the effectiveness of your drive.
Never attach anything to the stalk of the adjustable headrest.
4.2 Seat adjustments
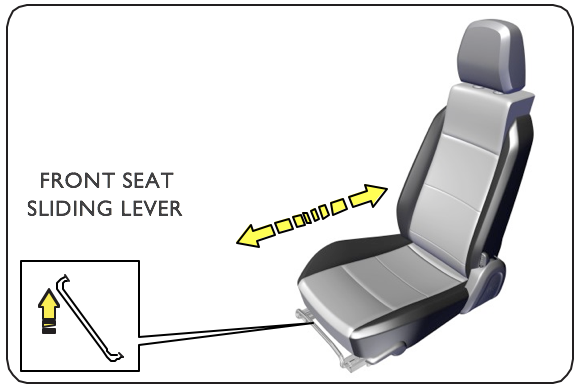
A LEVER is provided under the upper front side of the seats for adjusting the front seating position. Pull the LEVER up. Hold it and slide the seat forward or backward as required. Release the LEVER to lock.
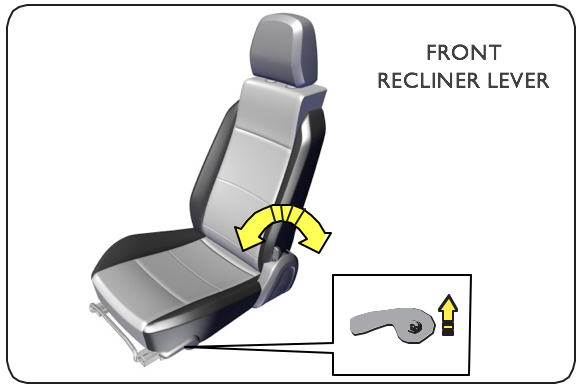
The RECLINER LEVER at the side of the front seats helps adjust the front seat position and rear backrest. Pull the RECLINER LEVER upwards to align to the desired position and release it to lock.The RECLINER LEVER is located on right-hand side for driver seat and on the left-hand side of the passenger seat.
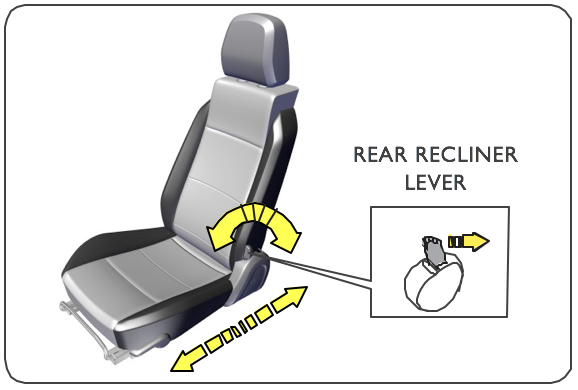
4.3 Rear recliner lever
Rear reclining lever of seats can be accessed for reclining and sliding of front seat. To do so:
- Pull up REAR RECLINER LEVER of the front seat provided at the side.
- The front seat will slide and the seat rest will recline forward.
- Make sure the front seat is returned back to its normal position before driving.
The vehicle rear seat should not be folded and used as additional luggage space. Doing so may result in serious injury or damage.
4.4 Seat belts
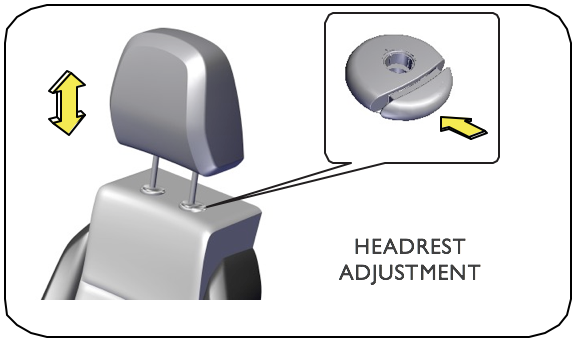
Press the HEADREST LOCK and pull the headrest to adjust.
Position of seat backrest should always be in an upright position when driving, or seat belt effectiveness may be reduced. Always adjust seat before start of drive. Never attempt to adjust seats or belts while driving.
4.4 Seatbelts
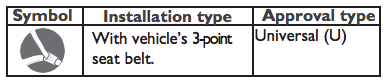
Both the front and rear seats are fitted with 3-point safety belts with retractor for maximum protection from any inadvertent event.
The front seats are of ELR (Emergency locking retractor) type. In emergency situations or a collision, the retractor instantly locks securing the occupant and preventing injury.
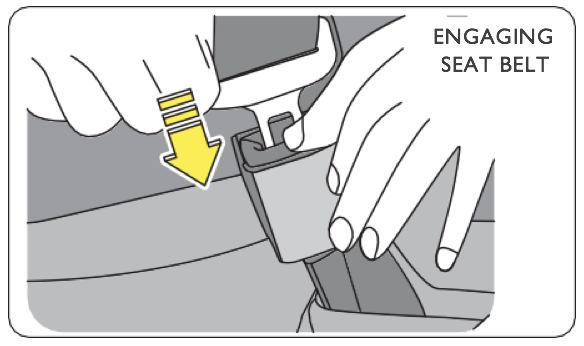
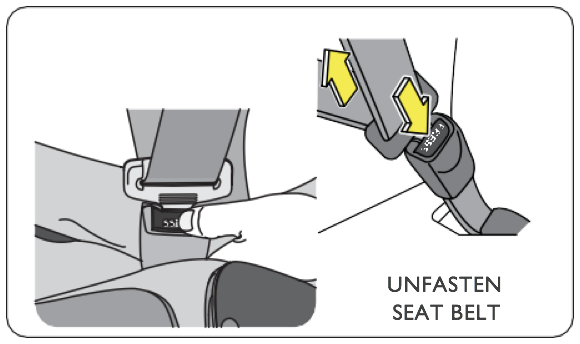
To engage seat belt insert the latch plate into the buckle till you hear a click and the latch engaged. Make sure the belt is securely latched, not twisted and the seat belt indicator near cabin light is OFF.

For safety precautions, ensure that the seat belts are fastened properly before driving. If they are not, the warning light will turn ON.
It is dangerous to drive without the headrest.
To unfasten belt, press the RELEASE button on the latch buckle.
The rear seat belts are of ALR (Automatic locking retractor) type that works both as ELR and ALR but has a switchover point indicated by a 'click' sound as you pull the seat belt. Sit upright, adjust the belt length and the latch buckle.
4.5 Headrest
The adjustable headrest is an add-on restraint system along with other safety systems in vehicle. The headrest can be adjusted for height with help of the button located on it. Press and hold the button to adjust. Pull the headrest upward to a level that you are comfortable in and to lower, push it down.
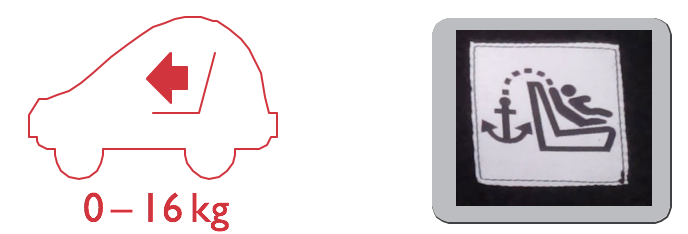
4.6 Child restraint system (CRS)
The car is equipped with a 3-point belt at front passenger seat and anchoring with 3-point seat belts in the rear seat for mounting child safety seats.
| Mass group | Seating position | |
| Front passenger | Rear LH or RH | |
| Group 0 (up to 10 kg) | U | U |
| Group 0+ (up to 13 kg) | U | U |
| Group I (9 to 18 kg) | U | U |
| Group II (15 to 25 kg) | U | U |
| Group III (22 to 36 kg) | U | U |
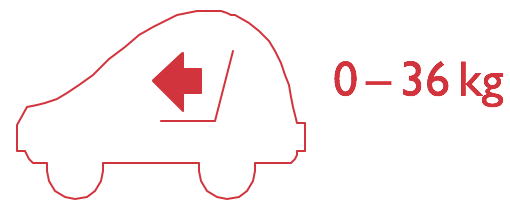
The table above gives information on the seats approved for child safety with different weight classes ranging from 0 kg to 36 kgs. Refer to user instructions provided along with the child safety seat for mounting it properly with seat belts.
Following seating positions on e2o comply with the prevailing Indian CMVR regulations respectively to install a child restraint system:
- Co-driver seat (LH or RH)
- Rear RH seat
- Rear LH seat
You can use child safety seat as follows:
| In the direction of travel | Yes |
| With 3-point belt | Yes |
| With fastening points (between seat surface and backrest) plus3-point belt- Rear seat | Yes |
| On front passenger seat | Yes |
| On Rear seat | Yes |
Read the following instructions carefully before fixing the child restraint system to the seating position.
- Always use child seats facing in the direction of travel.
- Always slide the passenger seat back fully and mount the child safety seat.
- Use 3-point seat belt for mounting child safety seat on the passenger seat.
- Ensure that the car seat belt is not twisted, this affects the effectiveness of the restraining system.
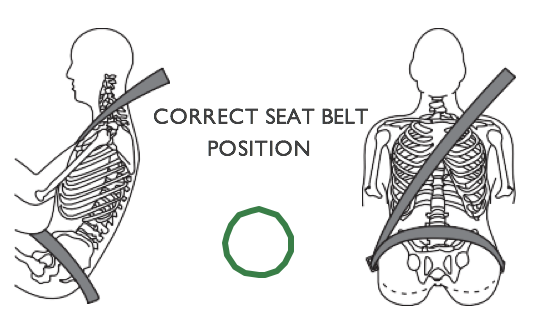
- Lap belt must lie as low as possible over the child's hips on both sides.
- Diagonal seat belt must run diagonally backward.Do adjust the course of the belt with the car's adjustable belt defector.
- The diagonal belt must never be directed forward to the belt defector on car.If it is so,use the child safety seat on rear seats only.
Child seat seat mounting
The child seat is not installed permanently in the car.It is simply secured together with your child using the car's front passenger 3-point seat belt.
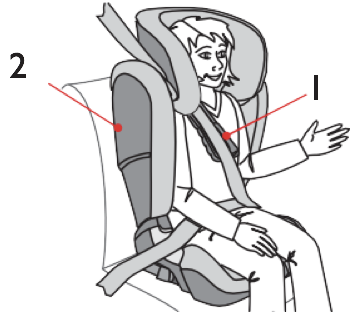
- Carry out steps for adjusting headrest (page 45).
- Place the pad 1 to the side of the child safety seat closer to the car door.
- Place the child seat on the front passenger seat. Ensure back rest 2 is compactly against the back rest of the passenger seat.
- Secure the child seat by strapping using the front passenger seat belt as shown in the figure.
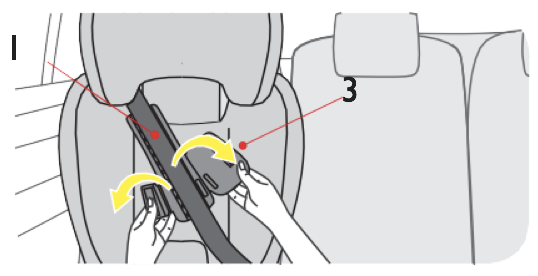
Unfastening your child
- To unfasten your child, press the RELEASE button of the seat buckle.
- If equipped, open the velcro fastener 3 and remove diagonal belt 1 .
- If the headrest of the car seat gets in the way, turn it the other way.
- The child seat should be securely fasted and lap belt should run in the belt guides on both sides of the seat.
- The diagonal seat belt on the side of car is seat belt buckle that runs backward through the belt guide of the seat cushion and is not twisted.
If your child tries to open the car belt buckle, stop immediately. Check whether the child safety seat is correctly fastened and ensure that your child is properly secured. Explain your child the dangers associated with his / her actions.
Please read these instructions carefully and keep them in the car storage compartment at all times. These instructions must be shared with third parties when the car is passed on to others.
- For the safety of your child:
- In the event of an accident or a collision at the speed of more than 10 Km/hr, the child safety seat may be damaged without the damage being immediately visible. The damaged child safety seat should be replaced and disposed of properly.
- Check the child safety seat as a rule for any damages, for example ,if it falls to the ground.
- Regularly check all important parts for any damage.
- Never lubricate or oil parts of the child safety seat.
- Never leave your child unattended in the child safety seat of the car.
- Always let your child enter into and exit from the car from the side pavement.
- Protect the child safety seat from direct sun light as long as it is not in use.The child seat can become very hot under direct sun light and can injure the child.
- Ensure that all passengers in the car have their seat belts fastened.
For the safety of your child, before every journey check if:
- The child safety seat is secured properly.
- The lap belt runs in the belt guide on both sides of the seat cushion.
- The diagonal seat belt section is on the side of the car and the seat belt buckle runs through guide of seat cushion.
- The cross seat belt section runs diagonally backward.
- The straps are tight and not twisted.
- Never use the child safety seat for free standing, not even for test sitting.
- When swiveling the backrest, ensure that nothing comes between backrest and the seat cushion.
- To avoid damage, ensure that child safety seat is not jammed between hard objects (car door, seat rails, etc.).
- Keep the child safety seat in a safe place when not in use. Do not place any heavy objects on the seat and do not store it next to direct sources of heat or direct sunlight.
- Seatbelt is equipped to be used by one person only. Never use seat belts for more than one occupant.
- Make sure you remove any hard or breakable objects from your pockets, if any, before wearing seat belts.
- Ensure seat belts straps are not twisted while in use.
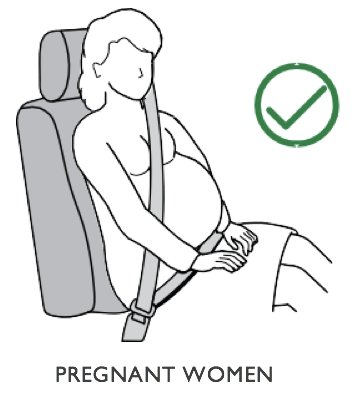
- Pregnant woman are recommended to wear seat belts for protection. Please consult your doctor for any specific recommendations. Never attach a seat belt over a child or infant in the occupant's lap.
Pregnant woman should wear lap belt snugly and as low as possible over the hips. Shoulder belt should be worn across shoulder but never across the abdomen area.When worn properly, it will protect both mother and fetus in any event of a collision or an emergency stop.
The child safety seat must always be secured when it is in the car, even when there is no child is in the car.
DisposalPlease refer to the waste disposal regulations in your region.
5. Instrument cluster and controls
5.1 IP cluster
- LH TURN INDICATION LIGHT
- CHARGE INDICATOR LIGHT
- PARKING AND LOW BRAKE FLUID LIGHT
- HIGH BEAM LIGHT
- LOW BEAM LIGHT
- PARKING LIGHT
- EV WARNING LIGHT
- ANTI THEFT LIGHT
- GEAR INDICATION
- SET BUTTON
- TRIP AND ODO METER
- DIGITAL SOC
- SOC BAR
- TIME TO CHARGE / DISTANCE TO EMPTY
- MODE BUTTON
- DRIVE EFFICIENCY GAUGE
- SERVICE LIGHT
- TEMPERATURE LIGHT
- LOW AUXILIARY BATTERY LIGHT
- SPEEDO METER
- DOOR OPEN LIGHT
- SEAT BELT INDICATOR LIGHT
- CLUSTER MESSAGE DISPLAY
- RH TURN INDICATOR LIGHT
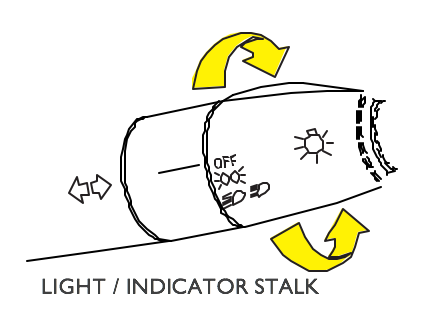
5.2 Headlights
The stalk lever operating headlight has 3 positions:
- OFF- All lights are OFF.
- Middle Position- Front parking lights, tail park lights, license plate lights and the dashboard back light is turned on.
- Third Position- Headlight (HI or LOW) beam turns on with other middle position lights when lever is turned on to HI or LOW position.
I. Parking light
Rotate the knob on the lighting stalk to first position to turn ON the PARKING LIGHT.

II. Low beam / High beam
- Rotate the knob to the next position to turn the headlights ON.
- For high (HI) beam, pull the LEVER upwards till you hear a click, then let go.
- To flash high beam, pull the LEVER slightly towards you and release it quickly.
- For LOW beam push the LEVER downwards till you hear a click.

III. Low beam
Is an indication of the headlight being on LOW beam when turned ON:
- LOW beam with the close door indication.
- LOW beam on closing the door, accompanied by a beep.
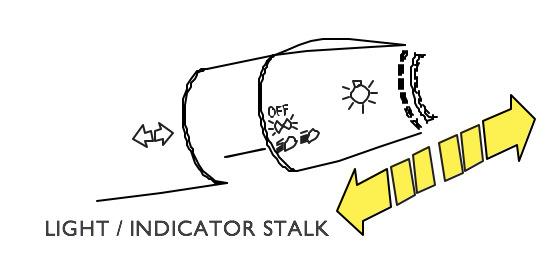
5.3 Turn signals
IV.High beam
Indication of headlight HI beam turned ON:
- HI beam with the close door indication.
- HI beam on opening the door, accompanied by a beep.
V.Follow me home headlight
To activate, turn the headlight switch ON and OFF twice within a gap of 1 second.The lights will be ON for 30 seconds after the doors are locked, assisting you with the parking exit.

TURN SIGNAL LIGHTS blink when you select STALK for a lane change or a turn:
- Push the side INDICATOR STALK forward for left turn and backward for right turn.
- During high speed lane change, push STALK upwards or downwards within 1 second for 3 automatic blinks.
Turn indicator
Blinking lights activated by the driver to show an intent to turn or change lanes toward the left or right with position of the INDICATOR STALK. Both the blinkers will flash together when the HAZARD button is selected.

If the lights blink faster than normal,then one of the bulbs is fused and has to be replaced.
5.4 Cluster indications

I.Charge light (Green)
While charging, the light will flash every 2 seconds. It turns solid once charged to 100%.
A charge fault will affect the normal functioning of the charge light and the message CHG FALT will be displayed on the cluster. In such situations, you are requested to contact our service dealer for assistance.
When the vehicle is powered on or off, some of lights on the cluster will glow for a short time. This is a part of the car's self diagnostics.If you notice a change in this function, please contact your service centre.
II. Parking brake / low brake fluid light
a) Solid - Indicates that the parking brake is engaged. Release the parking brake before driving your car.
b) Flashing - Indicates low brake fluid level and is accompanied by the BRK FLD cluster message.Top up with DOT-3 grade brake fluid to the maximum level and the flashing lights will automatically turn off.

VI. Anti-theft indicator light
This light turns solid after the car is properly locked and starts blinking after 45 seconds indicating the the car has entered into an immobilized state.
VII. EV warning light
The EV warning light indicates system faults with the appropriate fault message on the cluster. It displays messages to the user by pressing and holding the SET button for 5 seconds, pressed again to view more messages.
VIII. Door open light
Indicates that the driver or passenger side door or bonnet or hatch is open. It turns off once they are properly locked.
IX. Low AUX 12V battery light
This turns solid if the auxiliary battery voltage is low.

X. Seat belt indicator light
This turns on if the driver seat belt is not worn.

XI. Service light- Indicates:
a) Service due by kilometers- Flashing light for 20 seconds when key ON.
b) EV system faults- Turns solid.

XII. Temperature light
Light blinks for low / very high or turns solid during driving or charging indicating a maximum operating temperature for any of the components listed below:
1.Battery 2.Charger 3.Motor 4.Motor controller
Temperature light indications:
a) A flashing temperature light indicates that the EV system temperature is too low for normal usage.
b) Solid temperature light indicates that the EV system temperature has reached its maximum operating temperature.
c) During drive -
I. A solid light with the GO SLOW cluster message is an indication to avoid rash driving with high acceleration.
ii. A solid light with STOP CAR cluster message is a prompt to stop car for few minutes till light goes OFF.
Continuing to drive when the temperature light is glowing red will result in reduced performance of the car. If drive is continued further, STOP CAR message will display on cluster and car will stop soon to protect its drive system.
If the light is solid when the car is being charged, it is an indication of increased charging time due to high temperature of the charging system. If battery temperature is less than 0°C, it will not charge.
5.5 Speedometer and ODO meter

The digital speedometer will display vehicle speed either in Kilometers or Miles based on previous selection.
The odometer records and displays total distance in Kilometers (or Miles ) covered by the car.
TRIP A displays distance covered in current drive and gets reset once the car plugged in for charging.
TRIP B can be used to measure distance traveled on short trips between stops.
Total - 0 to 99999 Kilometers
TRIP A- 0.0 to 6553.5 Kilometers (resets to zero when plugged in for charging after each drive).
TRIP B- 0.0 to 6553.5 Kilometers (By default the odometer gets displayed every time the key is turned on).
Keep track of your odometer reading and check the maintenance schedule regularly for due services. Increased wear or damage to certain parts can result from failure to perform required services at defined mileage intervals may affect your warranty
After 99999 kilometers, cluster will auto reset to zero kilometers, system will have log of number of ODO resets.
5.6 Mode and Set button

- Press MODE button to toggle between ODO,TRIPA or TRIP B.
- To toggle between kilometers or miles in the ODO section, press and hold for 2 seconds.
- Under TRIP B, press and hold for 2 seconds to reset the value to zero.
- TRIP A displays the present drive cycle mileage and resets to zero when plugged in for charging.
- Press the SET or MODE button to turn on the cluster illumination.
- If the EV warning light is ON, press and hold the SET button for 5 seconds to read messages. Press again to read more messages.
5.7 Drive efficiency indicator
When the key is on, the EFFICIENCY GAUGE will either indicate energy consumption during drive or energy regeneration with the car in motion, when accelerator pedal is not pressed. A gradual application of brakes recharges the battery pack.
5.8 DTE /TTC indicator
DTE (Distance To Empty ) indicates approximate number of kilometers that can be driven with available charge.
TTC (Time To Charge) indicates approximate time for fully charging the vehicle.
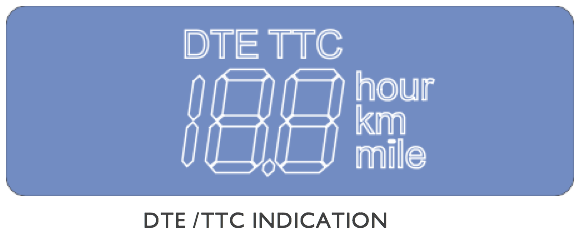
DTE is linear in the normal speed of 50-60 kilometers/hr. While driving under low ambient temperature conditions, high power consumption or rash driving, actual initial DTE shown and kilometers driven will vary, but in the last 10% of the charge exact DTE that can be driven will be displayed.
5.9 Digital SOC and SOC bar
- Is an indication of the State of charge (SOC) in digital and bar display.
- All bars are displayed if the SOC >95%.
- The lowest bar will start flashing if the SOC drops below 5% charge.
For more information, refer to "Starting and Driving" on page 88.
While driving, the cluster message center displays ambient temperature.
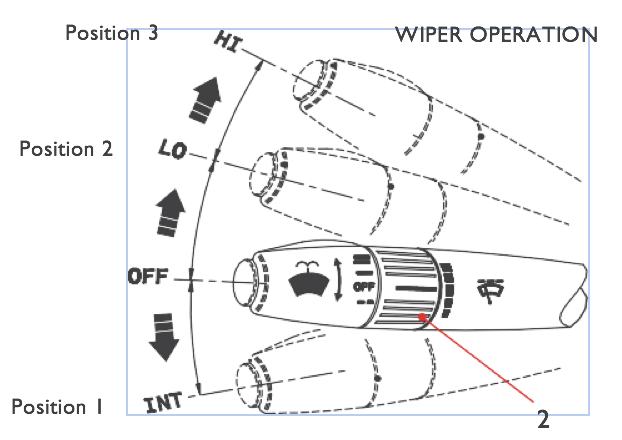
5.10 Windscreen wiper
To operate windscreen wiper, turn the LEVER from the turned OFF position to any of the below
positions while driving.
Position 1: Intermittent wiping speed
Position 2: Low wiping speed
Position 3: High wiping speed
- Pull the LEVER downward for intermittent operation.
- Push the LEVER upward for low and high wiping speeds.
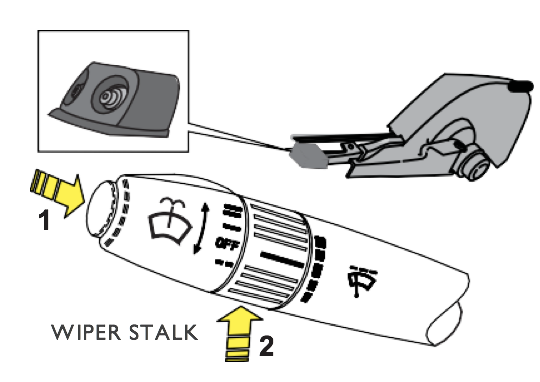
Windscreen washer nozzle
To spray windscreen washer fluid, press BUTTON 1 on the lever, the fluid will be sprayed through nozzles on the wiper blades onto glass. It wipes the screen for three consecutive wipes,followed by a single swipe after 3 seconds.To increase wiper speed rotate KNOB 2 on WIPER LEVER forward and to reduce the speed rotate backwards. For drip wipe, pull the WIPER LEVER once and release.This will wipe the wind shield once and stop. For rear wiper operation and spray, press the button on air flow modes knob of the HVAC control located on the center console.
In subzero ambient conditions, use anti-freeze liquid in the wind shield washer tank.
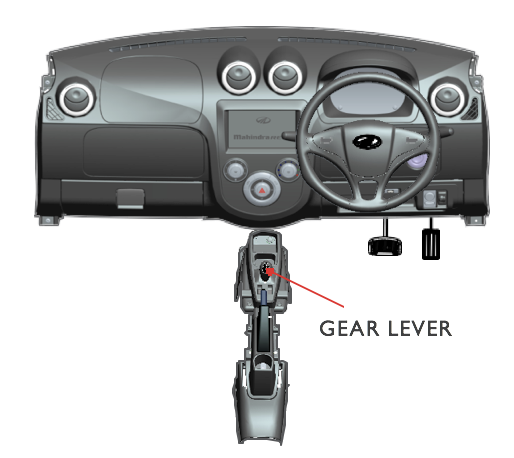
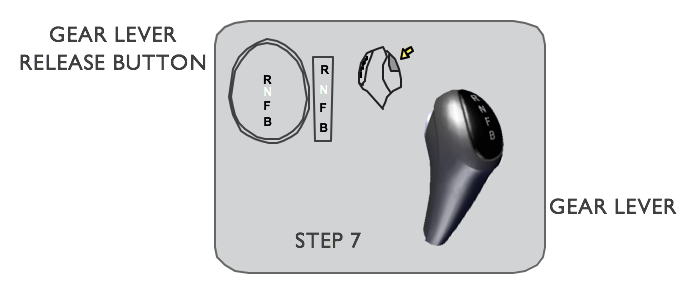
5.11 Gear lever and drive modes
GEAR LEVER enables you to choose your desired drive direction with the following modes:
Forward [F] (Range mode) -
Press the brake pedal fully, press the GEAR RELEASE button and move the lever from N to F mode.This is the normal driving position for driving in forward (maximum speed is 80kmph).This mode gives the best drive range.
Boost [B] (Power mode) -
This position also enables you to quickly accelerate forward and overtake while driving.
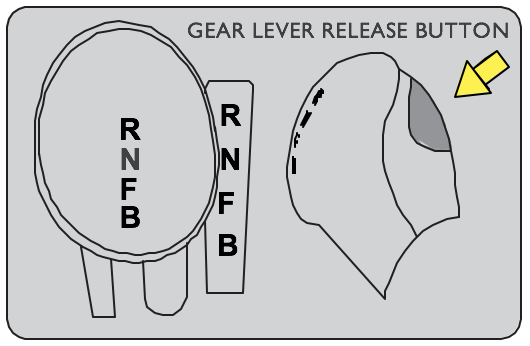
Neutral [N] -
Always park your car in the neutral position before turning off the STOP switch.
Reverse [R] -
Press the BRAKE PEDAL and then the GEAR RELEASE button to move the lever from N to R mode.This will allow you to drive in the reverse position and the speed is limited to 20 kmph. Use REVERSE CAMERA with the infotainment system for assistance. For more information, refer to 'Starting and Driving' section on page 88.
Button on the RNFB is the child safe mode switch to stop unintended operation. Lever may not move from forward to reverse position when the button is pressed for a long time. You can use it again after 2-5 seconds of idle time.

Neutral mode indication
- The N indication remains solid when the key is turned on and the gear is in neutral position.
- Modes B, F or R will flash when the key is turned on and gear is not in the neutral position. After authentication process, press the BRAKE PEDAL completely, then push the gear to N position to enable power to the drive system.

Boost mode indication This indication will be on when the gear lever is in the B position after turning on the key.

Forward mode indication is turned on when the gear lever is at F position after the key is on.

Reverse mode indication is turned on with a beep when the gear lever is at R position.

Economy mode indication is turned on when:
a) SOC drops to below 20%
b) The EV system temperature reaches to minimum or the maximum set limit, resulting in restricted power supply to the drive system.

Power save mode indication is turned on when:
a) SOC drops to below 10%
b) The EV system temperature reaches maximum set limit.
c) In this mode, the driving power will be limited with the PWR SAVE message on cluster and the air conditioning will automatically turn off.
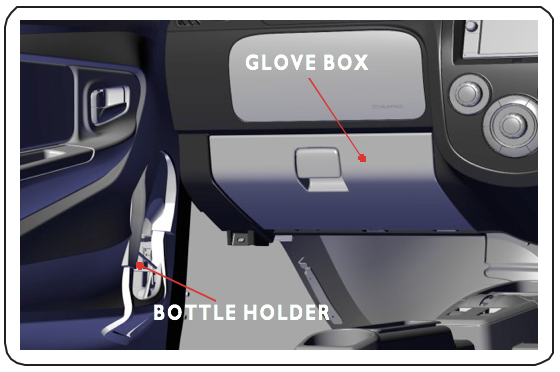
5.12 Glove box and bottle holder
The instrument panel houses the glove box that can be used for storing CDs, user manuals, spectacles etc. The inner panels of the front doors have a slot for holding water bottle.
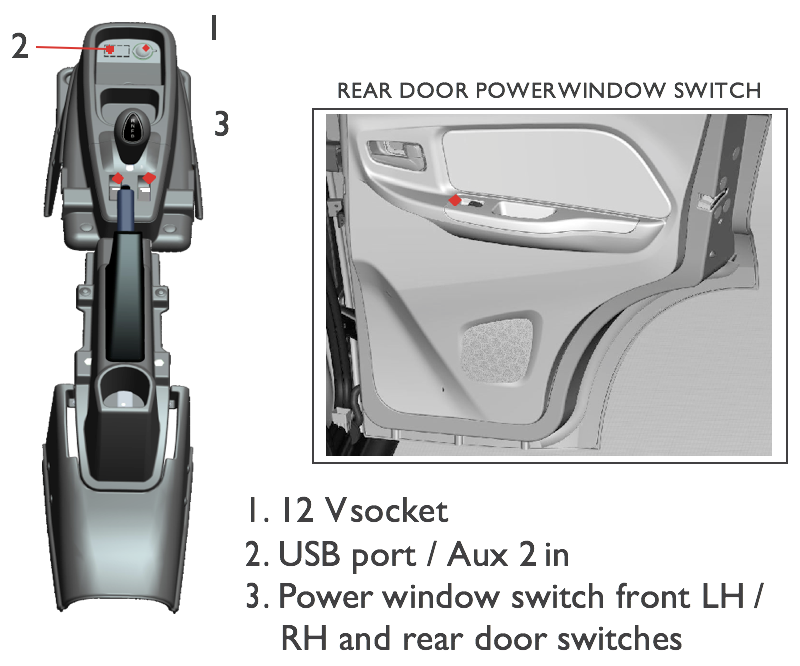
5.13 Accessories:
12V Socket - The center console is equipped with a 12V power socket for charging laptop, mobile and other applications which consume less than 100 watts.
USB port - The USB port can be used for playing audio and video files from USB 2.0 (supports up to 32GB), iPod when connected to the port.The system may not support some of USB makes that are not from the standard manufacturers. Refer to the "Infotainment manual" for more information.
Aux 2 in can be used to connect iPod, camera, gaming consoles, Walkman and compatible playing devices with respective cables. It will be available only when unit is connected with external A/V device or prompt shows No signal input.
Power window switch Driver and passenger doors are equipped with power windows on the center console and rear door switches are provided on door inner trim panel. Press the switch to lower the glass and pull up to raise the glass.
12V socket has been designed for charging gadgets like mobile phones and laptops. Using gadgets drawing high power (100 watts) can blow the fuse and damage the system.
5.14 CAUTION
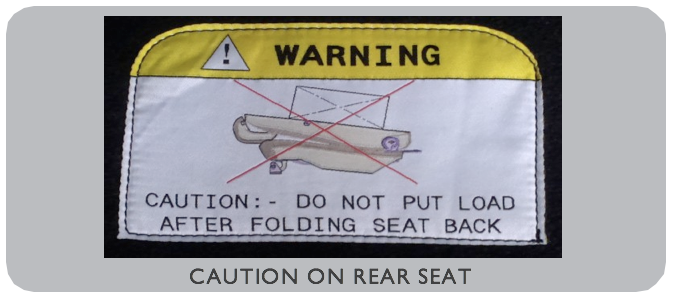
- The rear seat should be in upright position.The rear compartment behind the seat can be used to store small luggage.
- Never use the rear seat for storing luggage when it's in a folded condition.
Leaving children, helpless adults, or pets in car with the windows closed is dangerous as it can result in extreme heat and suffocation / injury or even death from heat stroke.
- Never leave them alone with the keys available as they can operate car unintentionally and cause damage.
- While raising the power window glass,do make sure that no hands / fingers (specially that of children) are on the window glass as it may result in injury.
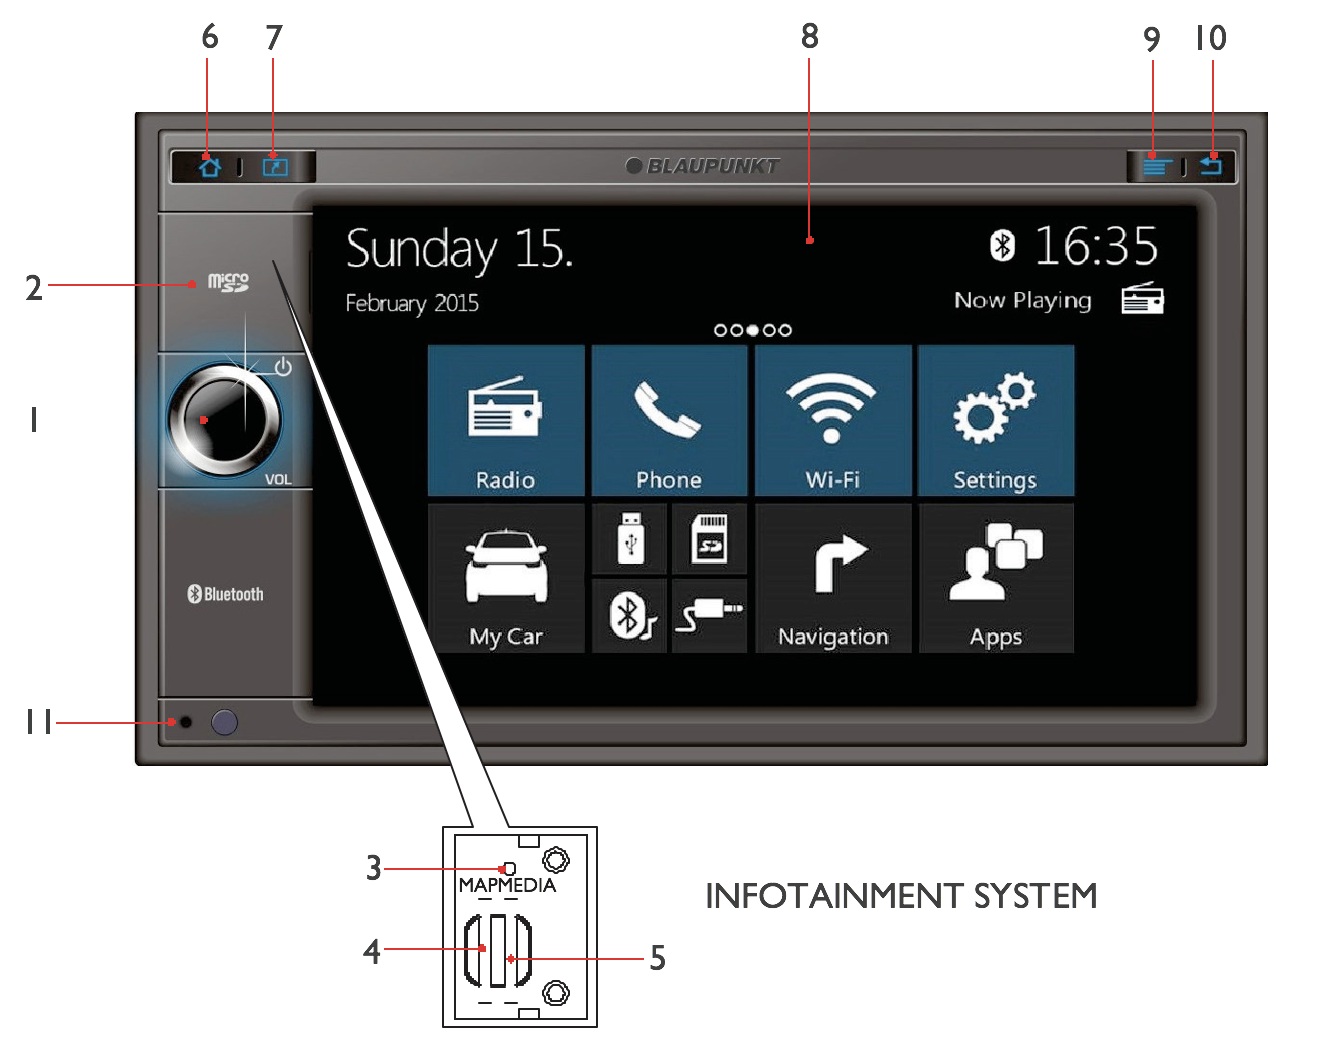
5.15 Infotainment system
- Rotary / push button
- Micro SD cover
- Reset button
- Micro SD card slot for Map
- Micro SD card (32GB- SD, SDHC and SDXC) slot for Media
- Home button
- Navigation button
- Touch screen
- Menu button
- Back button
- Internal phone
The vehicle should be equipped with Infotainment system for the above functions to be performed. Refer "Infotainment manual" for more information.
Infotainment system is provided in selected models and has its separate user manual.
6. Air conditioning systems
6.1 Air conditioning- Heating and cooling
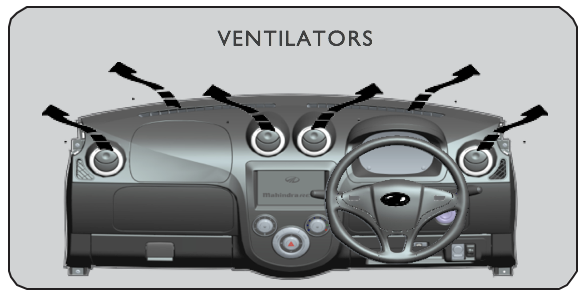
6.2 Air flow vents
The vehicle is equipped with a blower system and airflow vents to circulate air within the vehicle cabin.
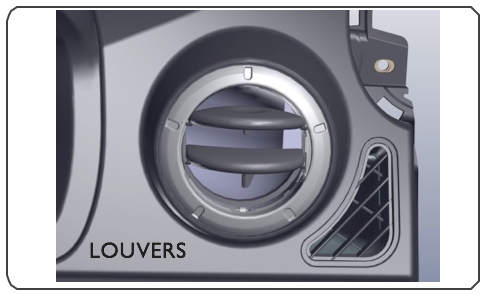
- Central (circular) Louvers direct air towards the cabin.
- Vents near the windshield direct air towards it.
- Louvers and vents at two corners of the dashboard direct air at sides and on to windows. Louvers at centre and sides can be adjusted to direct airflow for better comfort.
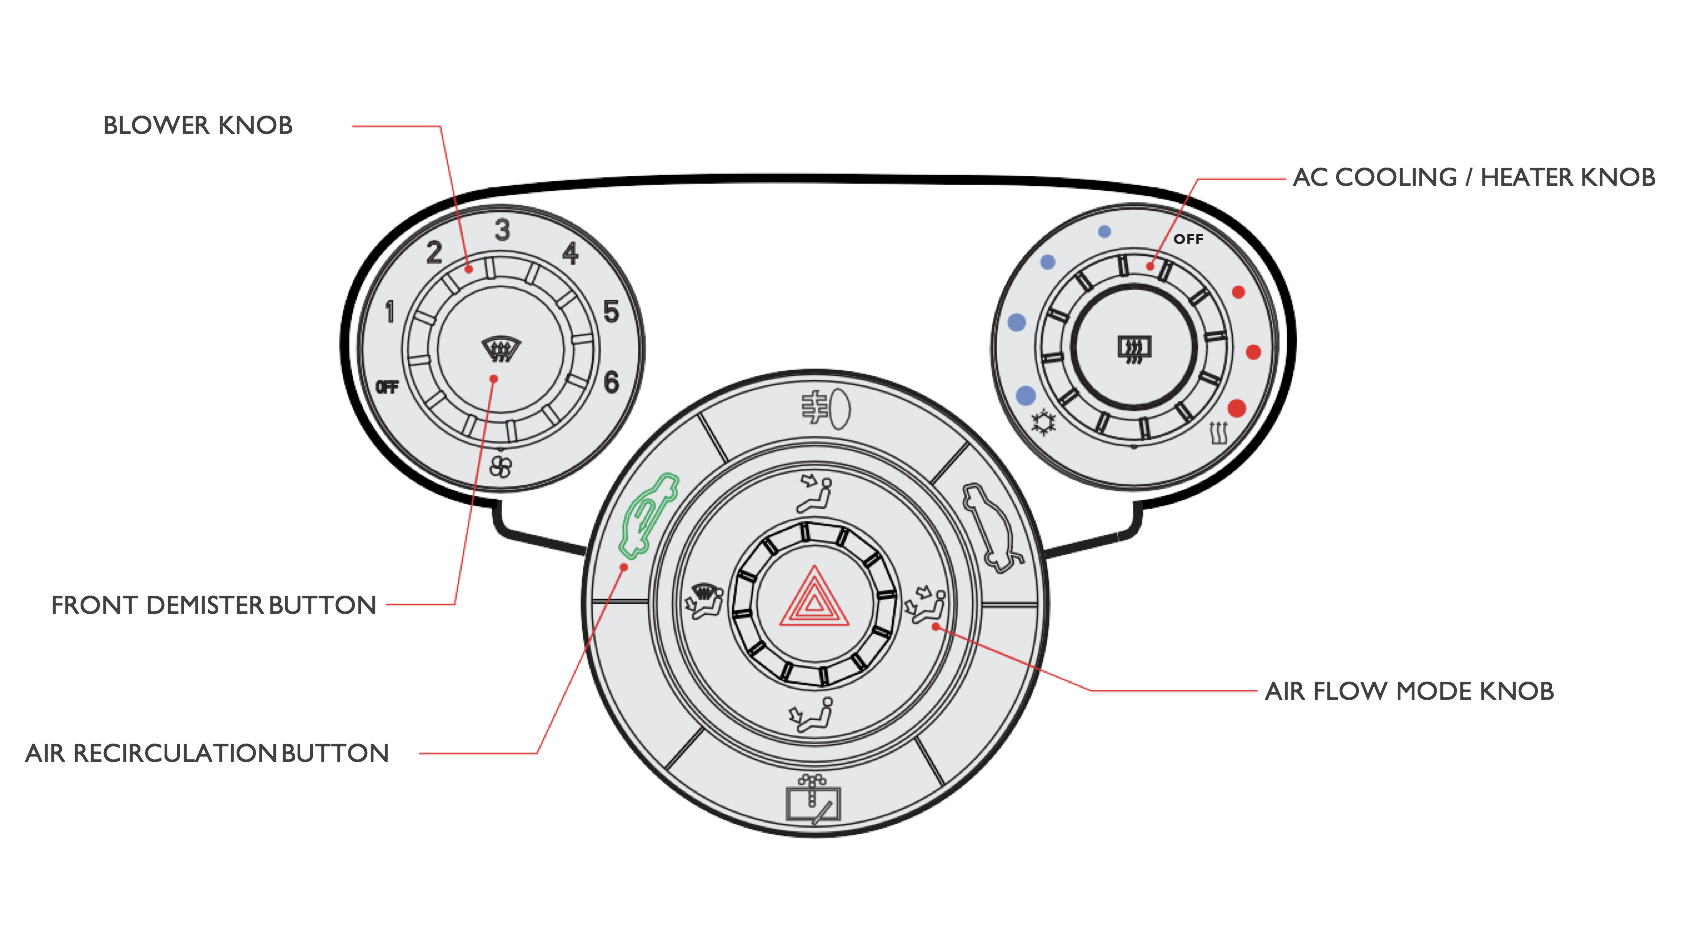
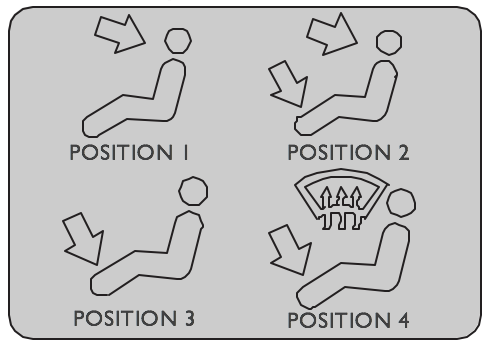
6.3 Air flow modes
Blower airflow can be adjusted to 4 different positions by rotating the knob clockwise to any of positions shown below. By default, the airflow mode will be in position 2 when the key is turned on.
6.4 Blower
Blower can be turned on by rotating the knob clockwise from OFF position to any of the 6 positions shown to adjust the airflow.
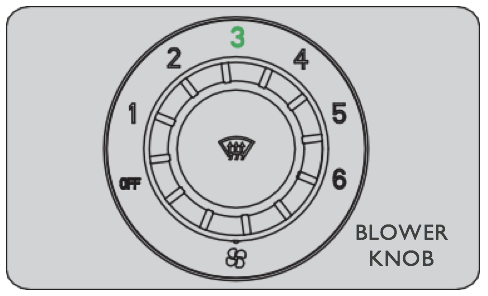
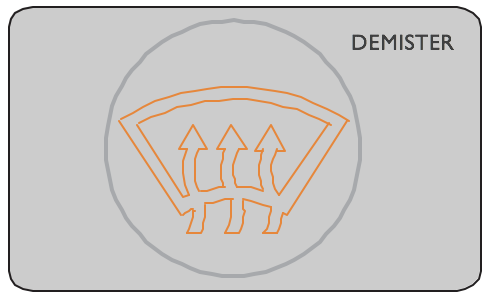
6.5 Blower - demister
Front wind shield glass demister can be turned on to clear fog by pressing the center button once on the blower knob. Press again to turn off the demister.
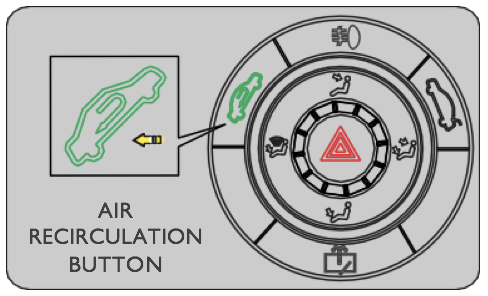
6.6 Air recirculation mode
The recirculation mode is on by default when the key is turned on. Turn OFF this button to enable fresh air mode.
Do not leave children or adults or pets requiring attention / support in the vehicle with doors and windows closed during hot / sunny days. The temperature inside the vehicle cabin could go up causing suffocation to people / animals, resulting in injury or death.
Avoid using the recirculation mode for longer periods as it can fog up window panes and the cabin air might turn stale.
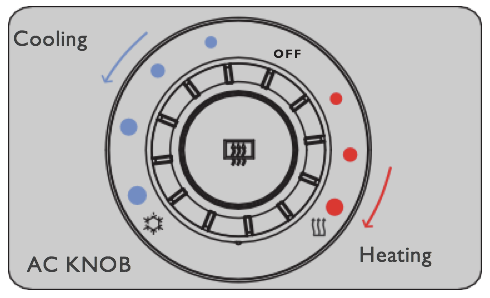
6.7 Cooling
- Turn the AC knob anticlockwise to switch on the air conditioning.
- Turn knob to desired cooling position to the desired comfort level.
- Cooling will be turned off when the SOC drops below 10% but the blower is on indicated by the blinking cooling position led.
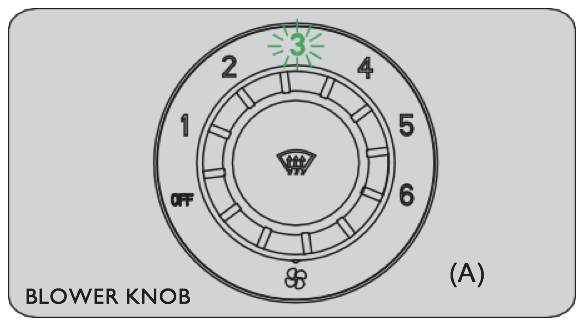
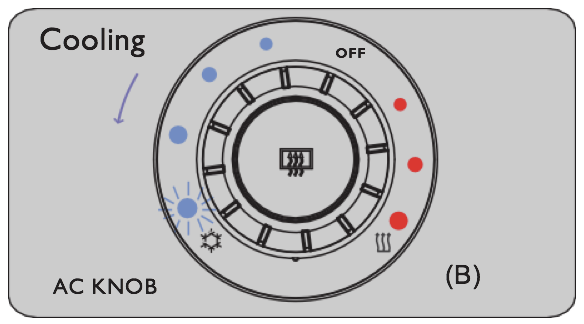
6.8 Auto comfort cooling
This function allows you to cool the car cabin to preset temperature in the HVAC module (12°C Grill temperature).
- To operate AUTO COMFORT COOLING:
- Select the AC knob to cooling position 1.The blower will start automatically.
- If the cabin temperature is warm (>25°C) the blower will automatically run at speed 3 with cooling position 4 and will cool your car cabin within 5 minutes.
- Blower speed 3 and cooling position 4 led will flash indicating that auto comfort cooling is active (Refer to figure A and B).
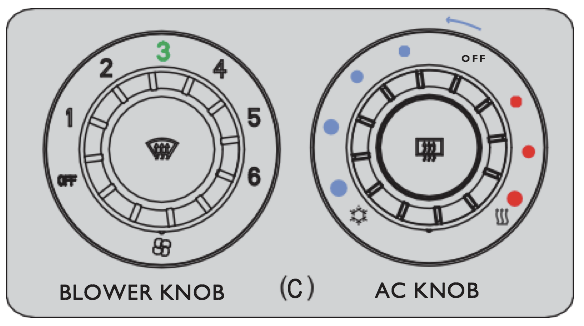
- If the temperature does not reach 12°C in 5 minutes, cooling position 4 and blower speed 3 will continue to operate. Flashing light on blower and AC knob will stop (Refer to figure C).
- If user selects blower or AC cooling knob to any other speed, the AUTO COMFORT COOLING function will stop.
- Auto comfort cooling will operate for either the initial 5 minutes or till the grill temperature reaches 12°C. Once this is reached, the blower will continue to work at speed 3 and cooling position 4.
Some of features are variant specific and may not be applicable in your car.
- If the cabin temperature is warm, the AC starts with preprogrammed blower speed and cooling position with maximum compressor speed for first five minutes.To set it to your comfort level, rotate the blower and cooling adjustment knobs to the required position.
- Use the lower setting on the blower and AC knobs to optimize cooling to your requirement.
- Using AC or heater continuously will reduce your drive range up to 25% per hour.
6.9 Heater
To operate the HEATER:
- Rotate knob from in the clockwise direction. The Heater indication will turn on and warm air will flow from vents based on mode selection.
- Heater will get switched off once the SOC reaches 10% while the blower continues to operate indicated by blinking HEATER led.
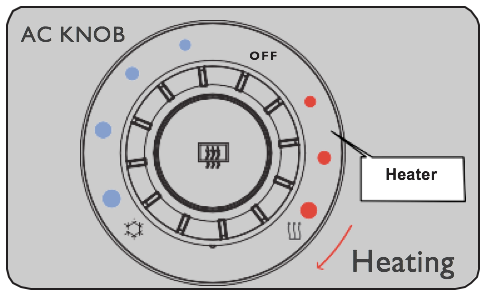
Heater will not operate when SOC is less than 10% and goes into PWR SAVE mode.
7. My car info
7.1 My car info
The following features can be accessed using the MY CAR INFO feature in the infotainment system:
- State of charge (SOC), Distance to empty (DTE)
- My car drive
- My car regen
- My car Idle
- Drive efficiency
- Revive
- User manuals
- Eco setting and Eco drive score
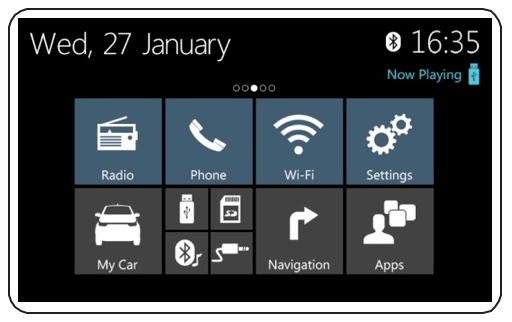
Switch on the infotainment system after turning the key on and select MY CAR on touch screen to access My car information.
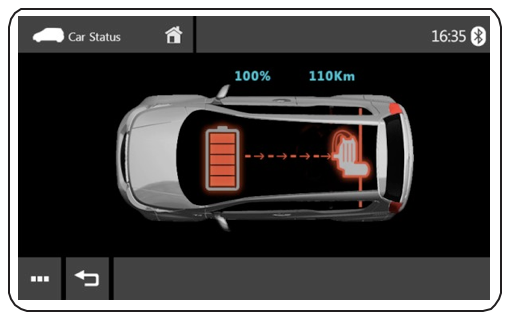
Under MY CAR information, you can view the state of charge (SOC), Distance to empty (DTE) and available energy for drive.The battery icon in red indicates energy consumption by drive motor.
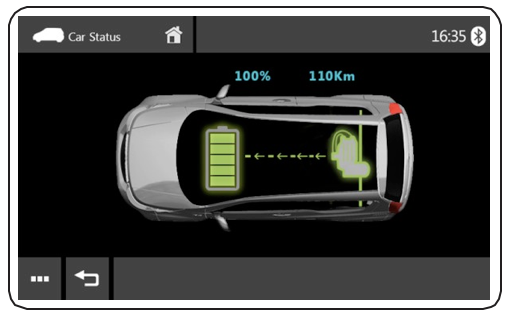
Battery icon in green indicates energy getting regenerated during drive.
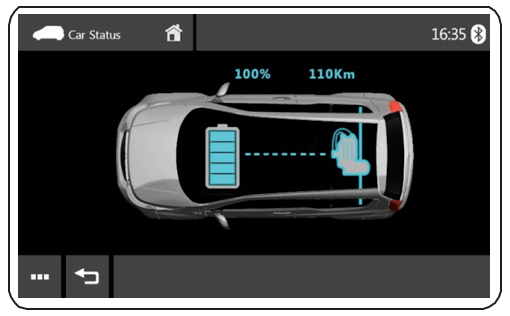
The battery icon in blue indicate an idle vehicle that is not consuming any energy.
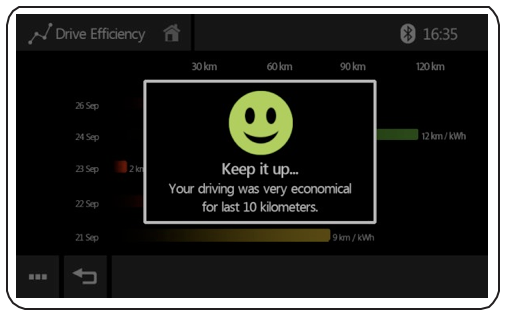
7.2 Drive Efficiency
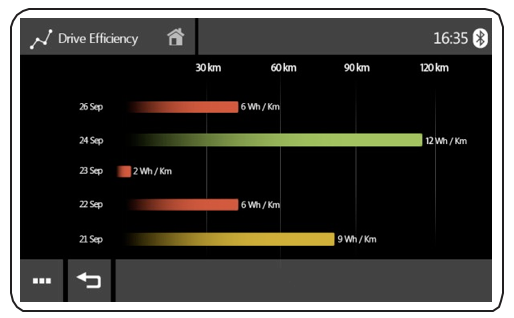
The EFFICIENCY screen displays the power consumption per kilometer for the last 5 drive cycles.
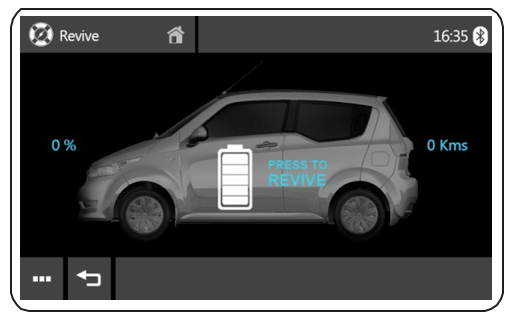
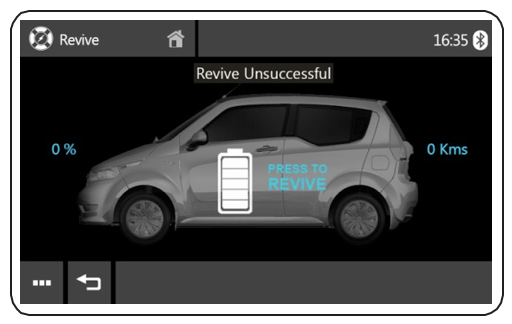
7.3 Revive
Revive is a feature that allows you to boost the car's drive with reserve energy when you run out of charge.
- Revive can be activated only when the SOC is <10%.
- Revive can be activated through the infotainment system or by smart phone.
To activate:
- Select GEAR LEVER to N.
- Press Revive in infotainment/ mobile app. The feature will be activated with an increase in the SOC and DTE.
In case the attempt to enable Revive is unsuccessful, any of the messages given below may be displayed:
- Revive time out
- SOC greater than 10%
- Revive already set
- Vehicle not in neutral
- Vehicle not authenticated
- Revive limit exceeded
- Vehicle deactivated
- Drive stop fault
Try again to activate Revive after verifying all the preset conditions.
Please note that Revive feature is only available for 5 times and use only when necessary.
Revive enable conditions:
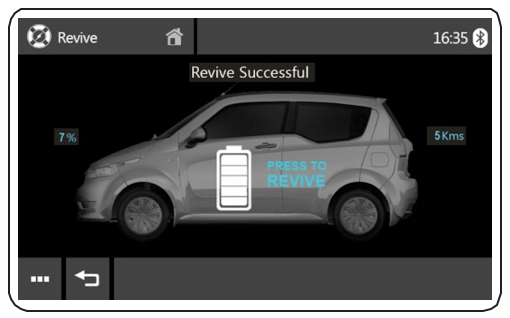
- The SOC must be less than 10% for Revive to be activated.
- If the feature has already been activated, the 'Revive Unsuccessful' screen will be displayed. Wait till the display changes to 'Revive Successful'.
- Shift the GEAR LEVER to NEUTRAL and try to activate the feature again.
- Authenticate the vehicle, check if all the preset conditions are met and try to activate Revive again.
- When you have crossed the maximum number times that Revive can be enabled, the infotainment screen displays the message 'Revive cannot be done'.
- Contact the technical helpdesk immediately if you get a 'Stop Drive' message while activating Revive.
7.4 User Manuals

The USER MANUAL section on the infotainment screen allows you to access User manual, Quick start Guide, Infotainment Manual.
7.5 Eco Setting and Appreciation
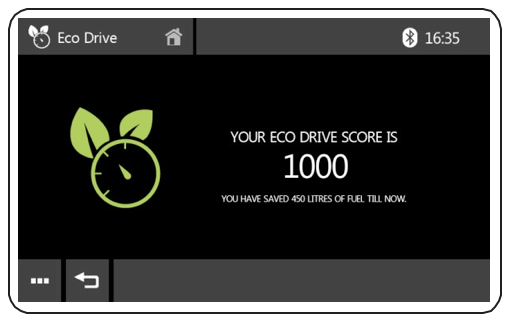
You can also save fuel by selecting the ECO DRIVE feature. Swipe the User Manual screen upwards to get to this screen.
The feature helps improvising driving habits. It shows the litres of fuel saved and prompts on how you can further improve your saving habits.
If there is a battery disconnect, the memory of preset stations and other infotainment system settings gets erased. These have to be set again.
In ‘My Car’ sub menu drive efficiency, Eco setting & appreciation pop-up features are disabled and will be enabled during software update on a later date.
8. Pre-drive checks
8.1 Key fobs and keys
The car comes with two identical key fobs with keys. Key fobs are used to lock or unlock the car, for authenticating to start, opening the rear hatch and finding the car in a parking lot. It is always useful to note the key tag details and keep it in a safe place. These details are very useful when you need a new pair of keys from the service centre in case of a loss or theft. For duplicate key request to the service center, always provide VIN details.
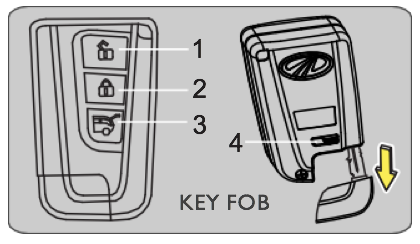
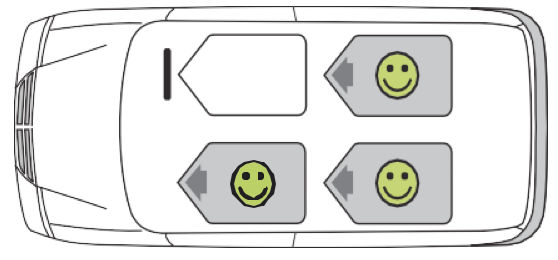
8.2 Key fob operation
Button 1: Press once to unlock doors (indicators flash twice).
Button 2: Press once to lock doors (indicators flash once). Press twice within a second for vehicle search.
Button 3: To open rear hatch, press and hold for a second.
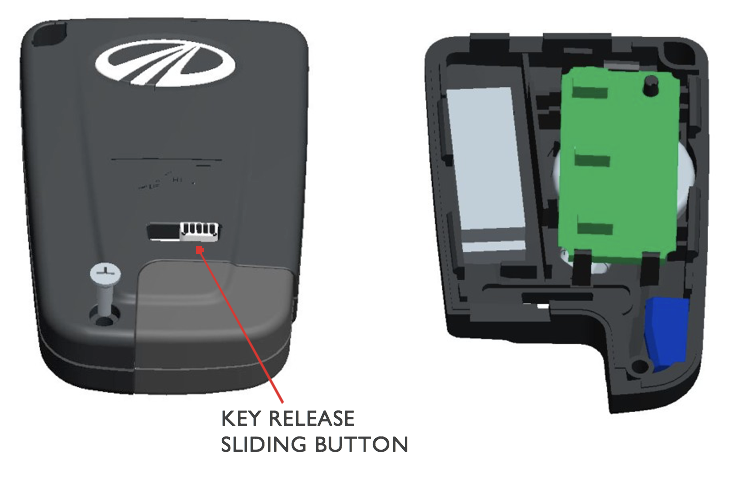
Button 4: A sliding button is given at back side of fob for removing key in case of an emergency access.
Always use the key fob when the car is within clear view.
- As a user, move gear lever to‘N’ mode, push the START switch to OFF and engage parking brake, lock car and keep key fob in your pocket while exiting the car.
- If the remote system fails when the car is locked,use the hatch release button on HVAC controls. In an emergency, remove grommet on rear trim and pull the pig tail cable to release rear hatch.
Your car is equipped with factory fitted central door locking (CDL) system. Keys must be used to lock or unlock front doors during an emergency when the CDL system is not working. It is advised to operate remotely while car is within viewing range, as the car's CDL system is of a visual type (indicators flash).
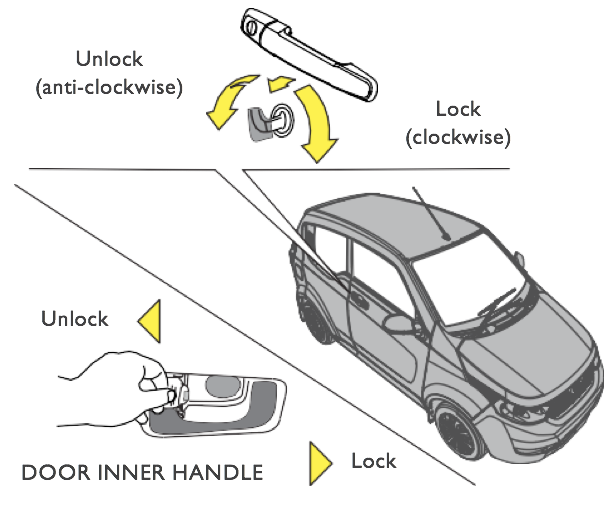
8.3 Door locks
To lock or unlock your car manually if the central locking is not working, turn the key in clockwise direction to lock or in the anticlockwise direction to unlock as shown in the figure below.
To lock LH door from inside, push the knob forward to lock and push it backward to unlock as shown in the figure below.
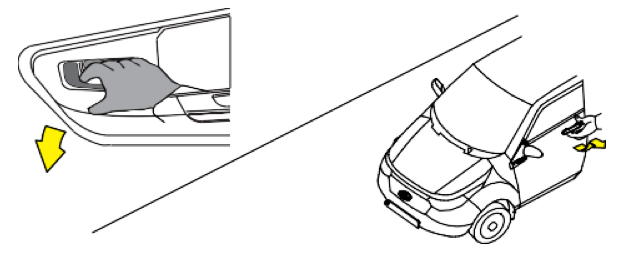
To open the door, pull the lever slightly towards you and push the door.
- Always make sure to close the doors properly before driving and lock them after exiting the car.
- Locking doors will guard the occupants from being thrown out in an accidental opening of a door.
- Allow a gap of 2-5 seconds between multiple operations of remote.
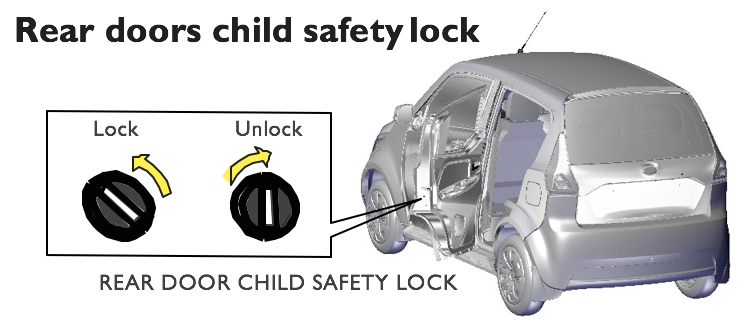
Rear doors can be locked so that it cannot be opened from inside. Using key from key fob, turn the slot anti clockwise to lock and clockwise to unlock with a click.
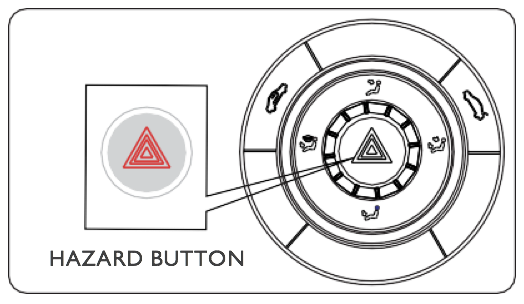
8.4 Hazard warning
Press the centre button to activate HAZARD WARNING LIGHTS. All the six external turn signal indicators will flash simultaneously.To turn off the lights, press the button once again. This should be used to warn traffic in event of an emergency.
8.5 Head light low beam focus switch
Use the scroll button on the switch to fine tune headlight low beam focusing as required before driving at night.
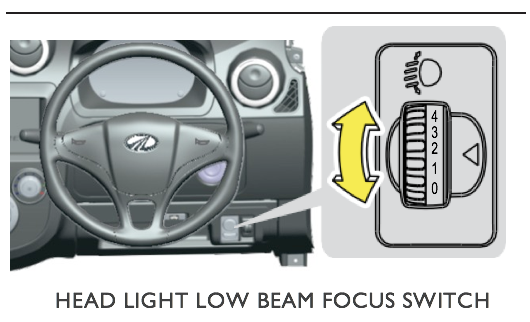
Head Light Leveling Device Switch Positions:
Driver (D) or D+1 - Switch Position 0.
GVW (D+3) - Switch Position 3.
8.6 Chime
The chime turns on in the following circumstances:
- Parking brake pulled and door is opened during drive (beeps every sec).
- Parking brake is pulled with the accelerator pressed (beeps every sec).
- Parking brake not pulled and doors open in all modes (beeps every sec).
- Brake fluid levels are low (beeps every sec while in charge and during drive).
- Continuous chime will be turned on when the EV system temperature reaches its maximum operating limit.
- A 5 second beep can be heard when the automatic drive mode is changed to economy, limp home, safe mode, or there is a charge fault or drive fault.
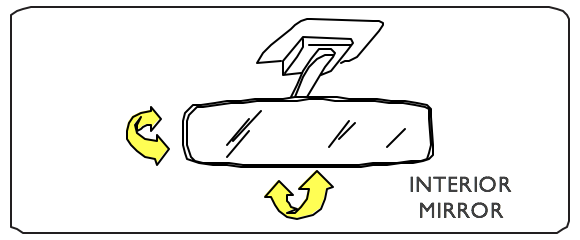
8.7 Mirrors
Keep the inside and outside mirrors clean and adjusted for better visibility. Be sure to adjust mirrors before you start driving.
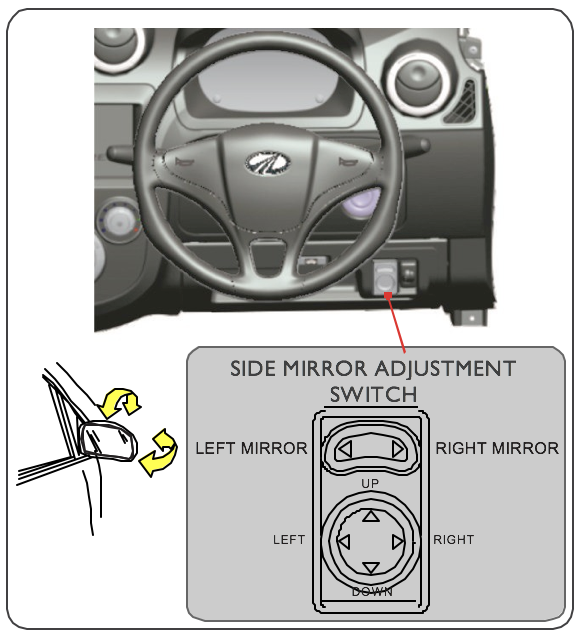
Both side mirrors can be adjusted electrically for a better view of the vehicles coming from behind.
- Select the right or the left side mirror, using the upper button.
- Adjust mirror to your driving position using the lower button with 4 arrows.
The interior and side mirror adjustments should be used for night driving also in order to avoid the glare caused by vehicles coming from behind.
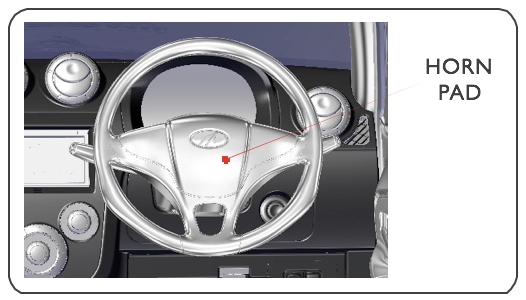
8.8 Horn switch
The HORN switch is integrated in the center pad of the steering wheel. Press anywhere on this pad to blow the horn.
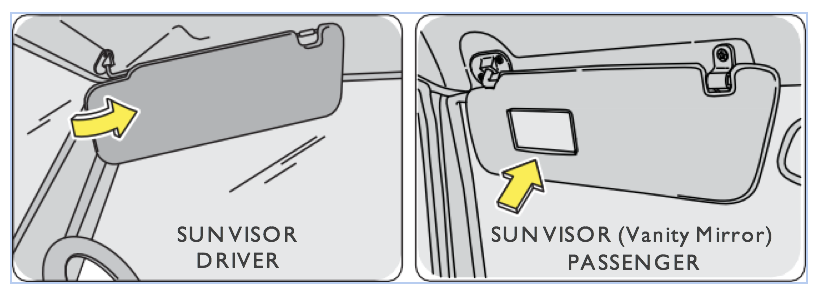
8.9 Sun visor
Adjustable sun visors are provided in the car for protecting the driver and the passenger from glare. In addition,the passenger side sun visor comes equipped with a vanity mirror on its back side.
The home charging unit, charge cable adapters etc. are not a part of standard fitment / supplied with the car. User has to purchase them as required accessories.
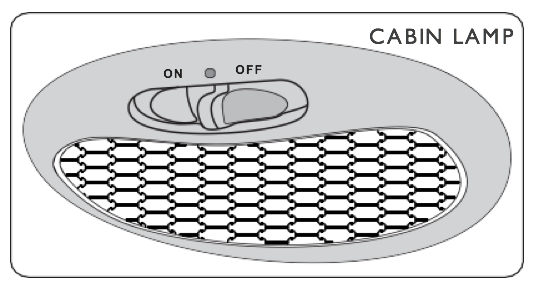
8.10 Cabin light
The Cabin Light has 3 positions:
Position 1 (off): Light remains off at all time.
Position 2 (0) : Light comes on when the doors are opened and goes off when doors are closed properly.
Position 3 (on): Light comes on regardless of whether the door is open or close.
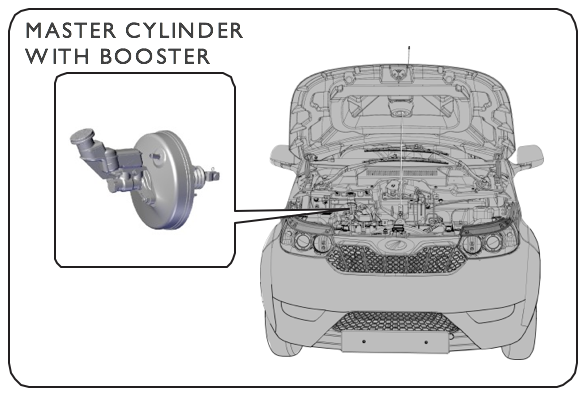
8.11 Brakes
The brake system in the car works on hydraulic with vacuum booster and is assisted by regenerative brakes. This lowers the effort put by the user while retarding and ensures proper braking. The electric vacuum pump helps in optimising vacuum in the booster. Check if the brakes work properly before starting your drive.
8.12 Wiper washer tank
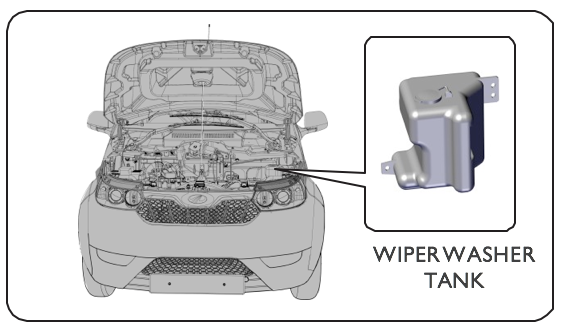
A container for the wiper washer fluid is provided under the hood.This is provided to clean or wash the windshield glass for good visibility if it is dirty. Check if the windshield is clean before starting your drive.
8.13 General checks
Before starting your drive:
- Check if the available energy is sufficient for your journey, and all dashboard lights are working properly.
- All tyre pressures are OK.
- Seat belts and lights or horn is working fine.
- Rear seat rest is in upright position and locked.
- Child seats are anchored and fixed properly as per
The EV warning light could turn on due to a temporary condition detected by the IEMS (on board computer) and will turn off if the problem gets corrected. In case it continues to stay on, contact the service center.
8.14 Key fob battery replacement
If the car doors are not getting locked or unlocked through the key fob,it could be due to low battery in the key fob and may need battery replacement.To replace the key fob battery follow the procedure as shown in the figures alongside. Open the key fob top cover by loosening the screw with a PH1 screw driver.
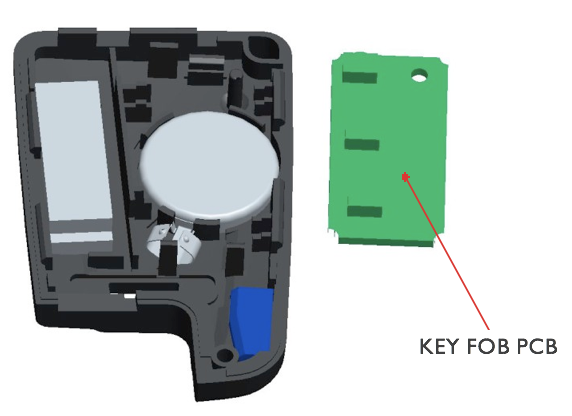
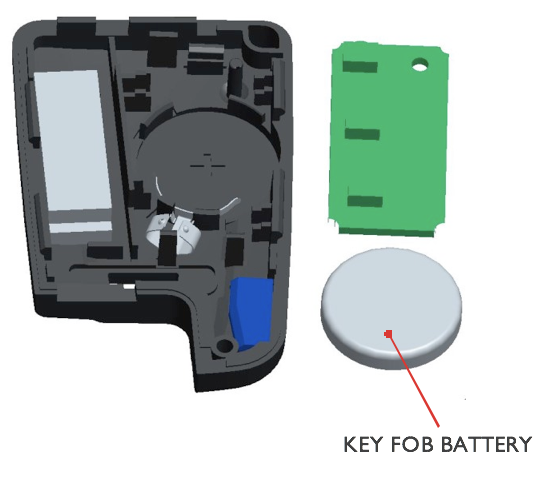
Gently take out the circuit board of the key fob. Take out the old key fob battery and replace it with the new one.
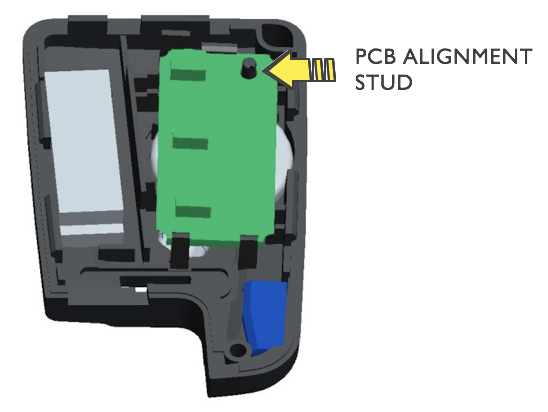
Align and fix the circuit board back into its position. Align the key fob cover and key release button, then tighten the screw. Check if the key fob works properly.
While fixing new battery, ensure correct polarity, gently align and press to fit.
- New battery voltage - Nominal 3V (Model - CR2032, Make - Maxwell)
- Align the circuit board properly before fixing key fob cover.
- While fixing key fob cover, ensure that the key release sliding button and spring are in place and properly aligned, or when required the manual key will not release properly.
9. Starting and driving
9.1 Starting
Check the energy level on SOC bar and digital SOC display. Ensure that there is enough charge for your immediate journey.
Eight simple steps to get your car started and ready to drive:Step1: Turn off the power supply at plug point, remove cable plug from socket.
Step 2:Remove the other end of the cable from the car charge port and close flap.Roll it and keep inside the car.
Step 3:Unlock the door using the remote key fob.
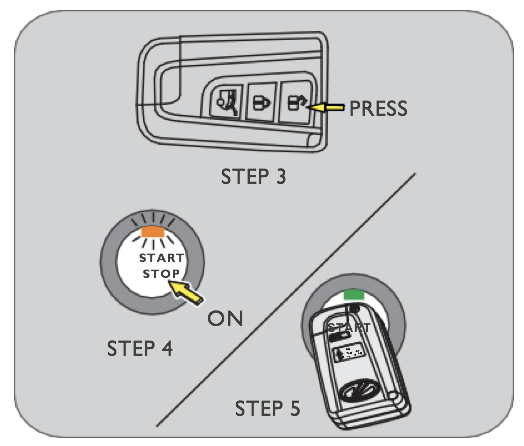
Step 4:Push the START switch.
Step 5: Authenticate by placing the KEY FOB just next to the START switch as shown above.
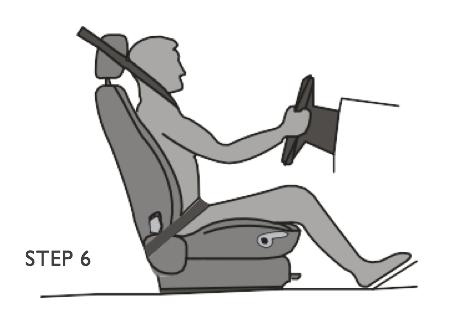
Step 6:Ensure that the seat belts are fastened.
Step 7: Press the brake pedal and press the GEAR LEVER release button to move the gear lever to desired driving position.
Step 8: Release the PARKING BRAKE.The car will start moving at a slow speed due to Creep feature (5 Kmph). Press the ACCELERATOR PEDAL to increase speed. Use your right foot only for operating accelerator and brake pedals.
9.2 Driving
Step 9: When you require a higher acceleration to overtake other vehicles or for an uphill climb, press BRAKE PEDAL, move GEAR LEVER to BOOST [B] mode.You will get a much higher torque. The maximum speed is 81 kmph. It is possible for you to switch from Forward [F] mode to Boost [B] mode and vice-versa when the car is in motion. However, for optimal driving range, use Forward [F] mode.
Step10:To reverse,make sure that your car is stationary. Press the brake and move GEAR LEVER to REVERSE [R] mode, car will start moving slowly. Press the accelerator gently and drive backward. In this mode, speed is limited to approx. 20 kmph.
Following the steps given above, makes it simple and easy to control your drive and your car. Read the section "Extending Driving Range" on page 92 to get the best performance out of your car.
Use the REVERSE CAMERA (if equipped) to assist you while reversing your car. It turns on as soon you select REVERSE mode with the infotainment system turned on.
9.3 Revive
When the charge level in your battery pack reduces to less than 10% SOC, the car's energy monitoring system puts it on the POWER SAVE mode. This is due to preprogrammed software in your vehicle's Intelligent Energy Management System [IEMS] and the Motor Controller. These components will monitor, as far as possible,that you never get stranded on the road due to insufficient energy in the battery pack.The digital SOC and the SOC bar display available energy and DISTANCE TO EMPTY indicating your driving range from the previous and the present drive .As you drive, the digital SOC and gauge bar will reduce, displaying possible driving range expected from the remaining energy in the battery pack.
If the SOC is low (<10%) while driving, you can activate Revive to use reserve energy. This will release the reserved energy and will help you in reaching your destination or the nearest charging point.
The Revive feature provides 7% SOC equivalent to 5 kilometers at 30°C of battery temperature. Revive should be used in case of an emergency. So, use the feature only when its necessary and plan your drive carefully.
If the authentication attempt is unsuccessful, the cluster will display RESTART message within 60 seconds. Press the start switch again and reposition key fob for authentication.
- Operate the brake pedal and accelerator pedal with your right foot only.
- While driving,if you remove your foot from accelerator pedal without pressing the brake pedal, you will feel partial regenerative braking. This is normal and is attributed to vehicle's regenerative braking that will recharge batteries giving you extra driving range.
- If the START or STOP buttons are turned off, it takes few seconds for LED to turn off. If you want to switch on the car during that time, simply press the START switch again, it does not require authentication again.
Always ensure that the energy level is sufficient for your planned travel distance. Avoid driving below 1% SOC as the vehicle might stop at any point of time.
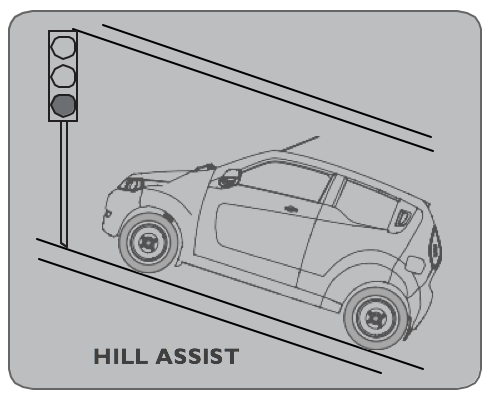
9.4 Hill assist (Creep)
This feature allows you to control your car better on inclined roads, after releasing brake. It gives an added advantage to the user by moving forward or backward based on gear selection while driving on an incline.
The car has energy save feature as the power is turned off by SSB switch. The power consumption by the car's electric system is minimized as power to few electric components is shutdown. During this, if car is not used for a couple of days, the auxiliary battery voltage will reduce. The car system turn on by IEMS and on board charger will charge the auxiliary battery with charger cooling fan operation. This may result in a humming sound of the cooling fan, contactor sound which is normal.
9.5 Extending drive range
- Always make sure that you release the parking brake completely before driving your car.
- Always drive car using the right foot only.
- Always drive in Forward [F] mode to get optimum range out of battery. Use B mode when you want to overtake.
- Pre-cool your car cabin remotely by turning on air conditioning while the car is still plugged in for charge.This will ensure that battery will be in 100% charge and the cabin temperature preconditioned.
- Use air conditioning with desired level of cooling settings during drive. This will reduce the energy consumed for cooling.
- By carefully applying gradual brakes, you will ensure that the car batteries will be charged for extra range.
If the car is kept idle without use, the vehicle battery energy will have 2.5 % idle discharge per day. Hence it is always advised to charge vehicle battery pack to 100% SOC (overnight charge) before using whenever car is kept idle for many days.
9.6 Electric power steering
The electric power steering system is designed reduce steering effort during drive. The motor in the steering column will assist whenever it senses the driver making an effort on the steering wheel at key ON. When the steering wheel is operated repeatedly or continuously while parking or while driving at low speeds, power assist for steering wheel will be reduced. This is to prevent overheating of the power steering system and protect it
from getting damaged. While power assistance is reduced, the steering wheel operation will become harder. When the temperature of the power steering system comes down, power assistance will return to normal.Avoid such repeated steering wheel operations that could cause power steering system to overheat.
If it is overheated,you may hear a 5 second chime sound at key switch ON or during drive along with EV warning lamp and CHK EPS message on cluster.
This indicates that the power steering system is not functioning properly and may need servicing. Have the power steering system checked by a Mahindra authorised service dealer.
In the event of EV warning lamp and CHK EPS message on cluster, the power assist for steering will cease operation. You will, however, have control on the vehicle but a higher steering effort will be required for sharp turns and low speeds.
If the power steering system malfunctions, you may hear 5 seconds chime accompanied by EV warning lamp and CHK EPS message on cluster.Drive carefully and visit authorised Mahindra dealer for support.
9.7 Troubleshooting
| Problem | Possible cause | Remedy | |
| 1 | Start switch pressed but car does not turn on with UPLG CAR message. | Charge cable may not be removed from on board charge port. | Remove charging cable from car on board charge port. |
| 2 | Car not switching on with message AUTH KEY on cluster. | Authentication not done correctly. | Place remote key fob near START switch for authentication. |
| 3 | REL PEDL fault on cluster and car will not move. | Accelerator pedal may be depressed prior to switching on the START switch ON. | Release Accelerator pedal and authenticate car. |
| 4 | Car not switching on with SHF TO N message on cluster. | Car may not be parked in neutral. | Switch on, move gear lever to neutral, authenticate and shift to the required mode. |
| 5 | Car not switching on with RESTART message on cluster. | Improper authentication. | Restart again and start your car. |
| 6 | Temperature Light comes on while driving with GO SLOW message on cluster. | EV drive system temperature may have reached the maximum operating limit. | Drive your car slowly. If the car is on charge, stop charging and allow 15-20 minutes to cool. |
| 7 | Temperature Light comes on while driving with STOP CAR message flashing on cluster. | EV drive system temperature may have exceeded maximum operating limit. | Park your car at a safe place. Engage parking brake.Wait for 15 minutes till temperature light goes off and start driving / charging again. |
| 8 | Car stops during drive with DRV FALT message on cluster with EV warning lamp ON. | Vehicle speed sensor failure or connection. | In the event of this, car will drive under reduced performance with mild jerks. Drive and park to side of road and call for service support and assistance. |
| 9 | Car stops during drive with CHG CAR message on cluster. | Charge level of battery has dropped to 0% SOC. | Charge your car or activate Revive, if available. |
| 10 | Error message BRK FLD and indication on cluster. | Low level of brake fluid in master cylinder | Top up brake fluid with recommended grade to maximum level. |
| 11 | Car not driving per mode and throttle demand with GO SLOW message. | Possible fault in EV drive system | Drive carefully and request assistance from your service dealer. |
| 12 | Car does not move and DRV FALT message is displayed | EV drive system has permanent fault. | Contact your dealer for assistance. |
| 13 | Central door lock not operating with KYFOB BT message. | Low battery voltage of remote key fob. | Replace key fob battery with recommended type. |
| 14 | Poor wiping action- Wiper blade is not moving or is stuck on windscreen area. | Blade improperly set. Windshield is dirty with oil. Wiper blade worn-out | Adjust blade position. Clean windshield properly. Replace with a new wiper blade. |
| 15 | Immobilizer activated | Opening door manually with keys will activate anti-theft alarm. | Press UNLOCK button in remote to deactivate. |
| 16 | Hard steering. | Low or uneven tyre pressure. | Inflate to correct tyre pressure. |
| 17 | Vehicle pulls to one side while driving. | Low or uneven tyre pressure/ disturbed wheel alignment | Inflate to correct tyre pressure. Check wheel alignment. |
| 18 | Steering kickback- While driving, you feel jerks and vibrations on steering wheel. | Low or uneven tyre pressure. | Inflate to correct tyre pressure. |
| 19 | Hard or rough ride- When you drive your car, you feel that ride is bumpy and rough. | Excessive tyre pressure. | Inflate to correct tyre pressure. |
| 20 | Wheel wobbling- While you drive, wheels and / or steering shake. | Incorrect wheel balancing and/or alignment. | Contact an authorised service centre and get wheels checked for alignment and balancing. |
If any of problems mentioned above remain unresolved even after you have attempted all the remedial measures mentioned, please contact the authorised service centre for assistance.
10. Tyres
10.1 Tyres
The car is provided with tubeless tyres.
10.2 Tyre pressure
Recommended tyre pressure (Cold fill) D+3 is:
| Front | 32 psi |
| Rear | 38 psi |
Driver (D), D+1 or D+2 is:
| Front | 32 psi |
| Rear | 32 psi |
10.3 Tyre markings
Continental tyres on the car are marked as-

Any under inflated tyre generates excessive heat that may reduce the life of tyres. Check inflation pressures on all tyres at least once in two weeks before driving. This should be done when tyres are cold. Low tyre inflation pressure will result in higher rolling resistance and will have a negative effect on the driving range.
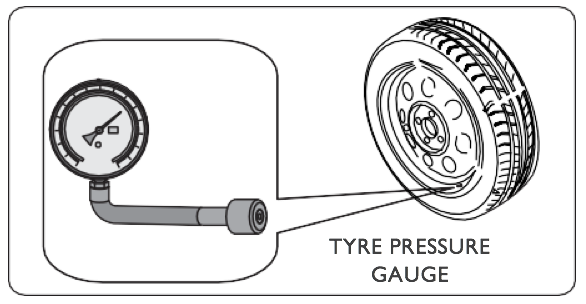
Tyres used are with special low rolling resistance and should be replaced with the same type. Using any other type of tyres other than the recommended Continental make will result in reduced driving range. All kind of repair/maintenance should be carried out by authorised service center only. Failure to do so can result in warranty becoming null and void.
Wheel alignment and balancing are important for safety and to optimise driving range and tyre life.
The tyres fitted in the vehicle meet the requirements of BIS and comply with the requirements under the CMVR 1989, as mentioned notification SO 2953E.
10.4 Wheel alignment and balancing
If your tyres are wearing unevenly, for example, the inside shoulder of the tyre is wearing out faster than rest of the tread, or if you detect excessive vibration, get your wheel alignment and balancing checked immediately. These conditions not only effect life of tyres, but adversely affect the functioning of the car.
Replacement of tyre is needed when:
- Worn out indicators are seen at three or more places on tyre.
- Cord / fabric can be seen showing through the tyre rubber.
- Tread or sidewall is cracked, cut, or snagged deep enough to show cord or fabric.
- Tyre has a bump, bulge or split.
- Tyre has is damaged, punctured or cut, and can't be repaired because of the size or location of damage.
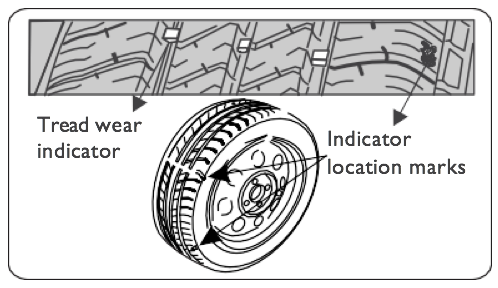
10.5 Tyre rotation
For uniform tyre wear, rotate tyres periodically as shown below. Purpose of tyre rotation at specified intervals is to get best mileage from all tyres in vehicle. First rotation is most important.When rotating tyres, always use rotation pattern as shown below. Make sure wheel nuts are tightened to specified torque of 70Nm.
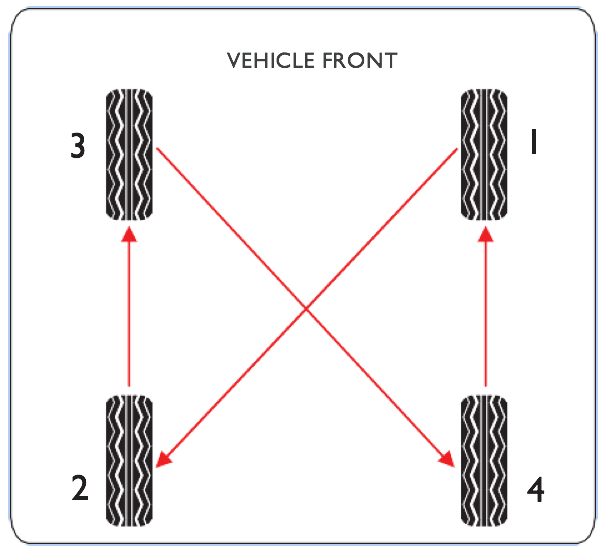
For uniform tyre wear, rotate tyres periodically as shown below. Purpose of tyre rotation at specified intervals is to get best mileage from all tyres in vehicle. First rotation is most important.When rotating tyres, always use rotation pattern as shown below. Make sure wheel nuts are tightened to specified torque of 70Nm.
Periodic rotation of tyres will result in uniform tyre wear. It is essential to get wheel alignment checked at service intervals after tyres rotation. After tyres have been rotated, get the tyre pressures adjusted to the recommended value as indicated on the door pillar.
10.6 Tyre inspection
Objects on the road, such as potholes, pieces of glass, metal, rocks, wood, debris, etc. can damage a tyre.These should be safely avoided if possible. Unavoidable contact with such objects should immediately be followed by a tyre inspection. Always look for bulges, cracks, cuts and abnormal tyre wear, especially on edge of tyre tread, which could be caused by a wrong alignment or under-inflation. If any such damage is found, contact the nearest authorised service centre.
10.7 Changing flat tyre
Follow the 6 simple steps given below to change a flat tyre: Step 1: Park vehicle on firm, level and non-slippery ground away from the traffic. Shift GEAR LEVER to N (Neutral) mode. Engage the parking brake, turn on the hazard warning lights and turn off the key switch. Empty the car of all passengers before changing a flat tyre.
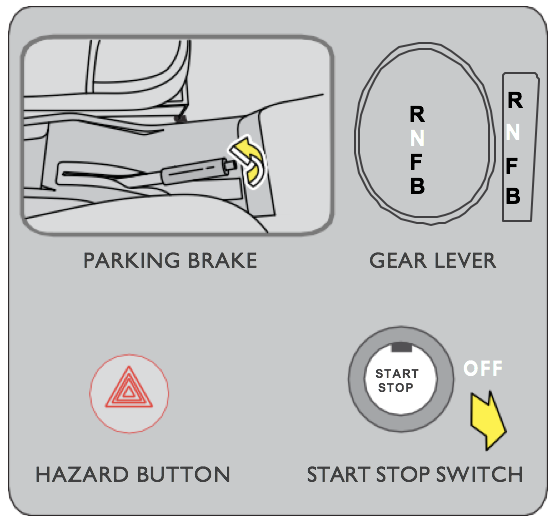
Spare tyre size: 155 / 70 R13
The spare tyre is meant for using as a spare for a short distance only up to the nearest tyre repair shop. It should not be used as a replacement to 165/60/R14 tyre.

Step 2: Remove the wheel spanner from the tool kit and provide a stopper to the wheel parallel to the flat tyre before jacking up for changing the wheel.
The car can roll off jack and seriously injuring anyone underneath if the instructions for changing a tyre are not followed properly. Never get under the vehicle when it is supported by just the jack.
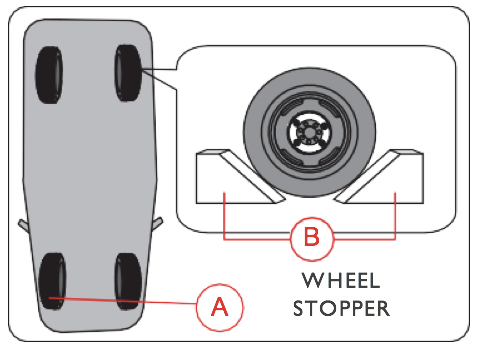
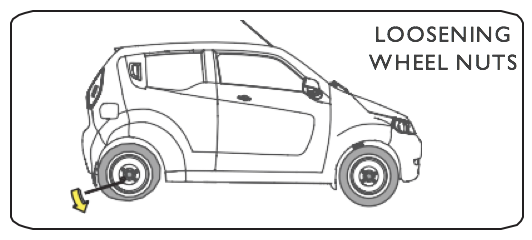
Step 3: If required remove the hubcap by holding cap at the top and tapping it gently. Loosen four-wheel nuts - a ½ turn with wheel spanner. Locate the jack point nearest to the flat tyre.
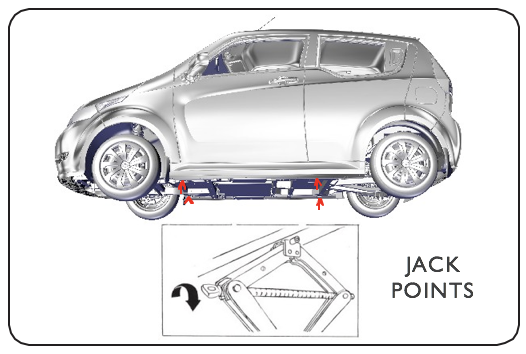
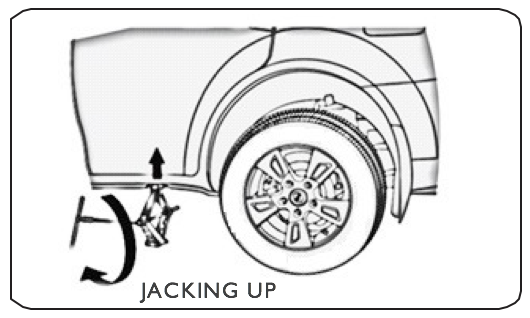
Step 4: Place the jack under jack point. Turn the end bracket clockwise until top of jack is in contact with the jack point. Make sure jack point tab is resting in jack notch. Use jack rod to raise the vehicle until the flat tyre is just off the ground. Remove wheel nuts and flat tyre. Temporarily place the flat tyre on the ground with the outside surface of the wheel facing up. You could scratch the wheel if it is put face down.

Step 5: Before mounting the spare or repaired tyre, wipe any dirt off the mounting surface of the wheel and the hub with a clean cloth. Wipe hub carefully, as it could be hot from the drive. Fix tyre, put wheel nuts back on finger-tight, then tighten them in a crisscross pattern with the wheel spanner until wheel is firm against the hub.
Step 6: Lower the car to the ground and remove jack. Tighten the wheel nuts securely in crisscross pattern to recommended torque (70nm). Fix the tool kit in the pouch located behind rear seat. Fix the hubcap by placing it in its original position and tapping it gently at center.
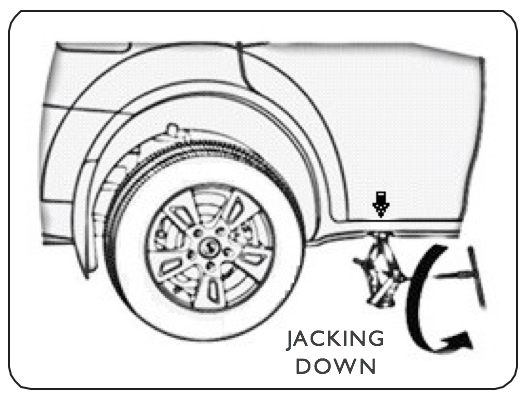

After the car tyre is repaired, it should be replaced and spare tyre to be fitted back under the bonnet.
11. Do’s and don’ts
11.1 Accessories - do's and don'ts
| Do’s | Don’ts |
| Only recommended accessories should be installed through the authorised service centre. | The customers should not install any electrical accessories. Unauthorised addition of electrical accessories can damage your vehicle and manufacturer warranty will become null and void. |
11.2 Parking - do's and don'ts
| Do’s | Don’ts |
| Always engage parking brake while parking your car. | Never exit the car without applying parking brake. |
11.3 Maintenance - do's and don'ts
| Do’s | Don’ts |
| Use a damp cloth or a soft brush to clean interiors of your car. Always wash your car regularly to keep it in a good condition. |
Do not spray water inside your car as water can get inside electronic/electrical components, result in failure. |
11.4 Charging - do's and don'ts
| Do’s | Don’ts |
| Inspect your charging cable periodically for any damage such as cracks, cuts, exposed wire etc. Replace if required. When the charging process is over, first switch off the power supply, then remove the charging cable from the plug point and then from the car charge port, in that order. Roll up and store the charging cable behind the rear seat. Make sure the children are kept away from the power source, plug and on-board charge port during the charging process. Charge your car when it is not in use. Allow the battery pack to overnight charging once in 3 days. Ensure that proper electrical earthing, over voltage protection and earth line circuit breaker has been provided to power source of plug point. |
Do not charge your car if the external power source and / or the on-board charge port are exposed to rain or water. Do not carry out charging procedure with wet hands. Do not allow children or people with medical electric implants near the car while carrying out charging process. |
11.5 Service - do's and don'ts
| Do’s | Don’ts |
| Get your car serviced at specified intervals as per the recommended maintenance schedule in the user manual.
Check the brake fluid level at least once a month. Top it up if the low brake fluid light starts flashing. Car should be disconnected from the power source before any electric related services are carried out. |
Do not charge the car while washing or cleaning. Do not use / spray water or liquid inside the car while washing / cleaning. |
11.6 Driving do's and don’ts
| Do’s | Don’ts |
| Always ensure the right amount of charge for the right distance. Check SOC level on cluster before commencing a journey.
Always wear seat belt while driving. Maximum payload is 320 kg. Adhere to it for better acceleration, driving range and comfort. As far as possible, drive in Forward [F] mode to optimise your driving range. Always accelerate moderately. While driving during night, switch off the headlights while idle at a traffic signal. This will help in conservation of energy and optimise the driving range. Always maintain recommended tyre pressure for optimising driving range, comfort and tyre life. |
Do not drive when the SOC level is very low. Driving in very low SOC might reduce the life of the battery pack.
Avoid sudden acceleration and hard turns. This will consume more energy and thereby affect the driving range. Do not use the accelerator pedal to hold car on an incline. |
Special attention is required for the situations explained below. Please contact your dealer service person for support.
- Charge light stays on even after the charge cable is removed or it does not turn on when the car is put on charge.
- EV warning light stays on during drive (this can be due to temporary faults, check the message on cluster and drive carefully).
- Service light stays on while driving.
- IP cluster Light stays on after start up switch is turned off.
- Temperature light turns solid after start up switch is turned on.
- Parking light and low brake fluid light stay on after the parking brake is disengaged and there is adequate brake fluid.
12. Appearance and care
12.1 Lights
Check the operation of your car exterior lights at least once a week. A burned out bulb creates an unsafe driving condition by reducing your vehicle's visibility, and ability to signal at other road users.
Following is a checklist of all the lights:
- Headlights (low and high beam)
- Parking lights 3.Turn signals
- Reverse lights
- Number Plate light
- Brake lights
- All indicator / IP warning lights
- High mount stop lamp
If you find any of the bulbs fused, have them replaced
.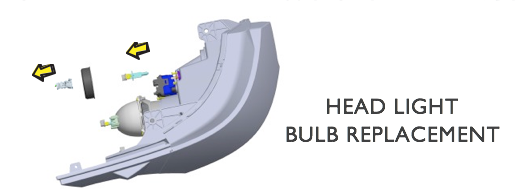
Brake light, High mount stop lamp and IP cluster lights are assemblies. In case of a fault, complete assemblies need to be replaced.
- Open the bonnet and engage stay rod.
- Disconnect the harness connector from rear of the bulb.
- Pull the rubber cap out.
- Release the bulb retaining spring and remove bulb.
- Replace the bulb with a new one.
- Install in reverse order of removal. When installing new bulb, ensure that lugs on bulb holder engage correctly in the recesses of housing.
- Install rubber cap correctly in place.
- Connect connector to the rear of the bulb.
Greasy hands or fingers will cause stains, resulting in dull and inefficient lighting. Do not touch bulbs with bare hands and clean head light lens with a non-fluffy cloth.
The inside of the headlight lens may get clouded immediately after washing your car and does not indicate defect.This moisture condensation inside the headlight lens will disappear gradually as it gets warmed up by the light. Keep the lights switched on for sometime after the car is washed.
Initial inclination of head lamp lo-beam is 1% and load is 55 watts with corresponding HLLD switch positions.
12.2 Turn lights
- Open the bonnet, fix the stay rod to the mounting groove.
- Rotate the bulb holder for front indicator and side indicator. Pull the bulb holder along with the rubber grommet from its seat for head light assembly.
- Rotate the bulb anticlockwise from its holder and remove it.
- Replace the bulb with a new one.
- Install in reverse order of removal.
- Press hatch release, open the rear hatch.
- Remove 2 screws on the REAR LAMP ASSEMBLY and pull it from mounted slot.
- Rotate the bulb holder anticlockwise to remove from assembly.
- Hold the bulb and rotate anticlockwise to remove it from the holder.
- Replace the bulb with a new one.
- Install in reverse order of removal.
12.3 Interior cabin light
- Use a small Phillip screw driver. Push down at groove on the front part of lens to remove the lens and pull the bulb out gently.
- While replacing the bulb, make sure that the contact springs are holding the bulb properly.
- To install cover, hook its rear end in and push it up till it locks with 'click' noise.
12.4 Brake fluid
Check the brake fluid level in the reservoir located under the bonnet once in 2 weeks. Fluid level should be between MIN and MAX marks on the side of the reservoir. If the level is below MIN mark, your brake fluid needs topping up. To fill, press the reservoir cap, turn it anticlockwise to open, fill with DOT-3 brake fluid up to MAX level and close cap. If there is frequent drop in the fluid level, have the car brake system inspected for any leaks or worn out brake pads.
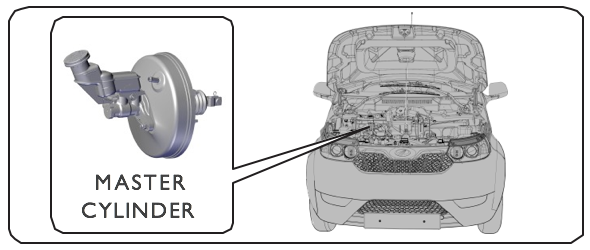
12.5 Tyres inflation
For safe driving,tyres must be in good condition with adequate tread and should be correctly inflated.
Keeping tyres properly inflated provides best the combination of handling, tread life and riding comfort. Under inflated tyres, wear unevenly, adversely affect handling and are more likely to fail due to overheating.
Over inflated tyres can make your ride bumpy or difficult. They are more prone to damage from road hazards and wear unevenly. It is recommended that you check your tyres every week and maintain the correct tyre pressure as suggested in the section on "Tyres" on page 98.
It is recommended to get wheel balancing and alignment done whenever tyre rotation is done.
In addition to proper inflation, get the wheel alignment done at recommended intervals that helps decrease tyre wear and tear. If you observe that the tyre is getting worn unevenly, contact your service centre for an alignment check.
12.6 Windscreen washer tank
Windscreen washer fluid tank is located under the bonnet on left-hand side corner.Check the level of the washer fluid in the tank at least once a month. Top up fluid when necessary. Absence of washer fluid can damage your washer motor. It is advisable to always keep washer fluid topped-up along with an anti-freeze solution.
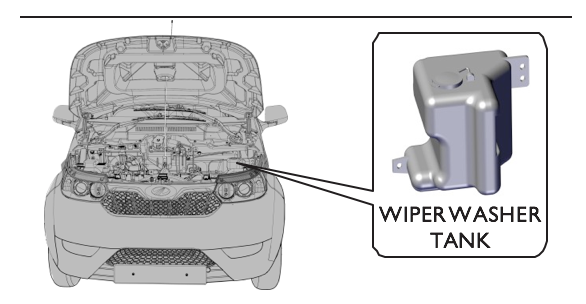
Use an anti-freeze solution in the windscreen washer reservoir. This will prevent the liquid in the washer unit from freezing during very low temperatures.
There may be damage if the washer motor is operated when the fluid is frozen or there is no fluid in the reservoir, or the nozzle is blocked.
12.7 Wiper blade replacement
Contamination by dust on either windscreen or wiper blades can reduce effectiveness of the front and rear windscreen wipers. If the blades are not wiping properly, it could be time to replace them. To replace wiper blade, press the RETAINING CLIP and pull the blade off the arm. Push the new wiper blade into the arm with a 'click' sound to lock.
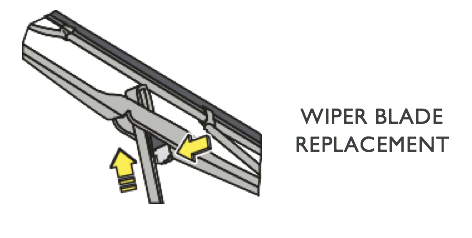
12.8 Fuse box
Components in the car are protected from short circuits by fuses. A fuse box containing various fuses with ratings for different operations is located under the bonnet, below the right side close-out cover. It has relays for other functions.
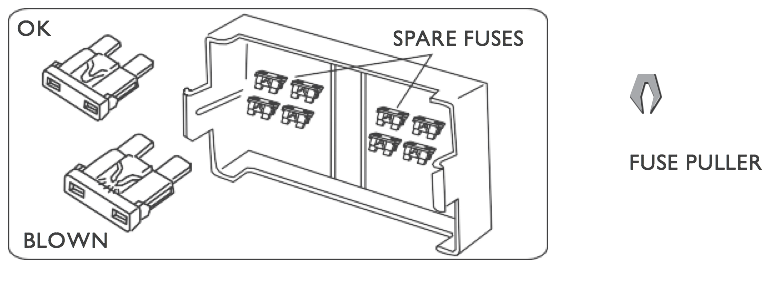
- Open the bonnet, provide prop rod stopper to bonnet.
- Open fuse box cover by pulling it up.
- Identify fuse, amperage, location by referring fuse list on cover.
- Check the fuse, if it is blown, remove fuse using fuse puller (located in glove box) and replace with spare fuse after rectifying the problem.
- Refix the fuse box cover, and close the bonnet with gentle downward push.

Replenish the fuse and refit cover. If any of the car's functions are not working properly or have stopped working, it could be due to a blown fuse or a short circuit. If the fuse gets blown frequently, please get it fixed with the help of authorised service technicians.
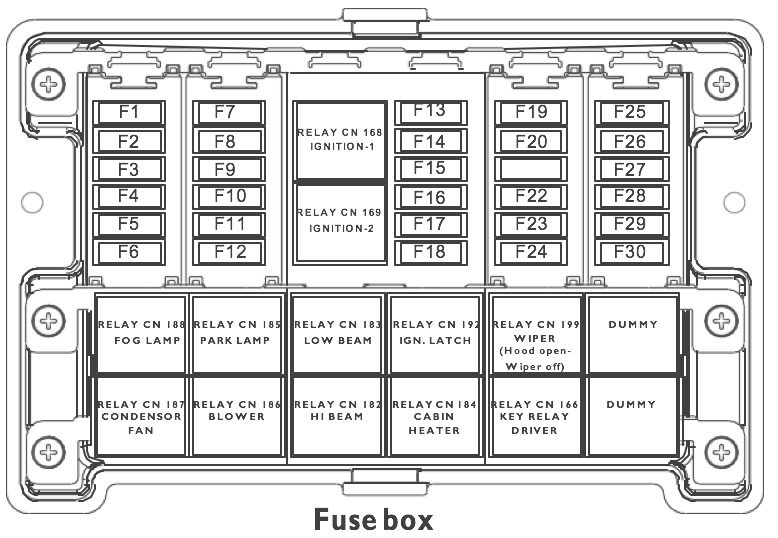
Always use fuses of correct rating. Do not use wire or aluminum for a fused circuit. Remember to replenish the fuse box with spare fuses that can be purchased from the authorised service centre.
| Fuse no | Rating (A) | Circuit protected |
| F1 | 15A | Head lamp low beam LH and RH |
| F2 | 3A | Relay coil- position lamp, H/L low and high beam |
| F3 | 3A | Brake lamp and HMSL |
| F4 | 7.5A | Horn |
| F5 | 15A | LH and RH door lock and rear hatch release |
| F6 | 15A | Front wiper |
| F7 | 15A | Head lamp high beam LH and RH |
| F8 | 5A | Position, roof, license lamps and back illumination |
| F9 | 3A | Relay coil- Remote blower & A/C heater |
| F10 | -- | Empty |
| F11 | 15A | Remote & normal condensor, BLDC controller fan |
| F12 | 15A | Blower fan and speed regulator module (SRM) |
| F13 | 30A | Power window motor LH and RH |
| F14 | 20A | Electric vacuum pump (EVP) |
| F15 | 15A | Rear hatch defroster |
| F16 | 7.5A | Front fog lamp |
| F17 | 3A | Relay key ON/OFF (ignition) |
| F18 | 3A | OVRM, H/L adjuster LH and RH, switch |
| F19 | 15A | Side indicators & Hazard |
| F20 | 7.5A | Infotainment system |
| F21 | 3A | HVAC module (hatch and hazard) and IP cluster |
| F22 | -- | Empty |
| F23 | 20A | Wiper & Horn ground |
| F24 | 3A | Electric power steering (EPS) |
| F25 | 3A | Ignition I/P to BCM and IEMS |
| F26 | 7.5A | Aux 12V socket |
| F27 | 3A | Ignition I/P to KSI SSR |
| F28 | 3A | Tree switch- Wiper and washer signals |
| F29 | 3A | IGN I/P to HVAC, infotainment and OBD |
| F30 | 10A | PRNDL, reverse lamp, camera and motor fan |
| Relay no | Relay name |
| CN166 | Key relay driver |
| CN168 | Key relay 1 |
| CN169 | Key relay 2 |
| CN182 | Head light high beam |
| CN183 | Head light low beam |
| CN184 | Air condition-heater |
| CN185 | Park lamp |
| CN186 | Blower |
| CN187 | Condenser fan |
| CN188 | Front fog lamp |
| CN192 | Ignition latch |
| CN199 | Wiper |
12.9 Storing your car
If you are not using your car for an extended period or over a week, ensure that it is kept on charge while you are away. The computer controlled on-board charger will keep the power pack charged as and when a discharge takes place while plugged in with mains on. If car is to be stored for an even longer period support it on jack stands or blocks, with tyres off the ground. Support the wiper blade arms with a folded towel or a paper tag so that they do not touch the windshield.
12.10 Interior notes & caution
To remove dirt, vacuum the carpets frequently. Always keep the carpets as dry as possible. Vacuum dirt or dust out of the upholstery frequently. To clean stubborn stains, use a commercially available fabric cleaner. To make sure it does not bleach or stain fabric, test it on a hidden area of the fabric. Make sure the solution does not penetrate into the foam beneath the fabric. Covering seat headrest with a cover will ensure that upholstery is maintained.
Clean inside and outside window surfaces with soap, water or a commercially available glass cleaner. This will remove haze that builds up on the inside of windows. Use a soft cloth or paper towels to clean all glasses and to clean interior plastic surfaces.
If vehicle seat belts get dirty, use a soft brush and a mixture of mild soap and warm water to clean them. Do not use bleach, dye, or solvents as they weaken the belt material. Dirt builds up in the loops of seat belt anchors and can cause belts to retract slowly.
Let the seat belts air-dry before using them. Wipe the inside area of the loops with a clean cloth dampened in mild soap and warm water.
Do not use or spray water in the car interiors. Doing so can result in damage(s) to car's electronic components. Always vacuum clean the interiors.
Do not use strong soaps and chemicals for cleaning.
Avoid washing under direct sun light to avoid the surface from getting water spotted.
Do not use glass or plastic cleaner on gauges or display lens covers,it damages and reduces visibility.
Never use benzene or thinner to clean any part.
Daily cleaning and polishing the car helps keeping it in a new condition. Here are few tips on preserving its appearance.
Be careful while purchasing air fresheners as some of them can damage your vehicle interiors.
12.11 Exterior notes
- Dirt or grit can scratch the body panel, while tree sap and bird droppings can ruin the finish permanently.
- Use anti-static brush for cleaning the car roof panel. Rinse the car body with cold water to remove loose dirt, use mild detergent made for cars for washing.
- Wash car using sponge or soft cloth. Start from top to bottom and rinse frequently.
- Check the car body for tree sap or foreign particles. Clean it immediately to prevent stain marks on the panel.
- After washing, dry it with chamois or a soft towel.
- Use glass cleaner to clean glass.
- Remove wheel covers carefully. Wash and keep on a soft surface to prevent scratches.
- Use a mild detergent and a soft brush to clean wheels.
- Wash the wheels and wheel caps with water.
12.12 Maintenance schedule
| Service at interval listed x kilometers or No. of months, whichever is earlier | x1000 kilometers | 3 | 10 | 20 | 40 | 60 | 80 | 100 | 120 | 140 |
|---|---|---|---|---|---|---|---|---|---|---|
| Months | 3 | 12 | 24 | 36 | 48 | 60 | 72 | 84 | 96 | |
| GENERAL CHECKS | ||||||||||
| Check for charging, HVAC cooling on vehicle receipt | I | I | I | I | I | I | I | I | I | |
| Evaporator cleaning | C | C | C | C | C | C | C | C | ||
| SUSPENSION & UNDER BODY | ||||||||||
| Front suspension bolts torque | I&T | I | I | I | I | |||||
| Rear suspension bolts torque | I&T | I | I | I | I | |||||
| A-arm bush | I&T | I | R | R | ||||||
| Knuckle ball joints (play/loose) | I&T | I | R | R | ||||||
| Anti roll bar bush | I&T | I | R | R | ||||||
| Anti roll bar ball joints (play/loose) | I&T | I | R | R | ||||||
| Trailing arm bushes & Pan hard rod bushes | I&T | I | R | R | ||||||
| Battery box lower, HV cables & Transmission oil leak | I | I | I | I | I | I | I | I | I | |
| Under body bolts tightness, brake pipes & hoses | I&T | I | I | I | I | I | I | I | I | |
| BRAKES,TRANSMISSION & WHEELS | ||||||||||
| Brake fluid change | R | R | R | |||||||
| Transmission oil change | R | R | R | R | R | R | R | |||
| Brake fluid level & Parking brake (check and adjust) | I | I | I | I | I | I | I | I | I | |
| Front brake pads / caliper | I | I | I | I | I | I | I | I | ||
| Rear brake shoes | I | I | I | I | I | I | I | I | ||
| Tyre rotation & wheel alignment* | I | I | I | I | I | I | I | |||
| Tyre pressure, wear & wheel nut torque (spare wheel) | I | I | I | I | I | I | I | I | I | |
Note: * It is pertinent to mention wheel alignment settings of the car get disturbed severely when driven on uneven surfaces (more specifically, pot holes, unscientific speed breakers etc.).This means waiting for the recommended kilometers will prove detrimental. We will, therefore, recommend wheel alignment at 5000 kms or earlier whenever there has been sustained use of the car on poor roads. Any decision to delay/decline wheel alignment will impact safety and durability.
| Service at interval listed x kilometers or No. of months, whichever is earlier | x1000 kilometers | 3 | 10 | 20 | 40 | 60 | 80 | 100 | 120 | 140 |
|---|---|---|---|---|---|---|---|---|---|---|
| Months | 3 | 12 | 24 | 36 | 48 | 60 | 72 | 84 | 96 | |
| STEERING | ||||||||||
| Steering rack mounting check | I&T | I | I | I | I&T | I | I | I&T | I | |
| Tie-rod end ball joints (play / loose) | I&T | I | I | I | I&T | I | I | I&T | I | |
| ELECTRICAL | ||||||||||
| All lights, horn, Key fob, wipers spindle/washer functions | I | I | I | I | I | I | I | I | I | |
| TCU, charger connections and all accessories function | I | I | I | I | I | I | I | I | I | |
| Headlight aiming switch function, FC port check* | I | I | I | I | I | I | I | I | I | |
| ORVM adjustment switch, power window function | I | I | I | I | I | I | I | I | I | |
| Gear lever functions (all modes) | I | I | I | I | I | I | I | I | I | |
| Electronics tub:All bolts and nuts tightness (torque) | I&T | I | I | I | I | |||||
| Auxiliary battery 12V | I | I | I | I | ||||||
| DOORS | ||||||||||
| All doors opening, closing and mounting bolts tightness | I | I | I | I | I | I | I | I | I | |
| FINAL INSPECTION | ||||||||||
| Vehicle charging | Y | Y | Y | Y | Y | Y | Y | Y | Y | |
| Vehicle washing | Y | Y | Y | O | O | O | O | O | O | |
| All DIS (driver information system) functions | I | I | I | I | I | I | I | I | I | |
| Test drive, Service due indicator check and reset | I | I | I | I | I | I | I | I | I | |
| Connect to vehicle by analyzer and check: | I | I | I | I | I | I | I | I | I | |
|
I | I | I | I | I | I | I | I | I | |
|
I | I | I | I | I | I | I | I | I | |
LEGENDS: I&T: Inspect & Torque, R: Replace, I: Inspect & Correct,Y:Yes, C: Clean and O: optional (Paid) * Applicable variant
Note: An inspection can lead to a replacement based on the condition of the part.
| Service at interval listed x kilometers or No. of months, whichever is earlier | x1000 kilometers | 160 | 180 | 200 | 220 | 220 | 260 | 280 | 300 |
|---|---|---|---|---|---|---|---|---|---|
| Months | 108 | 120 | 132 | 144 | 156 | 168 | 108 | 192 | |
| GENERAL CHECKS | |||||||||
| Check for charging, HVAC cooling / operation on receipt | I | I | I | I | I | I | I | I | |
| Evaporator cleaning | C | C | C | C | C | C | C | C | |
| SUSPENSION & UNDER BODY | |||||||||
| Front suspension bolts torque | I | I | I | I | |||||
| Rear suspension bolts torque | I | I | I | I | |||||
| A-arm bush | R | R | R | ||||||
| Knuckle ball joints (play/loose) | R | R | R | ||||||
| Anti roll bar bush | R | R | R | ||||||
| Anti roll bar ball joints (play/loose) | R | R | R | ||||||
| Trailing arm bushes & Pan hard rod bushes | R | R | R | ||||||
| Battery box lower, HV cables & Transmission oil leak | I | I | I | I | I | I | I | I | |
| Under body bolts tightness, brake pipes & hoses | I | I&T | I | I | I&T | I | I | I&T | |
| BRAKES,TRANSMISSION & WHEELS | |||||||||
| Brake fluid change | R | R | R | R | |||||
| Transmission oil change | R | R | R | R | R | R | R | R | |
| Brake fluid level & Parking brake (check and adjust) | I | I | I | I | I | I | I | I | |
| Front brake pads / caliper | I | I | I | I | I | I | I | I | |
| Rear brake shoes | I | I | I | I | I | I | I | I | |
| Tyre rotation & wheel alignment* | I | I | I | I | I | I | I | I | |
| Tyre pressure, wear & wheel nut torque (spare wheel) | I | I | I | I | I | I | I | I | |
LEGENDS: I&T: Inspect & Torque, R: Replace, I: Inspect & Correct,Y:Yes, C: Clean and O: Optional (Paid) * Applicable variant
Note: An inspection can lead to a replacement based on the condition of the part.
| Service at interval listed x kilometers or No. of months, whichever is earlier | x1000 kilometers | 160 | 180 | 200 | 220 | 220 | 260 | 280 | 300 |
|---|---|---|---|---|---|---|---|---|---|
| Months | 108 | 120 | 132 | 144 | 156 | 168 | 108 | 192 | |
| STEERING | |||||||||
| Steering rack mounting check | I | I | I | I | I | I | I | I | |
| Tie-rod end ball joints (play / loose) | I | I | I | I | I | I | I | I | |
| ELECTRICAL | |||||||||
| All lights, horn, Key fob, wipers spindle/washer functions | I | I | I | I | I | I | I | I | |
| TCU, charger connections and all accessories function | I | I | I | I | I | I | I | I | |
| Headlight aiming switch function, FC port check* | I | I | I | I | I | I | I | I | |
| ORVM adjustment switch, power window function | I | I | I | I | I | I | I | I | |
| Gear lever functions (all modes) | I | I | I | I | I | I | I | I | |
| Electronics tub: All bolts and nuts tightness (torque) | I | I | I | I | |||||
| Auxiliary battery 12V | I | I | I | I | I | I | I | I | |
| DOORS | |||||||||
| All doors opening, closing and mounting bolts tightness | I | I | I | I | I | I | I | I | |
| FINAL INSPECTION | |||||||||
| Vehicle charging | Y | Y | Y | Y | Y | Y | Y | Y | |
| Vehicle washing | O | O | O | O | O | O | O | O | |
| All DIS (driver information system) functions | I | I | I | I | I | I | I | I | |
| Test drive, Service due indicator check and reset | I | I | I | I | I | I | I | I | |
| Connect to vehicle by analyzer and check: | I | I | I | I | I | I | I | I | |
|
I | I | I | I | I | I | I | I | |
|
I | I | I | I | I | I | I | I | |
The Scheduled services are compulsory at recommended time intervals or kilometers (whichever is earlier). Failure to do so results in the warranty getting void.
12.13 Jump starting
The car has an auxiliary battery that should not be used to jump start any other battery in the system. Do not use the car battery to jump start other vehicles.
12.14 Battery pack
The battery pack needs regular balancing and recharging as low usage of car and not keeping it plugged in overnight charge once in 3 days leads to development of unequal states between battery modules in pack. Not plugged in could result in activation of “SAFE MODE” or “CHG FULL” messages and EV warning lamp on instrument cluster with display of higher state of charge during drive. Hence it is recommended to leave the car plugged in after 100% charge for about 4hours once in 3 days to balance battery cells.
12.15 End of life disposal
This electric vehicle uses many electric and electronic parts in its system. Part composition is explained so that it can be recycled after the end of life of the car. It has to be dismantled and disposed of without causing any kind of environmental pollution through accredited agencies.
The car is made out of steel, ABS panels, aluminum, lead, copper, wood, other plastics, glass, rubber and misc. Some of them are reusable while others might pose an environmental hazard and should be disposed of as per local pollution board regulations.
Vehicle owners should contact the local distributor or MEVL for disposal of used parts / materials after the end of its life. Local distributor or MEVL would guide to local accredited agencies for disposal abiding local laws and the pollution control board regulations.
- As the batteries are made of lithium and iron phosphate with solvents as electrolyte which are harmful, and have an adverse impact on the environment, they should be disposed as per local regulations.
- Similarly, ABS and other plastic panels used should be disposed of to accredited agencies for recycling.
- Most of other materials are reusable, components are to be segregated based on composition, as hazardous and nonhazardous, and should be disposed of to accredited recycling agencies.
It is advisable to contact the authorised service centre or MEVL for parts or vehicle disposal.
13. Emergency and user info
13.1 Emergency safety
The safety measures given below are set with the 48V system:
- 48V positive (+) and negative (-) are isolated from the vehicle chassis.
- 48V components are labeled and harnesses are orange colour coded for easy identification to isolate or help protect occupants and emergency responders from any electric shock.
- If key switch led is GREEN then the 48V system is active.
- If the charge indicator on the cluster is blinking, then the 48V system and also the 230VAC supply is active.
- If HVAC is operating, then the 48V system is active.
Press the start switch once to turn off the power to system. The status LED turns off.
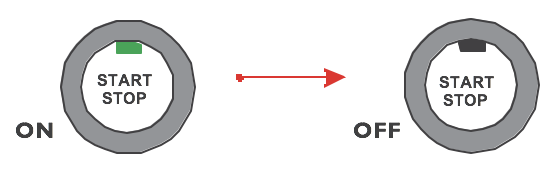
Check if vehicle can be driven, if so drive off to road side (by lane),apply parking brake and turn off the key switch.
Do a visual check for any damage to the bottom side of vehicle and request for dealer service support.
In the event of a fire, appraise the first responder in the EV to use AB type extinguisher for dousing fire.
In the event of a rear collision, check extent of damage to on board regular / fast charging ports, contact dealer service person for assistance.
For accident body repair, contact service dealer.
13.2 Battery power pack information
The car has a Li-ion battery having solvents as electrolytes. In case of a fire or high impact accident that damages the battery, the user is advised to walk away from the vehicle, and notify appropriate first responder and appraise fact that vehicle is an EV with 48V DC system. Battery electrolyte is colourless,has sweet odor.Coming in contact with it may irritate skin and eyes.In case of an exposure,use excess water to rinse area of contact and see a doctor immediately. This is highly a flammable substance. Even in case of a small fire, ABC type fire extinguisher should be used for dousing it. Since the battery modules are sealed and small in size, a large leakage of electrolytes is unlikely.

13.3 Recovery and Towing of car (recommended)
During an emergency towing, it is advisable to follow the above illustrated types of towing. The 3rd type of towing should be adopted only in the event of non availability of a recovery vehicle.
The 3 types of vehicle recovery are as follows:
- Flat bed - Broken down vehicle is loaded on to the back of the recovery truck. This is safest and best way of towing.
- Wheel lift - Tow truck pivot arms go below the front tyres and lift them off the ground. The back wheels are on the ground.
- Towing by cable - the broken down vehicle is fixed to a tow hook and towed by another vehicle using a towing cable.
Ensure that key switch is off while recovering the car using the 2nd and 3rd types of recovery methods.

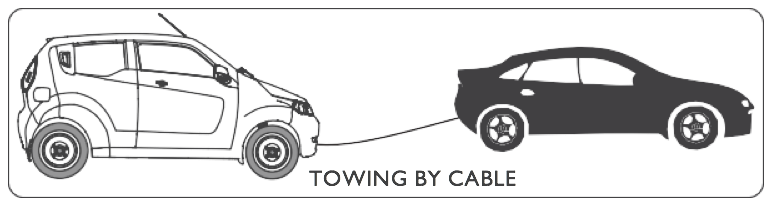
If the car breaks down, push it to the side of road. Take the tow hook from the tool kit. Tow hook mounting threaded holes are provided at front LH side ends of chassis cross member near the bottom grill below the number plate. Fix the hook by turning it into the hole in an anticlockwise direction. Tie one end of the towing rope to the tow hook eye of the broken down vehicle and the other end to the vehicle towing it. While towing, the key should be off, the hand brake released, and towing speed should be limited to limited to less than 20kmph.
- Always turn off the START / STOP switch before towing.
- Always switch on hazard warning of both the vehicles to caution other users of road while towing.
- Do not tow broken down vehicle at more than 20 kmph speed.
- Always maintain a gap of 4 meters between the affected car and the towing vehicle.
- Always tow vehicle without jerks to avoid snapping of towing eyelet.
13.4 Emergency exit
a) In case of an emergency or central door lock failure, use the rear hatch release located on hatch trim panel by removing the grommet and pulling the release cable.b) The seat head rest also can be removed and pointed metal bar is used for breaking car glass to exit from car.
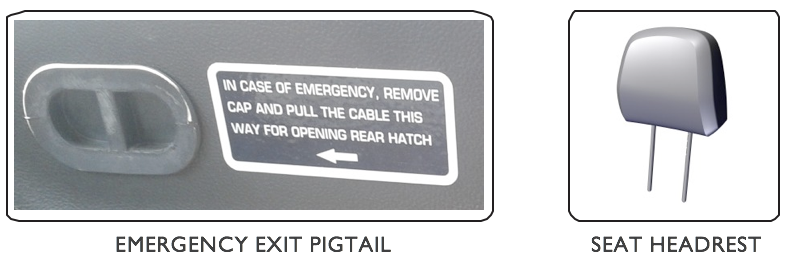
13.5 Safety features
The car has many unique features that are designed for safety and reliability.
Steel space frame chassis and side impact beams - A specially developed steel frame chassis with side impact beams is built to cocoon passengers in an inadvertent accident.
Frontal crush zone housing utility basket, reduces effect of impact in any head-on collision.
Energy absorbing bumpers in the car can withstand low magnitude impact and reduce external damage.
- Car does not move if the charge cable is plugged.
- In case you have forgotten to engage the parking brake after turning off key switch and the door is opened, a warning chime gets activated.
- Depending on level of charge, your car is designed to automatically switch to economy mode or power save mode to reach the nearest location.
- Tyres used are tubeless, designed for all weather conditions, provide best driving range and road grip.
14. Technical specifications
14.1 Vehicle Identification Number
(Location of vehicle identification number plate)
The vehicle identification plate is riveted on chassis strut cross member and is a 17 digit alphanumeric number.
VIN is punched on the right-hand side of the chassis strut member and last 5 digits are that of the vehicle serial number.
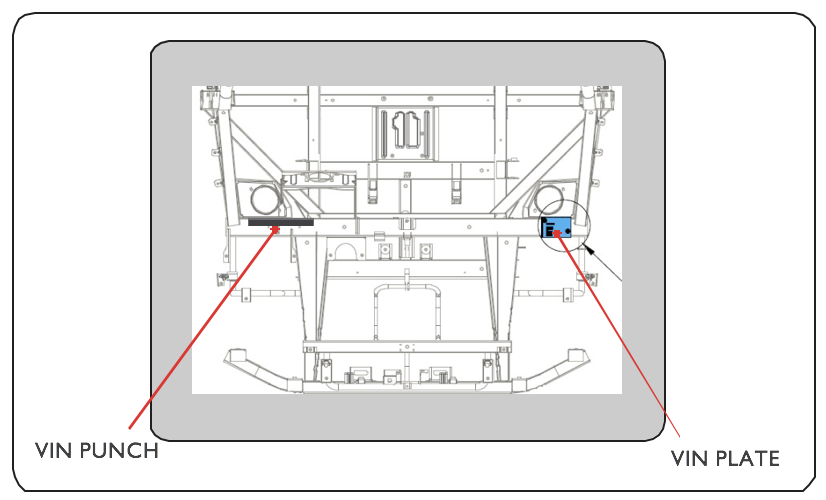
Motor number is punched on the body of the motor.
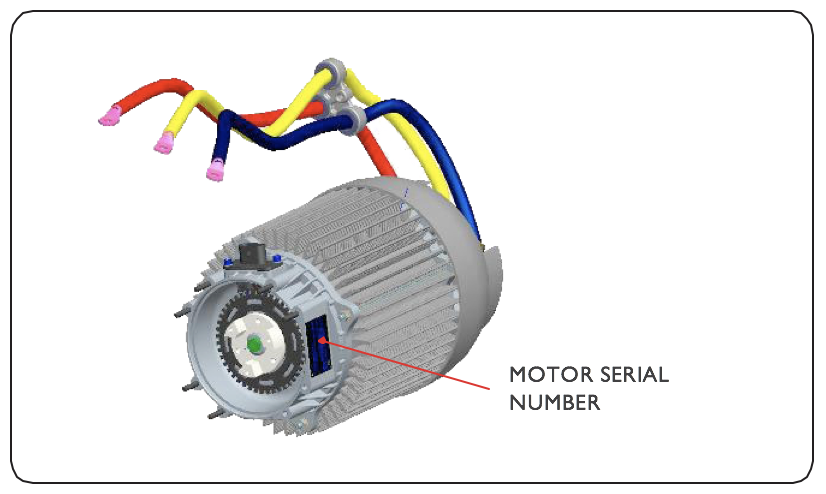
In due course of product research and development, specifications are subject to change without prior notice.
14.2 General
| 14.2 General | |
|---|---|
| Type | 4 door hatchback right hand drive |
| Seating capacity | 4 adults [driver (D)+3] |
| Overall length | 3590 mm |
| Overall width | 1575 mm |
| Overall height | 1585 mm |
| Wheelbase | 2258 mm |
| Ground clearance | 170 mm (D+1) |
| Kerb weight | 940 Kgs. |
| Gross vehicle weight | 1260 Kgs. |
| Pay load | 320Kgs |
| Turning radius | 4350 mm |
| Steering gear box | Rack and pinion |
| Frame type | Welded tubular steel frame |
14.3 Power pack/ Aux. battery
| 14.3 Power pack/ Aux. battery | |
|---|---|
| Battery type/ location | Lithium battery / packaged under the front seats. |
| Pack voltage | 48V DC system |
| Capacity | 210 AH (11KWh) |
| Aux. battery | 12V, 20Ah |
14.4 Performance
| 14.4 Performance | |
|---|---|
| Estimated range | 110 kms* in F mode under standard test conditions |
| Estimated top speed |
80 kmph [electronically limited] |
| Estimated charge time |
100% SOC in 6 hours at 30°C |
* In F mode without using any accessories as per standard test conditions
14.5 Motor
| 14.5 Motor | |
|---|---|
| Three phase squirrel cage induction motor | |
| Power | 19KW @3500RPM (peak) |
| Torque | 70Nm @1000 RPM |
14.6 Motor controller
| 14.6 Motor controller | |
|---|---|
| Type | 3 phase AC motor controller with hill assist. |
14.7 Controls
| 14.7 Controls |
|---|
| 2 pedal operation (brake and accelerator) 4 operating modes (R, N, F, B) |
| The RNFB mode selection lever provides reverse / neutral / forward / boost modes of operation. |
14.8 Suspension type
| 14.8 Suspension type | |
|---|---|
| Front | MacPherson strut type independent suspension with coaxial spring |
| Rear | Twin pivot trailing arm with coaxial spring damper. |
14.9 Electricals
| 14.9 Electricals | |
|---|---|
| car uses 12V D.C. for its lighting system. | |
| Headlights- HI / LOW | 55Watts-halogen bulbs |
| Parking (front& rear) | 5Watts |
| Bonnet lamp | 2Watts |
| Indicator (front and rear) | 21Watts |
| Side indicators | 5Watts |
| Brake light (stop)- LED | 3.5Watts |
| Roof light | 10Watts |
| Reverse light | 21Watts |
| License plate light | 5Watts |
Note: Initial inclination detail of head lamp LOW beam is -1% and load is 55 watts with corresponding HLLD switch positions.
14.10 Tyres
| 14.10 Tyres | |
|---|---|
| Tyre (front and rear) | 165 / 60 R 14 / 79T, tubeless |
| Tyre pressure- (laden): driver(D), D+1 or D+2: | Front: 32psi and Rear: 38psi Front and rear : 32psi |
Note: The tyres fitted in the vehicle meet the requirements of BIS and comply with the requirements under the CMVR 1989, as mentioned notification SO 2953E
14.11 Braking system
| 14.11 Braking system | |
|---|---|
| Type | Hydraulic with regen brake |
| Front: Disc | 215 mm |
| Rear: Drum | 180mm |
| Parking brake mechanically actuated on rear wheels. | |
| Vacuum assisted hydraulic brakes with regenerative braking. | |
14.12 Steering system
| 14.12 Steering system | |
|---|---|
| Type | Electric power steering, rack and pinion |
14.13 Body panels and bumpers
| 14.13 Body panels and bumpers | |
|---|---|
| Body panels | Scratch resistant high impact ABS. |
| Bumpers | Scratch resistant high impact ABS. |